EN USER MANUAL | Section 1 IT MANUALE D’USO | Sezione 1 PLL DIVERSITY UHF WIRELESS SYSTEMS SISTEMI RADIO UHF PLL DIVERSITY ES MANUAL DE USO | Sección 1 DE BEDIENUNGSANLEITUNG | Abschnitt 1 FR NOTICE D’EMPLOI | Section 1
Series CONTENTS 1 | Introduction 4 2 | Description 4 2.1 | Receiver 5 2.2 | Handheld microphone 6 2.
PACKAGE CONTENT START 16 HDM Version with Handheld mic • 1x START 16R receiver with built-in antennas - A • 1x START 16Mw handheld dynamic microphone - B • 1x External power adapter - C • 1x Unbalanced 6,35mm (1/4”) jack audio cable - D • 2x 1.5 Volts AA batteries - E • 1x User manual - Section 1 • 1x User manual - Section 2 The warnings in this manual must be observed together with the “User manual - Section 2”.
Series 1 | INTRODUCTION Thank you for choosing a A.N.T – Advanced Native Technologies – product! In our START 16 “PLL Diversity” wireless systems we have put our passion and our technological background gained over the years, to offer products that meet your needs, maintaining the quality over time. START 16 wireless systems operate in UHF band with 16 channels (frequencies). You may choose the operating frequency via buttons or via infrared using ASC feature.
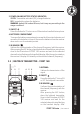
2.1 | RECEIVER - START 16R 1 POWER Press this button on receiver front panel for 1” to turn ON/OFF the unit. 2 AF LEVEL METER It shows the audio signal level. Avoid that the red LED (the rightmost one) remains lit continuously. 3 ASC Press this button to achieve automatic channel (frequency) synchronization via infrared. 4 IR WINDOW It allows the synchronization of the channel (frequency) with the transmitter.
Series REAR PANEL 1 2 3 1 “DC 12-18V” POWER SOCKET Connect to this socket only the supplied power supply. 2 UNBAL Unbalanced audio output with 6,35mm (1/4”) jack. Connect this output into an unbalanced input of your mixer. 3 AF OUTPUT Balanced audio output with XLR-M socket. Connect this output into a balanced input of your mixer. 2.
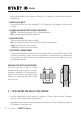
2 POWER ON AND BATTERY STATUS INDICATOR GREEN: Transmitter activated (ON), charged batteries. RED: Immediately replace the batteries. WARNING: battery life is about 8 hours, but it may vary according to the usage conditions. 3 ON/OFF Press this button for 3” to turn on or off the wireless handheld microphone. 4 BATTERIES COMPARTMENT To access the battery compartment unscrew the lid counterclockwise, and screw the lid clockwise to close it.
Series the synchronization, the receiver’s display is lit steadily on the selected channel (frequency). 4 MINI XLR-M INPUT Connected to this input the supplied PH-90 Headset or the signal of other sound sources. 5 POWER ON AND BATTERY STATUS INDICATOR GREEN: Transmitter activated (ON), charged batteries. RED: Immediately replace the batteries.
• Place the receiver in such a way that is far from a wall and that is at least 1 meter (about 3 feet) above the floor. • Cell phones, two-way radio equipment or similar devices may disturb the radio transmission between the transmitter and the receiver, so they should not be used close to the transmission system. PROBLEM LEDS SOLUTION No sound or very low sound level. Receiver ON/OFF LED turned off. Make sure the unit is properly connected. Power LED turned off.
Series 5 | TECHNICAL SPECIFICATIONS RECEIVER - START 16R Type Diversity Modulation FM Available frequency bands 823-832MHz (B6) / 863-865MHz (B7) Channels 16 Antennas x 2, adjustable and fixed on front panel Frequency response 60Hz - 15.
BELTPACK TRANSMITTER - START 16B FM Available frequency bands 823-832MHz (B6) / 863-865MHz (B7) Channels 16 Input DC powered Mini-XLR for PH-90 Headset Frequency response 60Hz - 15.000Hz (±3dB) Output power 5.19mW Controls Gain (3 steps), ON / Standby / OFF Indicators Power and battery status Power supply 2 AA 1.5 Volts batteries Operating time >10h with alkaline batteries Dimensions (W x H x D) 64 x 90 x 23 mm (2.51” x 0.91” x 3.54”) Weight 80 g (0.
Serie INDICE 1 | Introduzione 14 2 | Descrizione 14 2.1 | Ricevitore 15 2.2 | Radiomicrofono a mano 16 2.
CONTENUTO DELL’IMBALLO START 16 BHS Versione con trasmettitore Beltpack e Microfono ad archetto • 1x START 16R ricevitore da tavolo con antenne incorporate - A • 1x START 16B trasmettitore beltpack con antenna incorporata - F • 1x PH-90 microfono ergonomico ad archetto - G • 1x Alimentatore esterno - C • 1x Cavo audio jack 6,35mm (1/4”) sbilanciato- D • 2x Batterie stilo 1.
Serie 1 | INTRODUZIONE Grazie per aver acquistato un prodotto A.N.T – Advanced Native Technologies! Nei radiomicrofoni “PLL Diversity” START 16 abbiamo profuso la nostra passione ed il nostro background maturato nel corso degli anni per offrirvi un prodotto che soddisfi le vostre esigenze e mantenga la sua qualità nel tempo. I sistemi radio START 16 operano nella banda UHF e dispongono di 16 canali (frequenze). Potete scegliere la frequenza con i pulsanti o via infrarosso tramite il comando ASC.
2.1 | RICEVITORE - START 16R 1 PULSANTE DI ACCENSIONE Premete per 1” questo pulsante sul pannello frontale del ricevitore per accendere o spegnere l’apparecchio. 2 INDICATORE DI LIVELLO AF Indica il livello del segnale audio in ricezione. Evitate che il led rosso (quello più a destra) resti acceso in modo continuo. 3 ASC Premete questo tasto per la sincronizzazione automatica tramite infrarossi del canale (frequenza) di ricetrasmissione.
Serie 11 ANTENNE Collocate le antenne in posizione verticale per una buona ricezione del segnale. PANNELLO POSTERIORE 1 2 3 1 ALIMENTAZIONE “DC 12-18V” Collegate a questo ingresso esclusivamente l’alimentatore in dotazione. 2 UNBAL Uscita audio sbilanciata con connettore jack da 6,35mm (1/4”). Collegate questa uscita ad un ingresso sbilanciato del vostro mixer. 3 AF OUTPUT Uscita audio bilanciata con connettore XLR-M. Collegate questa uscita ad un ingresso bilanciato del vostro mixer.
2 INDICATORE POWER ON E STATO DELLA BATTERIA VERDE: Trasmettitore acceso (ON), batterie cariche. ROSSO: Sostituite immediatamente le batterie. ATTENZIONE: a durata delle batterie è di circa 8h ma varia a seconda delle condizioni di utilizzo del trasmettitore. 3 ON/OFF Premete questo pulsante per 3” per accendere o spegnere il radiomicrofono. 4 VANO BATTERIE Per accedere al vano batterie svitate il coperchio il senso antiorario e avvitatelo in senso orario per chiuderlo.
Serie attendete che il canale selezionato smetta di lampeggiare sul display del ricevitore. A sincronizzazione avvenuta il display del ricevitore si fissa sul canale (frequenza) selezionato. 4 INGRESSO MINI XLR-M Collegate a questo ingresso l’Headset PH-90 in dotazione o il segnale di altre sorgenti sonore. 5 INDICATORE POWER ON E STATO BATTERIA VERDE: Trasmettitore acceso (ON), batterie cariche. ROSSO: Sostituite immediatamente le batterie.
• Non collocate il ricevitore vicino a oggetti/superfici metalliche o vicino ad apparecchi digitali (lettori CD, computer, ecc.). • Collocate il ricevitore in modo tale che non stia vicino ad una parete e che sia ad almeno 1m di altezza dal pavimento. • Telefoni cellulari, apparecchiature radio bidirezionali o apparecchi simili possono disturbare il collegamento radio tra il trasmettitore e il ricevitore, pertanto non devono essere utilizzati vicino al sistema di trasmissione.
Serie 5 | DATI TECNICI RICEVITORE - START 16R Tipo Diversity Modulazione FM Bande di frequenze disponibili 823-832MHz (B6) / 863-865MHz (B7) Canali 16 Antenne x 2, snodabili e fissate al telaio frontale Risposta in frequenza 60Hz - 15.
TRASMETTITORE BELTPACK - START 16B FM Bande di frequenze disponibili 823-832MHz (B6) / 863-865MHz (B7) Canali 16 Ingresso Mini-XLR con alimentazione per Headset PH-90 Risposta in frequenza 60Hz - 15.000Hz (±3dB) Potenza in uscita 5.19mW Controlli Gain (3 livelli), ON / STANDBY / OFF Indicatori Stato e condizione della batteria Alimentazione 2 batterie AA 1.
Serie ÍNDICE 1 |, Introducción 24 2 |, Descripción 24 2.1 |, Receptor - START 16R 25 2.2 |, Micrófono de mano - START 16M 26 2.
CONTENIDO DEL EMBALAJE START 16 BHS Versión con transmisor Beltpack y micrófono de diadema • 1 START 16R receptor de sobremesa con antenas incorporadas - A • 1 START 16B transmisor Beltpack con antena incorporada - F • 1 PH-90 micrófono ergonómico de diadema - G • 1 Alimentador exterior - C • 1x Cable audio jack 6,35 mm (1/4”) desequilibrado - D • 2 Pilas 1.
Serie 1 | INTRODUCCIÓN ¡Gracias por haber comprado un producto A.N.T – Advanced Native Technologies! Los micrófonos “PLL Diversity” START 16 son fruto de la pasión y la experiencia alcanzada a lo largo de los años para ofrecerle un producto capaz de satisfacer sus existencias y garantizar la calidad a lo largo del tiempo. Los sistemas de radio START 16 utilizan la banda UHF y tienen 16 canales (frecuencias). Puede elegir la frecuencia con los botones o mediante infrarrojos con el mando ASC.
2.1 | RECEPTOR - START 16R 1 BOTÓN DE ENCENDIDO Pulse durante 1” este botón del panel frontal del receptor para encender o apagar el aparato. 2 INDICADOR DE NIVEL AF Indica el nivel de la señal de audio en recepción. Evite que el led rojo (el último de la derecha) permanezca siempre encendido. 3 ASC Pulse esta tecla para activar la sincronización automática por infrarrojos del canal (frecuencia) transpondedor. 4 VENTANA IR Permite sintonizar el canal (frecuencia) con el transmisor.
Serie 11 ANTENAS Coloque las antenas en posición vertical para optimizar la recepción de la señal. PANEL TRASERO 1 2 3 1 ALIMENTACIÓN “12 - 18 VCC” Conecte únicamente en esta salida el alimentador incluido en la dotación. 2 UNBAL Salida de audio desequilibrada con conector jack de 6,35 mm (1/4”). Conecte esta salida a una entrada desequilibrada del mezclador. 3 AF OUTPUT Salida de audio equilibrada con conector XLR-M. Conecte esta salida a una entrada equilibrada del mezclador. 2.
2 INDICADOR POWER ON Y ESTADO DE LA PILA VERDE: Transmisor encendido (ON), pilas cargadas. ROJO: Cambie inmediatamente las pilas. ATENCIÓN: las pilas duran aproximadamente 8 h pero dicho tiempo puede variar en función de las condiciones de uso del transmisor. 3 ON/OFF Pulse este botón durante 3” para encender o apagar el micrófono. 4 COMPARTIMENTO DE LAS PILAS Desenrosque la tapa hacia la izquierda para abrir el compartimento de las pilas y enrósquelo hacia la derecha para cerrarlo.
Serie parpadear en la pantalla del receptor. Al terminar la sincronización, la pantalla del receptor muestra el canal (frecuencia) seleccionado. 4 ENTRADA MINI XLR-M Conecte a esta entrada la Headset PH-90 incluida en la dotación o la señal de otras fuentes de sonido. 5 INDICADOR POWER ON Y ESTADO DE LA PILA VERDE: Transmisor encendido (ON), pilas cargadas. ROJO: Cambie inmediatamente las pilas.
• No coloque el receptor cerca de objetos ni superficies metálicas u otros aparatos digitales (lectores de CD, ordenadores, etc.). • Coloque el receptor de manera que no haya paredes cerca y se encuentre a al menos 1 m del suelo. • Los teléfonos móviles y los equipos de radio bidireccionales o similares pueden interferir en la conexión radio entre el transmisor y el receptor y, por ello, no se deben utilizar cerca del sistema de transmisión.
Serie 5 | DATOS TÉCNICOS RECEPTOR - START 16R Tipo Diversidad Modulación FM Bandas de frecuencias disponibles 823-832MHz (B6) / 863-865MHz (B7) Canales 16 Antenas 2 orientables y fijadas al bastidor frontal Respuesta en frecuencia 60 Hz - 15.
TRANSMISOR BELTPACK - START 16B FM Bandas de frecuencias disponibles 823-832MHz (B6) / 863-865MHz (B7) Canales 16 Entrada Mini-XLR con alimentación para Headset PH-90 Respuesta en frecuencia 60 Hz - 15.000 Hz (±3 dB) Potencia en salida 5.19mW Controles Ganancia (3 niveles), ON / STANDBY / OFF Indicadores Estado y condición de la pila Alimentación 2 pilas AA 1.
Serie INHALTSVERZEICHNIS 1 |, Einführung 34 2 |, Beschreibung 34 2.1 |, Receiver – START 16R 35 2.2 |, Handmikrofon – START 16M 36 2.
PACKUNGSINHALT START 16 BHS Version mit Beltpack-Sender und HeadsetMikrofon • 1 Receiver vom Typ START 16R mit integrierten Antennen – A • 1 Sender TART 16B mit integrierter Antenne – F • 1ergonomisches Headset-Mikrofon PH-90 – G • 1 externe Stromversorgung – C • 1 Audio-Klinkenkabel 6,35 mm (1/4”) mit asymmetrischer Signalführung – D • 2 Stück 1,5 Volt-Batterien, Typ AA – E • 1 Bedienungsanleitung – Abschnitt 1 • 1 Bedienungsanleitung – Abschnitt 2 Die Hinweise in der vorliegenden Bedienungsanleitung
Serie 1 | EINFÜHRUNG Danke, dass Sie ein Produkt von A.N.T – Advanced Native Technologies erworben haben! In unseren Mikrofonen vom Typ „PLL Diversity“ START 16 spiegeln sich unsere große Technik-Begeisterung und unsere über Jahre erworbene Erfahrung wider. Sie erhalten daher ein Produkt, das hohen Ansprüchen gerecht wird und jahrelang hochwertige Leistung liefert. Systeme vom Typ START 16 werden im UHF-Bereich eingesetzt und verfügen über 16 Kanäle (Frequenzen).
2.1 | RECEIVER – START 16R 1 EIN-/AUS-KNOPF Diesen Knopf 1 Sekunde lang gedrückt halten, um das Gerät ein- bzw. auszuschalten. 2 AF-ANZEIGE Zeigt die Stärke eingehender Audiosignale an. Es sollte vermeiden werden, dass die rote LED-Anzeige dauerhaft leuchtet. 3 ASC Das Drücken dieser Taste setzt die automatische Synchronisierung des Kanals (Frequenz) in Gang. 4 IR-FENSTER Zur Synchronisierung des Kanals (Frequenz) mit dem Sender.
Serie 11 ANTENNEN Um optimalen Signalempfang zu gewährleisten, wird empfohlen, die Antennen vertikal auszurichten. RÜCKSEITE DES GERÄTES 1 2 3 1 STROMVERSORGUNGSBUCHSE „DC 12-18V“ A n diesem Eingang ausschließlich das im Lieferumfang inbegriffene Stromversorgungskabel anschließen. 2 UNBAL Asymmetrischer Audioausgang mit 6,35 mm (1/4”)-Klinkenstecker. Verbinden Sie diesen Ausgang mit einem asymmetrischen Eingang Ihres Mixers. 3 AF-OUTPUT Symmetrischer Audioausgang mit XLR-M-Stecker.
2 POWER ON- UND BATTERIESTANDS-ANZEIGE GRÜN: Sender eingeschaltet (ON), Batterien geladen. ROT: Batterien sofort ersetzen. HINWEIS: die Haltbarkeit der Batterien beträgt ca. 8 Stunden, kann aber je nach Art der Nutzung des Senders schwanken. 3 ON/OFF-SCHALTER Diesen Knopf 3 Sekunden lang gedrückt halten, um das Mikrofon ein- bzw. auszuschalten. 4 BATTERIEFACH Öffnen des Batteriefachs durch Aufschrauben des Deckels gegen den Uhrzeigersinn; Wiederverschließen im Uhrzeigersinn.
Serie auf dem Display des Receivers nicht mehr aufleuchtet. Wenn die Synchronisierung abgeschlossen ist, leuchtet das Display des Receivers dauerhaft am ausgewählten Kanal (Frequenz) auf. 4 MINI-XLR-M-EINGANG An diesen Eingang wird das mitgelieferte Headset PH-90 angeschlossen oder das Signal anderer Schallquellen. 5 POWER ON- UND BATTERIESTANDS-ANZEIGE GRÜN: Sender eingeschaltet (ON), Batterien geladen. ROT: Batterien sofort ersetzen.
• Den Receiver nicht in der Nähe von Gegenständen/Flächen aus Metall oder Digitalgeräten (CD-Playern, Computern, etc.) aufstellen. • Den Aufstellort des Receivers so wählen, dass er sich nicht in der Nähe einer Wand und mindestens 1 Meter über dem Boden befindet. • Mobiltelefone, Zweiwege-Funksysteme oder ähnliche Geräte können die Funkverbindung zwischen Sender und Receiver beeinträchtigen und sollten daher in Nähe des Sendesystems nicht verwendet werden.
Serie 5 | TECHNISCHE DATEN RECEIVER – START 16R Typ Diversity Modulation FM Verfügbare Frequenzbereiche 823-832MHz (B6) / 863-865MHz (B7) Kanäle 16 Antennen 2, in verschiedenen Richtungen ausrichtbar und mit dem Front-Panel verbunden Frequenzgang 60 Hz – 15.
BELTPACK-SENDER – START 16B FM Verfügbare Frequenzbereiche 823-832MHz (B6) / 863-865MHz (B7) Kanäle 16 Eingang Mini-XLR mit Anschluss für Headset PH-90 Frequenzgang 60 Hz – 15.000 Hz (± 3 dB) Ausgangsleistung 5.
Série TABLE DES MATIÈRES 1 |, Introduction 44 2 |, Description 44 2.1 |, Récepteur - START 16R 45 2.2 |, Micro main - START 16M 46 2.
CONTENU DE L’EMBALLAGE START 16 HDM Version avec micro main • 1x START 16R récepteur de table avec antennes intégrées - A • 1x START 16M micro main sans fil avec capsule dynamique - B • 1x Bloc d’alimentation externe - C • 1x Câble audio jack 6,35 mm (1/4”) asymétrique- D • 2x Piles « bâtons » 1,5 V AA - E • 1x Notice d’emploi - Section 1 • 1x Notice d’emploi - Section 2 Respecter impérativement les avertissement ou mises en garde contenus dans la présente notice d’emploi ainsi que les indications de l
Série 1 | INTRODUCTION Nous vous remercions d’avoir acheté un produit A.N.T – Advanced Native Technologies ! Les micros main sans fil « PLL Diversity » START 16 sont le fruit à la fois de notre grande passion pour notre métier et de notre expérience pluriannuelle et ont été développés pour vous offrir un produit répondant à toutes vos exigences et attentes et maintenant durablement ses performances et sa qualité de haut niveau.
2.1 | RÉCEPTEUR - START 16R 1 BOUTON D’ALLUMAGE Appuyez pendant 1 s sur ce bouton, situé sur la face avant du récepteur, pour allumer ou éteindre l’appareil. 2 INDICATEUR DE NIVEAU AF Il indique le niveau du signal audio reçu. Évitez que la LED rouge (celle qui est située le plus à droite) reste allumée de façon continue (allumage fixe).
Série 11 ANTENNES Les antennes doivent être positionnées verticalement pour obtenir une meilleure réception du signal. FACE ARRIÈRE 1 2 3 1 BLOC D’ALIMENTATION « DC 12-18V » Cette entrée sert exclusivement à brancher le bloc d’alimentation fourni. 2 UNBAL Sortie audio asymétrique sur jack de 6,35 mm (1/4”). Cette sortie doit être reliée à une entrée asymétrique de votre table ou pupitre de mixage. 3 AF OUTPUT Sortie audio symétrique sur connecteur XLR-M.
2 INDICATEUR POWER ON ET ÉTAT DE CHARGE DES PILES VERT : Récepteur allumé (ON), piles pleines. ROUGE : Remplacez immédiatement les piles. ATTENTION : la durée des piles est d’environ 8 heures. Toutefois, cette durée peut varier en fonction des conditions d’utilisation du récepteur. 3 ON/OFF Appuyez sur ce bouton pendant 3 s pour allumer ou éteindre le micro main.
Série et attendez que le canal sélectionné cesse de clignoter sur l’écran du récepteur. Une fois la synchronisation effectuée, l’écran du récepteur se stabilisera sur le canal (la fréquence) sélectionné. 4 ENTRÉE MINI XLR-M Cette entrée doit être reliée à l’Headset PH-90 fourni ou au signal d’autres sources audio. 5 INDICATEUR POWER ON ET ÉTAT DE CHARGE DES PILES VERT : Récepteur allumé (ON), piles pleines. ROUGE : Remplacez immédiatement les piles.
• Ne placez pas le récepteur à proximité d’objets/de surfaces métalliques ou proche d’appareils numériques (lecteurs CD, ordinateur, etc.). • Placez le récepteur à au moins 1 m de hauteur du sol et à l’écart de toute paroi ou tout mur. • Évitez d’utiliser des téléphones mobiles ou portables, des appareils radio bidirectionnels ou d’autres appareils similaires qui peuvent perturber la connexion radio entre l’émetteur et le récepteur, près du système de transmission.
Série 5 | CARACTÉRISTIQUES TECHNIQUES RÉCEPTEUR - START 16R Type Diversity Modulation FM Bandes de fréquences disponibles 823-832MHz (B6) / 863-865MHz (B7) Nbre de canaux 16 Antennes x 2, articulées et fixées à la façade ou face avant Réponse en fréquence entre 60 Hz et 15 000 Hz (±3 dB) Optimisation de la transmission Tonalité ou Signal pilote THD <1 % Sorties audio Symétrique XLR, asymétrique jack de 6,35 mm Niveau de sortie symétrique + 10 dBu Contrôles/Commandes Power, Canal plus («
ÉMETTEUR BELTPACK - START 16B FM Bandes de fréquences disponibles 823-832MHz (B6) / 863-865MHz (B7) Nbre de canaux 16 Entrée Mini-XLR avec bloc d’alimentation pour l’Headset PH-90 Réponse en fréquence entre 60 Hz et 15 000 Hz (±3 dB) Puissance de sortie 5.
Serie 6 | NOTES/NOTE/NOTAS/NOTIZEN/REMARQUES 52 Serie START 16
www.ant-sound.com ENG The information contained in this manual have been carefully drawn up and checked. However no responsibility will be assumed for any incorrectness. This manual cannot cover all the possible contingencies which may arise during the product installation and use. Should further information be desired, please contact us or our local distributor. A.E.B. Industriale Srl can not be considered responsible for damages which may be caused to people and things when using this product.
FRA Les informations contenues dans cette notice ont été attentivement rédigées et contrôlées. Toutefois, notre responsabilité ne saurait être engagée quant aux éventuelles inexactitudes et/ou imprécisions des informations fournies. Cette notice ne peut pas fournir une réponse à chacun des problèmes qui peuvent éventuellement survenir pendant l’installation et l’utilisation de l’appareil. Raison pour laquelle nous restons à votre entière disposition pour tous renseignements et conseils complémentaires. A.E.
©2017 A.E.B. Industriale Srl | Printed in China | REV 1.0 A.E.B.