©2000 Antares Audio Technologies. All Rights Reserved. Antares Audio Technologies 231 Technology Circle, Scotts Valley, California 95066 USA voice: (831) 461 7800 fax: (831) 461 7801 service: (831) 461 7814 web: www.antarestech.com Printed in USA Rev 1.
Contents Getting Started Welcome Tech Support A few words from Dr. Andy Introducing the ATR-1a Chapter 1 Background So what exactly is it? A little bit about pitch Some pitch terminology How the ATR-1a determines pitch How the ATR-1a corrects pitch Program Mode vs.
Creative Applications Program Name page Save Program page Song Edit pages Song Speed page Song Items page Song Vibrato page Song Name page Save Song page System Edit pages Bass Mode page Sensitivity and LCD page Foot Switch and Detune page MIDI page 1 MIDI page 2 MIDI page 3 MIDI page 4 MIDI page 5 Owner Message page 27 27 27 28 28 29 30 30 30 31 31 32 33 34 35 35 36 36 Chapter 5 37 Factory Programs Scale and Chord Guides MIDI SysEx message formats MIDI SysEx message examples MIDI Implementation Chart
Welcome! On behalf of everyone at Antares Audio Technologies, we’d like to offer both our thanks and congratulations on your decision to purchase the absolute best intonation correction hardware in the world. Before you proceed much farther, we’d like to strongly encourage you to fill out and return the ATR-1a registration card. As an ATR-1a owner, you are entitled to receive notification of any firmware upgrades, technical support, and advance announcements of upcoming products.
Technical Support In the unlikely event that you experience a problem using your ATR-1a, try the following: 1. Make another quick scan through this manual. Who knows? You may have stumbled onto some feature that you didn’t notice the first time through. 2. Check our web page for tips, techniques, or any late-breaking information: www.antarestech.com 3. Call your local Antares dealer. 4. Call us at (831) 461-7814 Monday through Friday between 9am and 5pm USA Pacific Standard Time. 5.
A few words from Dr. Andy I remember, as if it were yesterday, sitting in my junior high school band, happily playing away on my flute, when I noticed that our conductor was screaming and jumping up and down on the podium. What was this about? Suddenly, I realized she was screaming at me. And just in time too — since I was able to duck and watch a baton fly past my head, missing me by inches. “Why [expletive] can’t you play in tune?” she asked. But I was in tune. Everybody else was out of tune.
Chapter 1: Introducing the ATR-1a Some background In 1997, Antares first introduced the ground-breaking Auto-Tune Pitch Correcting Plug-In for ProTools™ (followed a bit later by the VST and stand-alone versions). Here was a tool that actually corrected the pitch of vocals and other solo instruments, in real time, without distortion or artifacts, while preserving all of the expressive nuance of the original performance. Recording Magazine called Auto-Tune a “Holy Grail of recording.
A little bit about pitch Pitch is typically associated with our perception of the “highness” or “lowness” of a particular sound. Our perception of pitch ranges from the very general (the high pitch of hissing steam, the low pitch of the rumble of an earthquake) to the very specific (the exact pitch of a solo singer or violinist). There is, of course, a wide range of variation in the middle.
Pitches are often described relative to one another as intervals, or ratios of frequency. For example, two pitches are said to be one octave apart if their frequencies differ by a factor of two. Pitch ratios are measured in units called cents. There are 1200 cents per octave. For example, two tones that are 2400 cents apart are two octaves apart. The traditional twelve-tone Equal Tempered Scale that is used (or rather approximated) in 99.
How the ATR-1a corrects pitch The ATR-1a works by continuously tracking the pitch of an input sound and comparing it to a user-defined scale. The scale tone closest to the input is continuously identified. If the input pitch exactly matches the scale tone, no correction is applied. If the input pitch varies from the desired scale pitch, an output pitch is generated which is closer to the scale tone than the input pitch.
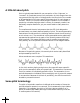
An example As an example, consider this before-and-after graphic representation of the pitch of a vocal phrase that contains both vibrato and expressive gestures. CORRECTED BY ATR-1 ORIGINAL PERFORMANCE In the original performance, we can see that although the final note should be centered around D, the vocalist allowed the tail of the note to fall nearly three semitones flat.
If a performance is quite close to begin with and only requires minor correction (i.e., never more that 50 cents), it’s often sufficient to simply choose the Chromatic scale, set Speed to about 10 and leave it there. If you are working in the studio to correct an already recorded track, you might use Program Mode to deal with the track one section at a time, stoping to change Programs between sections.
Chapter 2: Setting Up the ATR-1a Setting up the ATR-1a is a very straightforward. 1. Find a suitable location. The ATR-1a is designed to be mounted in a standard 19-inch equipment rack. 2. Confirm that the included power supply is correct for the electricity in your part of the world. If you are not sure, or the power supply has a plug that is incompatible with your wall sockets, contact your local Antares dealer for help.
An Important Note About Monitoring: If the ATR-1a is used to pitchcorrect an artist’s performance in real time, it is very important that the performer is able to monitor their original signal, not the pitch-corrected signal. Trying to react musically to the processed signal will drive them crazy and, in most cases, drive them farther off pitch.
Chapter 3: Panel Controls and Connectors As you have almost certainly noticed, the ATR-1a has relatively few controls. We’ll cover them here. 1 10 2 3 4 5 6 7 8 9 The Front Panel 1 Non-existent Power Switch That’s right. There isn’t one. The ATR-1a is designed to remain on continuously. You can, of course, plug it in to a switched power strip or power conditioner if you like, but leaving it on all the time will do it no harm. 2 LCD An easy-to-read 20 character by 2 line display.
7 SYSTEM Button Press this button to set various parameters that affect the ATR-1a’s overall functionality (MIDI response, LCD contrast, etc.) The accompanying LED lights to remind you that you are in System Edit Mode. When the LED is lit, press the SYSTEM buttom again to exit the System Edit Mode. 8 BYPASS Button Press the Bypass button to pass audio through the ATR-1a without any pitch correction or other processing.
1 2 3 4 5 The Back Panel 1 AC POWER INPUT Plug the 7-pin DIN connector from the included power supply in here. Do NOT use a supply which is not expressly intended for the ATR-1a (even if you could find one with the that weird plug on it). Bad things could happen. 2 MIDI IN Connect the MIDI Out from a MIDI keyboard, sequencer, or other MIDI source in here. 3 FOOT SWITCH Plug in a foot switch here. A 1/4-inch TS (tip-sleeve) plug is required.
Chapter 4: Display Screens and Menu Pages Flash Screen ATR-1a version 1.3 ATR-1a Processor The Flash Screen appears for a few moments after the ATR-1a is powered on. The first line displays the firmware version. The second line can display any message that will fit in 20 characters. As it comes from the factory, the ATR-1a displays the rather unimaginative message above. However, you can create your own (much more clever) message in one of the SYSTEM pages (see page 36).
To select a Program, move the cursor to the Program Number field and use the data knob to choose the desired Program. If the Program Mode Main Screen is displayed and MIDI Program Changes are enabled in the SYSTEM menu, a MIDI Program Change command of 1– 50 will select the corresponding Program. If the Program Mode Main Screen is displayed and the Foot Switch is set to STEP in the SYSTEM menu, pressing the foot switch will step to the next higher numbered Program.
Each Song Step must contain one of the following items: ITEM CODE MAIN SCREEN STEP DISPLAY 0 (no program) ## (Program number) the program name B (B bypass) <- (<- loop) E (E end) -> (-> link) Please note: In the Song Mode main screen, the Cursor buttons can be used to move the cursor to the YY field and the data knob can then be used to select any Song Step and display the item programmed for that step.
Speed Page The first edit page displayed is the SPEED page: Program:XX Speed (0 is fast): yy The SPEED control determines how rapidly pitch correction is applied to the incoming sound. Values range from 0 to 25. A value of zero will cause instantaneous changes from one tone to another and will completely suppress a vibrato and any purposeful expressive pitch variations (note that any related volume changes will remain). Values from 6 to 10 are typical for vocals.
Now simply play the melody to be corrected from your keyboard or sequencer. Tempo and rhythm don’t matter, so take your time and make sure you don’t play any wrong notes. As each note is played, its name appears in the top line of the display. Assume, for example, that your melody starts with D , B, and then A.
This page allows you to specify the scale notes to which the ATR-1a tunes the input sound. If you have used the Make Scale From MIDI function described above, the notes input via MIDI will already appear on the page and can be further edited here. There are 12 notes in this scale, i.e. C, C #, …etc. Each note in the scale can be set to one of three states: Tune (i.e.
This phrase is in D Major and, if all the pitch errors were no greater than about 49 cents, would work fine with a standard D Major scale (D, E, F , G, A, B, C ). However, the pitch error of three semitones at the end of the last note is so large that with B and C present in the Scale, as the pitch fell, the ATR-1a would see first C and then B as the target pitch and therefore allow the error to remain.
Program Name Page This page allows you to name each of your Programs. Typically, you would name the program after the scale that it contains. Alternatively, you could name it after the song or portion of a song in which it’s used. Do whatever helps you best remember what you had in mind when you created the Program. Program:XX Name:aaaaaaaaaaaaa To enter the name, place the cursor under each character space and use the data knob to select the appropriate character. Names may be a maximum of 13 characters.
To edit a specific Song, you must first select that Song as the current Song. Do that by calling up the appropriate Song number on the Song Mode Main Screen. Then, press the PROGRAMS button (the red LED under the PROGRAMS button will light). The number of the Song being edited will always appear in the top left corner of the various Song Edit pages. When editing a Song, you progress from one edit page to the next by pressing the PAGE button.
<- (Loop) When a Song Step containing a Loop command becomes active, the Song immediately resets to Song Step #1. If Song Step #1 contains a “0” (No Program) item, the Song moves forward to the next non-”0“ Step. Use Loop when you want to repeat a harmonic structure multiple times. E (End) When a Song Step containing End becomes active, the ATR-1a enters Bypass Mode and additional presses of the Foot Switch or MIDI Increment commands have no affect.
Song Name Page This page allows you to name each of your Songs. Song:XX Name:aaaaaaaaaaaaa To enter the name, place the cursor under each character space and use the data knob to select the appropriate character. Names may be a maximum of 13 characters. The following characters are available for naming (in this order): (space) (UPPER CASE LETTERS) (lower case letters) – .
When editing System parameters, you progress from one edit page to the next by pressing the PAGE button. After you have finished making changes, press the SYSTEM button again. Unlike Program and Song editing, you are not prompted to save the changes, they are automatically saved for you. Bass Mode Page Bass Mode OFF When operating in its normal mode, the ATR-1a is reliably able to detect pitches down to A0 (55Hz). Turning Bass Mode ON lowers the lowest detectable frequency by about one octave to 25Hz.
If you are working with a well-isolated solo signal (e.g., tracking in a studio or off of a multi-track tape) you can typically set the Sensitivity control to 10 and forget it. If, on the other hand, your signal is noisy or not well-isolated (as might be more common in a live performance situation), it may be necessary to allow more signal variation (higher Sensitivity numbers). However, if you back off too much, the ATR-1a’s ability to detect pitch may be affected.
DETUNE SETTING A=HERTZ -20 435 -16 436 -12 437 -8 438 -4 439 0 440 +4 441 +8 442 +12 443 +16 444 +20 445 This table can be extended in either direction by adding or subtracting 4 cents per Hertz, as appropriate. MIDI Page 1 Channel Note Sustain aaaa bbb ccc The Channel parameter selects the channel over which the ATR-1a receives MIDI messages.
The source of the MIDI input would typically be a MIDI keyboard or sequencer, and could consist of chords, scales, or even the exact melody that the input should be corrected to. If you will not be defining the ATR-1a’s target pitches via MIDI, be sure that MIDI NOTE MODE is set to OFF.
MIDI Page 3 These next two MIDI Control pages allow you to assign various MIDI controllers to set selected ATR-1a parameters in real time. (Note that all MIDI controller data must be sent on the MIDI Channel set on MIDI Page 1 in order to be recognized.) Midi Speed Control aaa Step bbb Assigning a MIDI Continuous Controller to the Speed parameter allows that controller to override the current Program or Song Speed setting. Note that this is simply a temporary override.
MIDI Page 5 SysEx Device Number aaa The ATR-1a supports a number of MIDI System Exclusive (SysEx) messages using the Antares manufacturer ID. (See the SysEx Appendix for details.) The ATR-1a SysEx device number is similar to the Device ID found in SysEx Real Time and Non-Real Time messages. By setting each unit to a different device number, up to sixteen ATR-1as can be independently controlled with System Exclusive messages. Values for the Device Number range from 0 to 15.
Chapter 5: Creative Applications for the ATR-1a The ATR-1a works on vocals so well you may think that’s all it can do. Actually, lots of instruments can use it to great advantage. Fretless bass, electric violin, trombone, even the theremin, all feature continuous pitch potential, unconstrained by frets or keys. Here are some other ideas for using your ATR-1a: • Produce instant double tracking in one take! Record with two mics, sending only one signal through the ATR-1a.
• The ATR-1a can be used to simulate other singing styles. Many ethnic styles feature exceptional (almost unbelievable) intonation during fast, melismatic passages. Setting the SPEED parameter faster than normal (less than 5), and setting the SCALE to an appropriately exotic mode (for example, G A A# C# D D# F#) can produce exactly this result (if the singer improvises with sufficient global panache.
• Use the MIDI Note function to create amazing ornamental flourishes and trills. Connect a MIDI keyboard and turn on the MIDI Note function. Set a fast Speed and sing a sustained note while playing the keyboard. Go crazy! • While the ATR-1a is not really intended to be a harmonizer, you can create some very high quality close two-part harmony by singing one part and using the MIDI Note function to retune what you sing to the appropriate harmony notes.
Appendix Factory Programs The ATR-1a comes from the factory pre-programmed with the basic chromatic, major, and natural minor scales in Programs 1–13 as listed below. You are, of course, free to overwrite these as you desire.
Scale and Chord Guides Here are some of the most commonly used scales, modes and chords, and their associated ATR-1a settings. All spellings use sharps because the ATR-1a software uses sharps to describe all accidentals (the black notes on the keyboard). Scales/Modes reference chart While the major scale needs no introduction, the others might need some explanation. For example, the difference between the natural and harmonic minor is only one note, the seventh scale degree.
Scales/Modes reference chart KEY MAJOR NATURAL MINOR C CDEFGAB C D D# F G G# A# C /D D D /E E F F /G G G /A A A /B B D E F G A B C D F G G A C D E F G A B C D F G A A C D E F G A B C D F G A B C D E F G A C C D F G A B C D E F G A C D D F G A B C D E F G A D E F G A A C D F F G A B C E F G A B C D F G G A C C D F G A B C D E G A A C D D F G A B C D E F C D FF G A C C D EF G AB ABCDEFG
HARMONIC MINOR DORIAN C D E F G A B PHRYGIAN CDD FGG B CDD FGAA CC D FGG A DEFGABC DD FGAA C C D E F G A C D E F G A A C D F F G A B D E F G A B C D F G G A C C E F G A B C D F G A A C D D F G A B C D E G A B C D E F G A C C D F F A B C D E F G A MINOR MIXOLYDIAN F GABC DE C D F F G A B D E F G A B C D F G G A C C E F G A B C D F G A A C D D F G A B C D E GG A CDD F GABCDEF G ABC D EF G A CC D FF C
MIDI System Exclusive Message Formats In the explanations, below, braces < > are used to represent enclosed MIDI data bytes. Concatenated data is shown by < > < >. Names are also enclosed in braces as symbolic representations defined further into the explanation. Values are decimal unless an H is used to denote Hexadecimal values. For example, the MIDI bytes to select song mode for DEVICE NUMBER 3 are: F0H, 0, 1, 26H, 3, 1, F7H.
… = … … 0 to 25 (see DELAY TABLE, below) all values between 32 (ASCII blank) and 7FH 1 to 20 0 to 25 0 = off, 1 = SINE, 2 = SQUARE, 3 = SAW 0 to 100 cents 1 to 97 (.1 to 9.
Vibrato Delay Table The following table identifies the MIDI controller values required to set each of the possible Vibrato Delay values: MIDI VALUE 46 VIBRATO DELAY (milliseconds) 0 0 1 10 2 20 3 45 4 70 5 100 6 140 7 190 8 230 9 270 10 315 11 370 12 435 13 510 14 600 15 710 16 830 17 970 18 1140 19 1340 20 1575 21 1850 22 2170 23 2550 24 3000 25 3500
MIDI System Exclusive Message Examples The following examples are Scripts from Opcode’s Galaxy. They show System Exclusive Messages which communicate with the ATR-1a. This message will cause the ATR-1a to select Program Mode. Put Put Put Put Put $F0 into Sys_Ex; 0 1 $26 into Antares; 0 into Device_Num; 0 into Mode; $F7 into End_Sys_Ex; Send Sys_Ex Antares Device_Num ¬ Mode ¬ End_Sys_Ex; This message will cause the ATR-1a to select Song Mode.
Put Put Put Put 0 7 0 0 into into into into Step_Controller; Sensitivity; Detune; Detune_Direction; Send Sys_Ex Antares Device_Num Mode Msg_Length ¬ MIDI_Channel MIDI_Sustain Pgm_Change ¬ MIDI_Note Pitch_Bend Mod_Wheel ¬ Foot_Switch Speed_Controller Vib_Rate_Controller ¬ Vib_Delay_Controller Step_Controller Sensitivity ¬ Detune Detune_Direction¬ End_Sys_Ex; This message sets Program data in the ATR-1a.
Put 0 into Vib_Type; Put 28 into Vib_Depth; Put 53 into Vib_Rate; Put 11 into Vib_Delay; Put “My test name.
MIDI Implementation Chart Model: ATR-1a, version 1.
ATR-1a Specifications Data format 20-bit linear 56-bit internal processing Sample rate 46.875 kHz Frequency response 10Hz–20kHz, +0.06dB/-0.23dB Distortion + Noise Less than 0.005% (@1kHz) ADC 20 bit 103 dB Dynamic Range (A weighted) 97 dB S/(N+D) DAC 24 bit 105 dB Dynamic Range (A weighted) 94 dB S/(N+D) Inputs XLR: Balanced, 17.9 dBu, 40kΩ 1/4 inch Phone: TRS Balanced, 17.9 dBu, 40kΩ Unbalanced, 17.9 dBu, 40kΩ MIDI In: 5-Pin DIN Footswitch: 1/4 inch Phone Outputs XLR: Balanced, 17.
Index A F AC power input 19 ATR-1, defined 9 Auto-Tune Plug-In 9 Back Panel 19 Bass Mode Page 31 Bend 34 BYPASS Button 18 Factory Programs 40 Firmware version 20 Flash Screen 20 Foot Switch 19, 32 Foot Switch and Detune Page 32 Detune parameter 32 Foot_Switch parameter 32 Foot_Switch parameter 32 Front Panel 17 C G cents, defined 11 Cents to Hertz relative chart 32 Channel parameter 33 Chord reference chart 42 Creative applications for the ATR-1 37 Cursor buttons 17 Grounding 15 D I Data entry k
M P Make Scale From MIDI Page 23 MIDI Implementation Chart 50 MIDI IN 19 MIDI Page 1 33 Channel parameter 33 Individual MIDI channels 1–16 33 Note field 33 OMNI 33 Sustain parameter 34 MIDI Page 2 34 Bend 34 Mod_Whl (Mod Wheel) 34 Pgm_Chg (Program Change) 34 MIDI Page 3 35 Speed parameter 35 Step parameter 35 MIDI Page 4 35 Delay 35 Vibrato Rate 35 MIDI Page 5 36 SysEx device number 36 MIDI System Exclusive Message Examples 47 MIDI System Exclusive Message Formats 44 Mod_Whl (Mod Wheel) 34 Mode Pages 20
Song Step Items 22, 28 ## (A Program Number) 28 -> (Link) 29 <- (Loop) 29 0 (No Program) 29 B (Bypass) 28 E (End) 29 Song Vibrato Page 29 Specifications 51 Speed 12 Speed Page 23 Speed parameter 35 Sustain parameter 34 SYSTEM button 18, 30 System Edit Pages 30 T Technical Support 6 V Vibrato 12 Vibrato Delay table 46 Vibrato Page 26 Dly (Delay) control 26 Dpth (Depth) control 26 Rt (Rate) control 26 W waveform examples 10 54