USER’S GUIDE Auto-Tune ™ Antares Advanced Tuning Effects Plug-in for Mackie Digital Mixers ® ™
Iconography This icon identifies a description of how to perform an action with the mouse. This icon identifies a description of how to perform an action from the console. This icon will lead you to some further explanations of features and practical tips. This icon marks information which is very important, so please make sure you have a read. “Mackie” and the “Running Man” figure are trademarks or registered trademarks of Mackie Designs Inc.
Contents Introduction ----------------------------------------4 About Antares ---------------------------------------------------4 About the D8B UFX Card -------------------------------------- 5 About Auto-Tune------------------------------------------------ 5 Let’s Get Started ---------------------------------- 6 Requirements ----------------------------------------------------6 Authorizing the Plug-in ----------------------------------------6 Unlock Procedure ---------------------------------------------
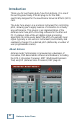
Introduction Thank you for purchasing Auto-Tune from Antares. It is one of the exciting new family of 24-bit plug-ins for the D8B, specifically designed for the new Mackie Universal Effects (UFX) card. The Auto-Tune plug-in is a precision instrument for controlling pitch, allowing you to apply nuances of intonation to virtually any performance. This plug-in is an implementation of the Antares Auto-Tune pitch correcting software for the Mac and PC.
About the D8B UFX Card The UFX card provides robust processing power for computationheavy plug-ins. The UFX card is a 4-in/4-out architecture, which means it can support four mono, two mono and one stereo, or two stereo sends simultaneously. Up to four UFX cards can be installed in the D8B, allowing up to sixteen simultaneous singlechannel effects, eight stereo plug-ins, or combinations thereof. Note: Earlier D8Bs were fitted with 16 MB of memory.
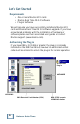
Let’s Get Started Requirements • One or more Mackie UFX cards • Mackie Real Time OS 3.0 Software • Plug-in Software We will assume you have successfully installed a Mackie UFX card and Mackie Real Time OS 3.0 software upgrade. If you have encountered problems with the installation of hardware or software please see their associated user guides or contact Mackie support (www.mackie.com). Authorizing the Plug-in If you have D8B v 3.
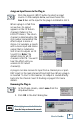
Unlock Procedure 1. Locate your D8B’s Electronic Serial Number (ESN). This is displayed at the bottom of the Licensing window, which is accessed from the Setup screen. The 12 digit ESN is made from numbers 0–9 and letters A–F. It is unique to the D8B processor, and is not the serial number label on the rear of the control surface or CPU chassis. 2. You will also need your plug-in’s serial number which is printed on the floppy disk label. 3.
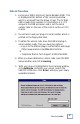
Configuring the Plug-in After booting the D8B you must assign the Auto-Tune plug-in to a UFX card. See FX Routing on page 23 for more details. Assign the Auto-Tune Plug-in to a UFX card 1. Click the Plugins menu and select Plugins, (or Ctrl+P on the keyboard). 2. In the Plugin Configuration window, locate the card slot that contains the UFX card you wish to assign to. 3. In the Mode column, click the Mono/Stereo toggle button and set it to Mono. 4.
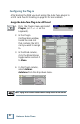
Assign an Input Source to the Plug-in • Click the plug-in’s INPUT button to select an input source. In the example below, we have chosen the Aux 5 Bus as the input to the plug-in installed in slot 5. When a plug-in is fed from an aux bus, its output appears on the FX Return channels (faders in the EFFECTS bank). The return channel is determined by the slot number and whether the effect output is mono or stereo.
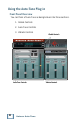
Using the Auto-Tune Plug-in Front Panel Overview You can think of Auto-Tune as being broken into three sections. 1. Global Controls 2. Auto-Tune Controls 3.
Global Controls Input Select Display & Drop-down Menu Preset Display/ Select Hide Plug-In Window Button Meter Displays (In/Out) Preset Select Memory A/B Buttons Menu Bypass Button Button Input Select Assign Auto-Tune’s input from any of the DB8’s pre, post, or auxiliary channels. Input and Output Meters The input meter represents the incoming signal from the D8B, with a range from –50 dB to 0 dB. The output meter is located just beneath the input meter.
Memory A/B Memory A and Memory B are two separate storage banks that let you temporarily store setups. This is handy for quickly referencing and comparing sounds while you are creating edits. Bypass This allows the input signal to pass through Auto-Tune without being processed. Click the button again to resume processing. Switching the Bypass state will not cause any audio artifacts, so it can be used in real time for live performance, recording or mixing applications.
Auto-Tune Controls This section is a reference for all of the Auto-Tune controls and describes the function of each control. Scale Display & Drop-down Menu Scale Editor Button Pitch Controller Change Meter Key Display & Dropdown Menu MIDI Input Channel Display Scale Detune Display & Slider Retune Display & Slider Tracking Display & Slider Scale Selection Select the desired scale from the drop-down scale list. The first three scales are equal tempered.
Scale Editor Click the Scale button to open the Scale Editor window. Edits made using this dialog are associated with each scale. That is, each scale retains its own edits separate from the other scales. When finished editing, click the Done button to close the window.
If the Do Not Track box is selected, when the input pitch is close to this note the input will be passed through with no correction. If the Remove box is selected, then the note is simply removed from the current scale. For example, selecting the Chromatic scale and then setting C#, D#, F#, G#, A# to Remove would cause a C Major scale to remain. In that case Auto-Tune would always retune the input to the closest note of the C Major scale.
Pitch Controller The Pitch Controller is used to force the input to an exact pitch. Trigger the desired note(s) by selecting keys on the keyboard image or by using a MIDI input controller. MIDI Chan 6 As long as a key is selected or held/triggered from an external controller, the chosen note will adjust the input pitch. Only when you release the note will the input return to its original pitch. An external MIDI controller can also be used to gain immediate access to multiple octaves.
Retune Speed Retune Speed controls how rapidly the pitch correction is applied to the incoming sound. The units are milliseconds. A value of zero will cause instantaneous changes from one tone to another and will completely suppress a vibrato (note that any related volume changes will remain). Values from 10 to 50 are typical for vocals.
Vibrato Controls The Vibrato Section contains one drop-down menu and three sliders. The Vibrato drop-down allows you to select the shape of the vibrato’s pitch variation through time. The choices are: (no vibrato), sine wave, square, and sawtooth. Depth varies from 0 to 100 cents, controlling the amount of pitch variation in the vibrato. Rate varies from 0.1 to 10.0 Hz and controls the speed of the vibrato. Delay varies from 0 to 300 milliseconds, controlling the speed of onset of the vibrato.
Saving, Loading, and Resetting a Preset Auto-Tune settings can be saved and recalled from the hard drive. You can save and load files using either Memory A or Memory B. To Save a Preset: 1. Click and hold the Menu button. 2. Select Save User Preset to overwrite the file currently opened. 3. Select Save User Preset As to save to a new file name. The Save Preset File As dialog box appears. 4. A default name for the preset is automatically displayed, such as Preset#1.
To Load a Preset: 1. Click Mem A or Mem B to choose the memory location from which to load the file. 2. Click and hold the Menu button. 3. Select Load Antares Autotune to open a file. The Load Preset File dialog box appears. 4. Click INTERNAL if the file is on the internal drive, or click FLOPPY if the file is on a floppy disk. 5. Select the preset you want to load. 6. Click Open to load the selected preset. You can also load a preset from the Preset Display.
To Reset the Plug-in: Reset will reload the previous patch. 1. Click and hold the Menu button. 2. Select Reset Antares Autotune. To Cut Preset Settings: 1. Click and hold the Menu button. 2. Select Cut AntaresAT. The current settings are temporarily stored in the clipboard memory in case you want to paste them to a new preset. The plug-in also reverts to its default state (it is reset). To Copy Preset Settings: 1. Click and hold the Menu button. 2. Select Copy.
Automation and Snapshot Control Dynamic Real Time To write automation on a loaded plug-in: On The Console 1. Engage AUTO TOUCH. 2. Engage ALL, disengage BYPASS, and send timecode to the console – the POSITION readout will change to show TC is being received. 3. Move a parameter or recall a patch (user or factory preset). Subsequent edits to any recorded automation moves may be performed in the Mix Editor.
FX Routing The Plug-in Configuration Window Input Source AsCard Slot Column signment Column Plug-in display toggle Input Channel Assignment Dropdown Menu Button Card A Plug-in Assignment Column Close Window Stereo/Mono Mode Column Stereo/Mono Toggle Button Card B Card C Card D (no card installed) User’s Guide 23
Inserting a Plug-in into a Channel A pre- or post-DSP channel insert can also be used as the input source for a plug-in. When a channel insert point is selected, the plug-in output returns to the channel. The FX return path is disconnected, although the plug-in output is still displayed on the FX return channel meter. A plug-in channel insert assignment can be made from the Plugin Configuration window, or from a drop-down menu from the mixer screen.
Using an Aux Send with a Plug-in ♦ Click the associated INPUT menu button and select an Aux input source. In the example below, we have chosen the Aux 5 Bus. Send the Input Signal to the Aux Bus 1. Send a signal to a D8B mixer input channel (MIC/LINE or TAPE IN). 2. Assign the input channel V-Pot/GUI Control Pot to an aux send. We have chosen AUX 5 according to the example above. 3. Use the AUX 5 control to adjust the input level to the plug-in.
You will see the plug-in’s input meter become active as you raise the mixer input channel’s aux send. Set the plug-in input/output signal levels as you would with any effect, so the meter reaches its upper-most range every so often (always trust your ears first). This can be accomplished from the console or GUI. Pre-Fader and Post-Fader Auxiliary Sends Normally, effect sends are post-fader, so the signal sent to the effect follows the program level in the mix.
The FX Return Channel ♦ Switch the D8B Bank Select to EFFECTS (49-72) and bring up faders one and two (channels 49 and 50). You will also see meter activity associated with these channels. FX Channels 1&2 (channels 49&50) Stereo Plug-in The Plug button toggles between Windows menu buttons and FX buttons (lower left on the D8B mixer screen). Plugins button opens the Patch Configuration window (or Ctrl+P on the keyboard). Here the Delay Factor plug-in is selected for display.
More About Scales Historical Tunings 28 • Ling Lun: a twelve-tone scale dating from 2700 B.C. China. • Scholar’s Lute: a seventone scale dating from 300 B.C. China. • Greek diatonic genus: a seven-tone scale from ancient Greece. • Greek chromatic genus: a seven-tone scale from ancient Greece. • Greek enharmonic genus: a seven-tone scale from ancient Greece. • Pythagorean: a twelve-tone scale dating from 600 B.C. Greece.
• Vallotti & Young chrom: a twelve-tone scale. Another derivative of the Pythagorean scale designed to allow arbitrary keys. • Barnes-Bach (chromatic): a twelve-tone scale. A variation of the Vallotti & Young scale designed to optimize the performance of Bach’s Well-Tempered Clavier. Ethnic Tunings • Indian: This 22-tone scale is used in India to perform ragas. • Slendro: This five-tone Indonesian scale is played by ensembles called gamelans.
• 24 Tone: Also know as the quarter-tone scale, this scale is used for variety but has no advantage in terms of ratios that better approximate pure intervals. • 31 Tone: In addition to intervals that better approximate pure intervals, this scale also contains good approximations to Indonesian pelog and slendro scales. • 53 Tone: Related mathematically to the cycle of fifths, the 53-tone scale has very pure major and minor thirds, and fifths and fourths.
Complimentary Doodle Page User’s Guide 31
® ™ ©2001 Mackie Designs Inc. and Antares Audio Technologies. All Rights Reserved. Part No. 820-252-00 Rev.