X-310 PRO Faze Machine User Manual English • Français • Deutsch • 中文 © 2014 Antari Lighting and Effects Ltd.
Congratulations on the purchase of your new ANTARI X-310PRO Fazer -Introduction Thank you for choosing an ANTARI X-310PRO Fazer. You now own a rugged and powerful state-of-the-art machine. Besides its ability to operate silently, this new model is user-friendly in terms of controlling and operating. In addition, for Antari X-310PRO it is W-DMX compatible. Prior to use, we suggest that you carefully read all of the instructions.
Never aim the output nozzle directly at people. Machine will warm up when operating, locate the fog machine in a well-ventilated area. Never cover the unit's vents. In order to guarantee adequate ventilation, allow a free air space of at least 30 cm around the sides and top of the unit. Never aim the output nozzle at open flames. Always allow your ANTARI X-310PRO Fazer to cool down before attempting to clean or service it.
Optional Accessories: 1. X-30PRO Wireless Control Module 2. FX-310 X-310PRO Flightcase -Setup 1. Remove all packing materials from shipping box. Check that all foam and plastic padding is removed, especially in the nozzle area. 2. Place fog machine on a flat surface and remove fog liquid tank cap. 3. Fill with only Antari Fog Fluid. Antari X-310PRO Fazer only works with uncontaminated Antari FLG Fog Fluid.
30 seconds, check the hose attached to the tank to make sure there is fluid going through the hose. If you are unable to determine the cause of the problem, do not simply continue pushing the control module button, as this may damage the unit. Return the machine to your ANTARI dealer immediately. -Antari X-10PRO Control Module Operation X-10PRO: The X-PRO is a 2-meter wired multifunction remotecontrol module with 5-pin XLR connector for ANTARI X-PRO series model X-310PRO.
Setting the fog output volume for timer operation - Press the button FUNCTION until the display indicates » Timer Out «. Use the buttons UP and DOWN to adjust the fog output volume in timer mode within the range of 1 % and 100 %. Setting the fog output volume for continuous operation - Press the button FUNCTION until the display indicates » Volume Out«. Use the buttons UP and DOWN to adjust the fog output volume in continuous mode within the range of 1 % and 100 %.
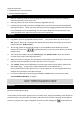
fog volume depend on the corresponding menu settings. Press the button TIMER , to activate the timer mode. The display indicates the set time interval. The unit counts down to 0 seconds and emits fog. To deactivate the timer mode, press the button TIMER again. X-10PRO REMOTE CONTROL EXTERNAL VIEW 01. Thumb Screws 02. L.C.D Screen 03. Function Keypad 04.
Press the button “A”, to emit fog. The button “A” has the same function as the button VOLUME on the control panel, i.e. the fog output depends on the setting of menu item »Volume Out«. The display indicates »Volume« followed by the defined value or »NON STOP BURST« when continuous fog output was selected. To stop the fog output, press the button “B”. * Receiver: The receiver is tested and pre-attached to the panel of each Z-30PRO. Please do not try to remove it.
In order to use 1 transmitter to control 2 or more machines, turn on the machines respectively. When the displays indicate »Wireless Setup«, press the button “A” 1 second on the transmitter within 15 seconds to establish the signal transmission. -Battery change on the transmitter If the range of the transmitter decreases, the battery is probably exhausted and must be replaced. For this purpose, take off the housing cover and remove the used battery.
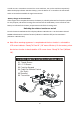
-ANTARI On-Board DMX Module Settings There are 3-pin and 5-pin male/female DMX control sockets for connecting your selection located at the rear panel of the X-310PRO fazer. The X-310PRO Fazer has on-board DMX control. This model uses two channels to control Volume output and Fan speed. Whatever channel you select on the unit, the channel next to it will automatically be selected for fan volume control. The X-310PRO fan has three fan speeds: Slow, Medium, and Fast.
container and the fog machine liquid tank immediately after filling. Do not operate the fog machine without liquid at any time. Clean with a dry cloth only. Store dry. Cleaning your fog machine regularly will help reduce costly replacement and repair charges. Note: All fog machines are prone to clogging due to the thick consistency of fog liquid and the high temperature at which it vaporizes. It is strongly recommended that after 2,000 hours of operation, do regular maintenance and services.
-DMX Connector Pin Assignment The machine provide 3 or 5 pin XLR connector for DMX connection. Diagram below indicate pin assignment information Pin Function 1 Ground 2 Data- 3 Data+ -ANTARI X-310PRO on-board DMX settings Channel A Channel B Fan Speed Volume output 171-255 (FAST) 6-255 (5%-100%) 86-170 (MEDIUM) 0-85 (SLOW) 0-5 (OFF) The X-310PRO Fazer has on-board DMX control. This model uses 2 channels to control Volume output operation and Fan operation.
ANTARI LIMITED WARRANTY Thank you for purchasing an Antari product from an authorized Antari dealer. We take great pride in the highest quality and reliability of our products. Please follow proper operation and storage procedures outlined in your accompanying user manual.Shall you require any further assistance, please kindly contact sales@antari.com Warranty shall be valid only if the product is purchased from Antari’s authorized distributors or dealers.
Nous vous félicitons pour l'achat de votre nouvelle machine à fume ANTARI X-310PRO. -Introduction Nous vous remercions d'avoir choisi une machine à fumée d'ANTARI X-310PRO. Vous êtes en possession d'un produit robuste et puissant. En vue d'utiliser correctement votre nouvel appareil, veuillez lire attentivement ce mode d'emploi. Si vous respectez les instructions suivantes, vous profiterez d'une performance solide et convaincante de votre machine à fumée ANTARI pour de nombreuses années.
que pour l'usage par des personnes adultes. Installez-le hors de l'atteinte des enfants. Ne jamais faire marcher sans surveillance.Ne jamais braquer le bec de l'appareil directement sur des personnes. Le débit de la machine à fumée est très chaud. Pendant que la machine est en marche, respectez une distance d'environ 50 cm vis-à-vis son bec. Installez l'appareil à un endroit bien aéré. Ne jamais couvrir les orifices d'aération.
1. 2. 3. 4. Une unité de machine de fumée X-310PRO avec câble Secteur X-10PRO module de contrôle Réservoir de liquid Mode d’emploi Accessoire optionnel: 1. X-30PRO module de contrôle sans fil 2. FX-310 Flight Case -Installation 1. Enlevez tout matériau d'emballage. Assurez vous d'avoir enlevé toute la mousse et le rembourrage en plastique, sûrtout au bec de la machine. 2. Placez la machine à fumée sur une surface plane et dévissez le couvercle du réservoir du liquide à fumée. 3.
Observez toujours le niveau de liquide à fumée au réservoir pendant les jets de fumée. Un emploi sans liquide à fumée peut endommager la machine. Si vous apercevez un débit trop faible, un bruit de la pompe ou la manque totale de débit, débranchez immédiatement votre machine. Vérifiez le niveau de liquide, la fusible externe, la connection à la télécommande et l'alimentation au secteur. Si tout apparaît être correct, branchez de nouveau.
Appuyez sur le bouton FUNCTION jusqu'à l'écran indique » Duration Set « [réglage de la durée]. Utilisez les boutons UP et DOWN pour ajuster la durée de chaque dégagement de fumée entre 1 à 200 secondes. - Réglage de la volume de fumée pour le fonctionnement timer Appuyez sur le bouton FUNCTION jusqu'à l'écran indique » Timer Out « [réglage du volume de fumée]. Utilisez les boutons UP et DOWN pour ajuster le volume de fumée pour le fonctionnement timer entre 1 % à 100 %.
et le mode timer. Lorsque un des modes de maniement est activé, la machine à fumée dégage tout le temps de la fumée avec volume de débit maximal quand vous presser le bouton MANUAL. - Fonctionnement timer En mode timer, l'appareil dégage automatiquement de la fumée. Les intervalles, la durée et le volume de fumée dépend des paramètres individuels du menu. Pour activer le mode timer, appuyez sur le bouton Timer. L'écran indique la alors l'intervalle ajusté et l'appareil compte les secondes à partir de 0.
Avec le transmetteur, il est possible de débiter de fumée dedans un rayon d'action de 50 mètres. Le transmetteur est compatible avec chaque récepteur de X-30PRO et peut contrôler des machines illimitée en mémé temps. Pour dégager la fumée, appuyez sur la bouton “A”. Le volume de fumée dépend de l'ajustement sous l'entrée de menu »Volume Out« [réglage du volume de fumée]. L'écran indique »Volume« et la valeur ajustée ou Nonstop Burst quand fumée continu est ajusté.
Ajuster exemple 2 : Pour utiliser un transmetteur pour contrôler deux ou plus machines, veuillez mettre les machines en service respectivement. Quand l'écran indique »Wireless Setup«, pressez le bouton “A” 1 seconde sur le transmetteur entre 15 secondes pour commencer la transmission du signal. -Changer la pile du transmetteur Quand le rayon d'action du transmetteur cesse, la pile est probablement vide et doit être remplacée. Veuillez ouvrier le couvercle et quitter la pile vide.
été testés et nettoyés. Quand vous mettez-la en service pour la première fois, appuyez sur la touche MANUAL de 3 à 5 secondes. N'essayez pas encore à activer le fonction Timer. En outre, c'est normal si l'appareil fait les bruits de pompe pour environs 5 secondes. Si la machine fonctionne correctement, vous pouvez utiliser toutes les fonctions. Il est recommandé de vider le réservoir à liquides avant un transport et de répéter la procédure ci-dessus après un transport.
-Note d'Exécution Il est recommandé, de reguler le débit du ventilatuer à 100% et le débit de brouillard entre 15 à 20%. Ce réglage garanti un débit constant de brouillard fin. Pour les effets extrêmes, appuyez sur la touche MANUAL pour un débit immédiat de 100%. MANUAL -Caractéristiques Techniques MODÈLE Te n si o n d 'a l i me n ta ti o n X - 3 1 0 P RO 1 0 0 /1 2 0 V A C , 2 3 0 /2 4 0 V A C, 5 0 /6 0 Hz 1 .0 0 0 W 1 2 5 m³ /mi n 0 ,6 8 6 p a 1 0 mi n.
Configuration de la connexion DMX La machine possède fiches XLR 3 pôles et 5 pôles pour connecter un contrôleur DMX. Le graphique ci-dessous montre la configuration des fiches. Contact Fonction 1 Masse 2 Signal- 3 Signal+ Antari X-310PRO réglage DMX Canal A Canal B Réglage du débit Réglage du ventilateur 171-255 (vite) 6-255 (5%-100%) 86-170 (moyen) 0-85 (lent) 0-5 (arrêt ) Le machine à fumée X-310PRO possède un contrôle DMX.
Wir beglückwünschen Sie zum Kauf Ihres neuen ANTARI X-310PRO NEBELGERÄTES. -Einleitung Vielen Dank, dass Sie sich für ein ANTARI X-310PRO Dunst-Nebelgerät entschieden haben. Das Modell arbeitet geräuscharm und ist überaus benutzerfreundlich in Punkto Steuerung und Bedienung. Zusätzlich ist für dieses Modell das Funk-Steuermodul X-30PRO mit DMX-Funktion (W-DMX) erhältlich. Vor Benutzung des Gerätes bitte unbedingt diese Bedienungsanleitung sorgfältig lesen.
-Brandgefahr Eigenmächtige Veränderungen am Gerät sind aus Sicherheitsgründen verboten. Öffnen Sie nie das Gehäuse um Veränderungen am Gerät vorzunehmen. Verbrennungs-gefahr. Nur für Erwachsene. Das Nebelgerät muss außerhalb der Reichweite von Kindern installiert werden. Betreiben Sie das Gerät niemals unbeaufsichtigt. Richten Sie die Nebelaustrittsdüse niemals direkt auf Personen. Der Ausstoß des Nebelgerätes ist sehr heiß. Halten Sie während des Betriebes einen Sicherheitsabstand von ca.
schwerwiegender Transportschaden vorliegt. Sollte das Gehäuse oder das Netzkabel beschädigt sein, Gerät nicht an das Netz anschließen und einschalten, sondern Ihren ANTARI-Händler um Rat fragen. Der Versandkarton sollte die folgenden Artikel enthalten: 1. 2. 3. 4. X-310PRO Fazer mit Netzkabel X-10PRO Steuermodul Fluidtank Bedienungsanleitung Erhältliches Zubehör: 1. X-30PRO Funk-Steuermodul 2. FX-310 Flight Case -Inbetriebnahme 1. Entfernen Sie jegliches Verpackungsmaterial vom Versandkarton.
5. 6. Während des Nebelns immer auf die Fluidtankanzeige achten um eine Unterbrechung des Nebeausstoßes zu vermeiden. Weitere Informationen zum Betrieb Ihres ANTARI Nebelgerätes X-310PRO finden Sie unter "Bedienung des Steuermoduls". -Achtung Während des Nebelns immer auf die Fluidtankanzeige achten. Der Betrieb eines Nebelgerätes ohne Fluid kann zu irreparablen Schäden Ihres Gerätes führen.
automatisch in einem nichtflüchtigen Speicher gespeichert. Dadurch bleiben alle Einstellungen erhalten, auch wenn die Maschine ausgeschaltet wird. -Menüeinstellungen mit der Taste FUNCTION - Zeitintervalle für den Timer-Betrieb einstellen Drücken Sie die Taste FUNCTION, bis auf der Anzeige » Interval Set « [Intervall einstellen] erscheint. Verwenden Sie die Tasten UP und DOWN, um die Zeitintervalle (d.h.
Lüfter und Heizelement ein- und ausschalten Drücken Sie die Taste FUNCTION , bis auf der Anzeige » Heater&Fan Open « erscheint. Verwenden Sie die Taste MANUAL, um den Lüfter und das Heizelement ein- [Anzeige »Open«] und auszuschalten [Anzeige »Closed«]. - Dauerbetrieb Drücken Sie die Taste VOLUME , um einen dauerhaften Nebelausstoß auszulösen.
* Sendeeinheit: Mit der Sendeeinheit lässt sich der Nebelausstoß per Funkübertragung über eine Distanz von bis zu 50 Metern auslösen. Die Sendeeinheit ist kompatibel zu allen Empfängern der X-30PRO und kann eine unbegrenzte Anzahl von Maschinen parallel steuern. Drücken Sie die Taste “A”, um den Nebelausstoß auszulösen. Die Taste “A” hat die gleiche Funktion wie die Taste VOLUME am Bedienfeld, d. h. der Nebelausstoß richtet sich nach der Einstellung im Menüpunkt »Volume Out« [Nebelvolumen einstellen].
zuvor adressiert werden. Schalten Sie dazu die Maschine ein. Drücken Sie die Taste “A” 1 Sekunde auf jeder Sendeeinheit, wenn auf der Anzeige »Wireless Setup« erscheint. Dadurch werden alle zuvor adressierten Sendeeinheiten aus dem Speicher des Empfängers gelöscht. Die Adressierung muss innerhalb von 15 Sekunden nach dem Einschalten der Maschine erfolgen. Danach wird der Einstellmodus automatisch beendet. Auf der Anzeige erscheint »Wireless Setup OK« [Funkeinstellungen OK].
B E S CHRE IB UNG X - 3 0 P RO FUNK S TE UE R- MO DUL 01.Sicherungsschraube 02.LCD-Anzeige 03.Tastenfeld 04.Anschlusskabel (2 m / 5-pol) 05.Antenne 06.Sender O FF ON -DMX-gesteuerter Betrieb Auf der Geräterückseite befinden sich 3-polige und 5-polige Buchsen zum Anschluss Ihrer Geräte. Das Dunst-Nebel-gerät X-310PRO verfügt über DMX-Ansteuerung. Das Gerät benötigt 2 Kanäle für Ausstoß und Lüfterleistung. Jeder Kanal bewegt sich innerhalb der DMX-Werte 0 bis 255.
Steuerkanal B (Ausstoßvolumen) DMX Wert Eigens c haft 0-5 Aus (0% ) 6-255 Ausstoßregulierung (5%-100%) Zwischen den Werten 0 und 5 von Steuerkanal B ist das Gerät aus.Zwischen den Werten 6 bis 255 wird der Nebelausstoß reguliert. Dabei bezieht sich der Wert 6 auf den minimalen Nebelausstoß und 255 auf den maximalen Nebelausstoß. Der Nebelausstoß steigt mit zunehmendem DMX-Wert. Zwischen den Werten 250 und 255 läuft das Gerät bei maximalem Nebelausstoß.
-Technische Daten Modell Spannungsversorgung Gesamtanschlusswert Ausstoßvolumen Ausstoßdruck Aufwärmzeit Fluidverbrauch Tankinhalt Gewıcht Maße (mm) X - 3 1 0 P RO 100/120 V AC, 230/240 V AC, 50/60 Hz 1 .0 0 0 W 1 2 5 m³ /mi n 0 ,6 8 6 p a 1 0 mi n. 4 5 mi n ./1 L , 2 S td .
Belegung der DMX-Anschlüsse Die Maschine verfügt über 3-polige und 5-polige XLR-Anschlüsse für den Anschluss an einen DMX-Controller. Die nachfolgende Grafik zeigt die Belegung der Buchsen. Kontakt Funktion 1 Masse 2 Signal- 3 Signal+ ANTARI X-310PRO DMX-Einstellungen Ka n a l A Ka n a l B Lüfterleistung Nebelausstoß 171-255 (schnell) 6-255 (5%-100%) 86-170 (mittel) 0-85 (langsam) 0-5 ( Aus) Das Dunst-Nebelgerät X-310PRO verfügt über DMXAnsteuerung.
歡迎您成為 ANTARI X-310PRO 專業特效煙霧機的使用者 感謝您選用 Antari X310PRO Fazer 專業煙霧機,此系列煙霧機除了在使用時完全靜音以外, 更增加了人性化及易控性的優點, 能選擇搭配無線 DMX 控制器,增添無限便利。使用煙霧 機之前,我們建議您先仔細閱讀此說明書,依照使用說明書中的說明,讓您在使用 Antari 專 業煙霧機時非常安全﹐輕易的達到最滿意的煙霧效果﹐也使的機器的使⽤壽命更為延⻑。 注意! 小心觸電,為避免觸電,在需要打開機殼前,請先移 除電源。本包裝中未附有服務零件,如有服務需求 敬請聯繫 Antari 代理商或洽詢合格技術人員。 請依照這份操作說明,以確保機器 再⻑期使⽤及保養上的安全性。 -重要安全準則 -避免觸電的安全使用方式: 請保持機器乾燥,僅於室內使用,本產品非為室外使用設計。 使用前請注意電壓及伏特數/赫茲數,所有機種應配合接地型插座使用。 填充煙霧油前,請先拔掉電源插頭。 不使⽤時請關閉電源﹐⻑時間不使⽤時請拔掉電源插頭。 本產品之設計為不防水,遇潮濕浸水或煙霧油滲出時請即刻拔掉插頭並擦乾機體。 -避免燃
煙霧機在運轉時機器會產生溫度,請將煙霧機放置於通風良好的地方,請勿遮蓋機器散 熱部分,為確保適度通風,機器的上方及周圍請預留最少 30CM 空間。 請勿將機器噴嘴對準火焰或易燃物。 清潔、從事維護及收納機器時,請先確認機器已經完全冷卻。 -避免爆炸的安全使用方式 請勿將任何可燃性液體 (例如油脂, 瓦斯, 香水),放置於煙霧油槽中,並請使用前詳細閱 讀說明書。 請使用代理商所推薦的 Antari 高品質 FLG 水性特效煙霧油,任意使用其他煙霧油產 品,可能導致堵管現象甚至造成內部零件腐蝕。 若您的 Antari 機器有任何不當運轉情況時,請即刻停止使用並請聯絡 Antari 經銷商, 如需送回經銷點維修時請倒出煙霧油,待機器冷卻後,仔細包好本產品(建議以原包裝) 送 至代理商或經銷商維修。 請記得在運送或郵寄本機器前,確定完全傾倒出所有在油桶中的煙霧油。 建議: 在使⽤本機之前﹐詳細的閱讀⼀次印刷在機器上蓋板及後背板的警語標示。 -拆除包裝及檢視機器 請打開包裝確認機器運作的所有設備齊全,並檢查是否有任何在運送過程中造成的損傷,如 果有發現損壞,請勿插
成人體健康的危害。因使用其他煙霧油所造成的損壞不在保固範圍之內。 -操作機器 1. 將電源線插在有接地的插座上,再將機身後方之電源開關打開至“ON”,暖機約八分鐘 直至控制器上顯示螢幕正確的顯示“ Ready to Faze ” ( 噴煙準備就緒) 為止。 2. 設定 X-10PRO 遙控器上適當的按鍵以調整需要的噴煙時間、輸出量大小及噴煙間距。 3. 控制器上的顯示螢幕會依機器運轉溫度循環顯示 “Warming up” (加溫準備) 以及 “Ready to Fazer” (準備就緒) 。 4. 當油桶中的煙霧油量過低時,機器內建的藍色 LED 會開始持續閃爍兩分鐘,接著停下動 作來保護幫浦。因此請隨時檢視油桶中的煙油量以避免煙霧輸出中斷。 5. 機器的噴嘴部分﹐為⻑條型扇葉設計﹐可藉由噴嘴兩邊的梅花型螺絲調整並固定所需求 的輸出角度。ㄧ般而言,X- 310PRO 輸出的煙霧經過風扇攪拌,已經呈現較薄的半透明 狀,將機器置放於低處,讓煙霧依自然特性遍佈,會是較佳的使用方式。 6.
X-10PRO:控制器:為⼀配有 10 公尺⻑連接線和 5 芯的 XLR 連接器的多功能搖控器,適用 於 Antari X-PRO 系列煙霧機 X-310 PRO。 其操控介面可以讓操作者藉由調整噴煙動作的間隔時間,連續動作時間和輸出煙霧量來隨心 所欲創造各種所需的效果。而其液晶顯示螢幕和內鍵記憶體可以自動記憶您上次的設定,而 不會因為因關機而遺失。 -操作說明如下: 1.
您可以利用 MANUAL 鍵,來控制電熱管和風扇的開關。 2. 按下 TIMER 鍵,可以啟動計時器,而機器會根據之前在功能鍵下對計時器模式所做的設 定來動作。如果要停止計時器功能,僅需再按 TIMER 鍵⼀下即可。 3. 按下 VOLUME 鍵,可以立刻使機器根據先前在 VOLUME OUT 模式下設定的輸出煙量 來動作﹐再按⼀ VOLUME 即可停止噴煙動作。 4.
* 設定功能: 1. 所有的接收器都能接收任何已完成對頻的發射器。 2. 每個接收器都能記憶五組發射器的訊號。 3. 每個發射器在出廠前都已經完成設定,使用者可以不用重新設定即可使用。最初的設定 為按 A 按鈕可以啓動機器,按 B 按鈕則可以停止機器運作。 4. 若使用者希望透過其他發射器來控制機器(除了原來配備的發射器之外),需要在機器開啓 的 15 秒內完成設定,否則機器會在 15 秒之後自動離開設定模式。 設定範例 (1): 若使⽤者希望設定三組發射器對⼀台機器﹐當機器啓動且 LCD 螢幕顯示「Wireless Setup」 (無線設定),請在 15 秒內分別按下這三組發射器的 A 鈕,即可完成設定配對。 請注意若 LCD 螢幕顯示「Wireless Setup OK」時,則表示 15 秒的時間已到,機器已離開 無線設定的模式,之後將無法再新增配對任何控制器。 設定範例 (2): 若使⽤者想⽤⼀個發射器配對兩台、或多台機器使用,可將希望控制的機器個別打開電源, 當 LCD 螢幕顯示「Wireless Setup」(無線設定)時,在 15 秒之內按下控制器的 A 鈕來完成 設定配對。 5.
X-10PRO 01. 02. 03. 04. (2 / 5Pin) X-30PRO 01. 02. 03. 04. (2 / 5Pin) 05. 06.
PRO 的風扇共有三段速度﹐分別為低速﹑中速和⾼速﹐無論您選擇了哪⼀個頻道來控制煙量﹐ 下⼀個頻道會⾃動地被選擇為風扇速度的控制頻道。 舉例說明:如果機器被設定在 DMX124 的位置﹐則頻道會在⼀致的 124 而 DMX125 頻道則被 ⽤來控制風扇的速度。每⼀個頻道均有 0 至 255 個控制範圍。計時器的功能,如持續和間隔 時間可由 DMX 控制器和軟體程式來設定。 請注意:X-310PRO Fazer 在新機器出廠時,油桶及油管中的油都已被清空,在首次使用機器 加熱完畢時,建議先按壓機器右下方的 MANUAL 按鍵讓機器吸取煙霧油煙順利的在機器內跑⼀ 次內循環,約 3 ~ 5 秒即可﹐不要急於設定輸出量及時間。第⼀次的輸出﹐機器會發⽣非常 短暫約 3~ 5 秒空管抽油的聲響,這是正常的情況,在機器順暢的噴出煙霧之後再進行設定 所希望的運轉模式。往後機器在進行搬運或大幅度移動之前,都建議清空油桶,再重新啟用 機器時依照上述的⽅式讓機器的煙霧油跑⼀次內循環。 DMX 連接 PIN 的接點說明 本機提供 3 Pin 或 5 Pin XLR 的 DMX 連接。下方為 Pin 的接點說明: Pin
DMX 0-85 86-170 171-255 ⼀般⽽⾔﹐風速的快慢與煙霧的濃淡成反比﹐以 100 % 煙霧輸出量為例:風扇慢速旋轉時, 煙霧的輸出最濃,當風扇高速旋轉時,煙霧的輸出較為薄透。 頻道 B 煙量輸出控制 DMX 0-5 6-255 (5 % - 100 %) 如果將 DMX 頻道 B 位置被設定在 0 至 5,則煙霧機停止動作。DMX 位置在 6 至 255 中可 以線性的控制煙霧的輸出量。在 6 的時候,煙量輸出是最小的,而在 255 的時候,煙霧機則 提供 100%的輸出。Antari X-310PRO 具有持續最大煙量輸出的特性。 -維護保養您的煙霧機 請定期的清潔您的煙霧機,將可有效的協助您降低零件更換率或維修的費用。 請勿污染煙霧油,隨時蓋上油桶的瓶蓋,及煙霧機上所裝置煙霧油桶的蓋子。 無論何時,請勿在空油桶的情況下,啟動煙霧機。 注意: 由於煙霧油黏稠的特性和高溫的汽化過程,很難完全避免機器堵管的情況發生,然而,因此 強烈建議請於 2,000 個⼩時運轉⼯作後做定期的適當保養﹐如此⼀來可以確保機器更穩定的 ⼯作及更⻑的壽命。 -儲放注意事項 為了使煙霧
-規格說明 X- 310 P RO A C1 0 0 V/ 1 2 0 V/ 2 3 0 V/ 2 4 0 V, 5 0 - 6 0 Hz 1,000 3,500 0.686 pa 10 45 ,2 , 30% (100% 2 .
DMX 連接 PIN 的接點說明 本機提供 3 Pin 及 5 Pin XLR 的 DMX 連接。下方為 Pin 的接點說明: Pin 功能 1 接地 2 數據- 3 數據+ Antari X-310PRO 內建 DMX 設定 Channel A Channel B 171-255 ( (高速) ) 6-255 (5%-100%) 86-170 ( (中速) ) 0-85 ((慢速) ) 0-5 為機器停止動作 0 至 5 為機器停止動作 6-255 為煙量輸出控制 (可以線性控制煙霧輸出量從 5%到 100%的範圍,6 為 5% 而 255 為 100%) X-310PRO 煙霧機有內建 DMX 控制功能﹐此機器利⽤⼀個頻道來控制煙霧的輸出量及下 ⼀個頻道控制風扇﹐每個頻道均有 0 至 255 的數值範圍。計時器功能如持續噴煙時間和噴 煙間隔時間,燈光特效設計師可以利用 DMX 控制器或 DMX 控制軟體來完成想要的設定。 如果 DMX 位置被設定在 0 至 5 則煙霧機停止動作。 52
DMX 位置在 6 至 255 中可以線性的控制煙霧的輸出量。在 6 的時候,煙量輸出是最小 的,而在 255 的時候,煙霧機則提供 100% 的輸出。 注意:在以上的範例中,如果機器被設定在 DMX 124 的位置,則頻道會在⼀致的 124 而 DMX125 頻道則被用來控制風扇的速度。 X-310PRO 的 Nopstop Burst (不間斷連續噴煙動作)功能無法直接由從 DMX 系統來做控制 與設定。 請仔細閱讀並妥善收存此份操作說明書 53
________________________________________________________________________________ ________________________________________________________________________________ ________________________________________________________________________________ ________________________________________________________________________________ ________________________________________________________________________________ ________________________________________________________________________________ __________________________
________________________________________________________________________________ ________________________________________________________________________________ ________________________________________________________________________________ ________________________________________________________________________________ ________________________________________________________________________________ ________________________________________________________________________________ __________________________
C08XPRO01 56