
Inc Computer Hardware User Manual


5
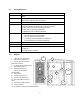
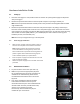
4. Lift up and remove the motherboard.
5. Screw in the brass standoffs to the threaded
holes that line up with the motherboard.
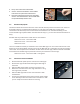
6. Place the motherboard on the brass standoffs.
Screw in the motherboard to the standoffs with
the provided Phillips-head screws.
2.4 Flexi-Drive Bay System
The Nine Hundred Two V3 comes with nine 5.25” external drive bays at the front of the case. There are
three HDD cages pre-installed inside the bottom six 5.25” bays. Each HDD cage occupies three
consecutive 5.25” drive bays and can house three hard disk drives. For maximum flexibility you can
mount the HDD cage anywhere within the external drive bays (i.e., you are not limited to the bottom six
bays).
Possible drive bay combinations include but are not limited to:
• External 3 x 5.25” + internal 6 x HDD
• External 6 x 5.25” + internal 3 x HDD
• External 9 x 5.25”
There is a middle fan bracket pre-installed on one of the HDD cages. You can install a 120 mm fan to the
bracket so the air will be blown into the case to use the HDD cage as a cooling duct to cool your graphics
card or CPU. This will prevent the installation of hard drives into this cage, however. Remove the middle
fan bracket from the HDD cage if you decide to mount your hard drives into this cage.
• External 3 x 5.25” + internal 3 x HDD + cooling duct
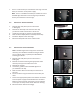
2.5 Internal 3.5” Device Installation
1. Remove both side panels per the instructions in Setting Up.
2. Remove the cage thumbscrews fastening the HDD cage to
the frame.
3. Slide the HDD cage forward out of the front of the case.
4. Mount the hard drive in the drive cage and fasten it using
the long screws provided.
5. Slide the HDD cage back into the case and fasten it with
thumbscrews.
6. Connect the appropriate connector(s) from the power supply
to the device(s). Leave some slack in the connections so that
you can easily access the fan filters for cleaning.