SLK1650_Manual_intl.
SLK1650_Manual_intl.
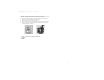
SLK1650_Manual_intl.qxd 5/14/2004 3:49 PM Page 6 At Antec, we continually refine and improve our products to ensure the highest quality. So it's possible that your new case may differ slightly from the descriptions in this manual. This isn't a problem; it's simply an improvement. As of the date of publication, all features, descriptions, and illustrations in this manual are correct. Installing the Motherboard This manual is not designed to cover CPU, RAM, or expansion card installation.
SLK1650_Manual_intl.qxd 5/14/2004 3:49 PM Page 8 connectors to the appropriate headers on your motherboard. You can use the LED I and LED II connectors as you see fit: as SCSI LED, Message LED, etc. or any other function supported by your motherboard, expansion cards, and peripherals. Connecting the USB Ports You will find a single 10-pin connector on a cable attached to the front USB ports.
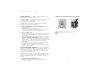
SLK1650_Manual_intl.qxd 5/14/2004 3:49 PM Page 10 You could also install an 80mm intake fan between the air guide and the case's side panel. This will further improve your system's cooling airflow. To 1. 2. 3. 4. mount the optional fan between the chassis air guide and the side panel: Remove the chassis air guide from the side panel. Attach the fan to the side panel (see Figure 1). Using the fan screws, lock the flange of the air guide to the fan (see Figure 2).
SLK1650_Manual_intl.qxd 5/14/2004 3:49 PM Page 12 Chez Antec, nous améliorons constamment nos produits pour garantir la plus haute qualité. Il est donc possible que votre nouveau boîtier diffère légèrement des descriptions fournies dans ce manuel. Ceci n'est pas un problème, seulement une amélioration. A la mise sous presse, toutes les caractéristiques, descriptions et illustrations de ce manuel sont correctes. Avis de non-responsabilité Ce manuel est un guide de référence Antec.
SLK1650_Manual_intl.qxd 5/14/2004 3:49 PM Page 14 vitesse du ventilateur à ces vitesses et pourront engendrer de faux avertissements de défaillance de ventilateur. Veuillez vous référer à votre manuel de carte mère pour une bonne installation du suivi du ventilateur. 1. 2. 3. 4. 5. Raccorder le connecteur d'alimentation ATX de 20 broches (ainsi que les connecteurs AUX ou +12V si approprié) à votre carte mère. La mise à zéro (étiquetée RESET SW) se raccorde à votre carte mère au connecteur RST.
SLK1650_Manual_intl.qxd 5/14/2004 3:49 PM Page 16 Installation du ventilateur Nous avons équipé le boîtier d'un ventilateur arrière de 120 mm et d'une cage pour ventilateur avant de 80 mm (optionnel). 4. Branchez un large connecteur de périphérique 4 broches du bloc d'alimentation au connecteur mâle 4 broches situé sur le ventilateur. Le ventilateur arrière est installé de sorte que l'air est évacué du boîtier.
SLK1650_Manual_intl.qxd 5/14/2004 3:49 PM Page 18 Wir von Antec sind stets bemüht, unsere Produkte zu verbessern und höchste Qualität zu bieten. Es kann also sein, dass Ihr neuer P160 nicht ganz der Beschreibung in diesem Handbuch entspricht. Dabei handelt es sich allerdings nicht um ein Problem, sondern eine Verbesserung. Zum Zeitpunkt der Veröffentlichung entsprechen alle Funktionen, Beschreibungen und Illustrationen dem aktuellen Stand.
SLK1650_Manual_intl.qxd 5/14/2004 3:49 PM Page 20 Lüfter angeben. Bitte konsultieren Sie das Handbuch Ihres Mainboards zur korrekten Einstellung der Ventilatorüberwachung. kann 2 externe 3,5"-Laufwerke und die untere kann 3,5 interne 2"-Laufwerke aufnehmen. 1. 1. 2. 3. 4. 5. Schließen Sie den 20-Pin-ATX-Stromanschluss (und AUX- oder 12VAnschlüsse, wenn zutreffend) an Ihr Mainboard an. Reset (mit der Beschriftung RESET SW) schließt Ihr Mainboard an den RSTAnschlussan.
SLK1650_Manual_intl.qxd 5/14/2004 3:49 PM Page 22 Lüfterinstallation Im Lieferumfang enthalten ist ein rückseitig anzubringender 120 mm Kühllüfter mit vibrationshemmenden Gummiunterlegscheiben und wahlweise ein vorne anzubringender 80mm Kühllüfter. Antec Qualität 3-Jahr-Teile und Arbeitsgarantie (AQ3) Sehen Sie Details an: http://www.antec.com/warranty.html Der rückseitige Lüfter ist so installiert, dass die Luft aus dem Gehäuse geblasen wird.
SLK1650_Manual_intl.qxd 5/14/2004 3:49 PM Page 24 La Antec è costantemente impegnata nel perfezionamento e nel miglioramento dei propri prodotti al fine di garantire la massima qualità. Per questo motivo, è possibile che il nuovo telaio risulti leggermente diverso da quello descritto nel presente manuale. Non è un problema, è solo un miglioramento. Tutte le caratteristiche, descrizioni e illustrazioni contenute nel presente manuale sono validealla data della pubblicazione. 3. 4. 5.
SLK1650_Manual_intl.qxd 5/14/2004 3:49 PM Page 26 eventualmente generano avvertimenti di errori sbagliati. Fate riferimento al 1. manuale della vostra scheda madre per l'esatta regolazione del monitoraggio della ventola. 1. 2. 3. 4. 5. Collegare alla scheda madre il connettore ATX con 20 pin (e connettori AUX o 12V se adatti). Reset (etichettato RESET SW) collega la scheda madre al connettore RST. L'etichetta dovrebbe essere rivolta verso la parte frontale del telaio.
SLK1650_Manual_intl.qxd 5/14/2004 3:49 PM Page 28 1. Liberare la gabbia della ventola stringendo le linguette. 2. Mettere la ventola nella gabbia, quindi spingerla in sede finché scatta il bloccaggio. Rimettere la gabbia della ventola in sede con bloccaggio a scatto. Collegare un grande connettore periferico a 4 pin dall'alimentatore ad un connettore maschio a 4 pin sulla ventola frontale. 3. 4.
SLK1650_Manual_intl.qxd 5/14/2004 3:49 PM Page 30 En Antec ajustamos y perfeccionamos nuestros productos para asegurar la máxima calidad. Por lo tanto, es posible que su nueva caja muestre ligeras diferencias con la descripción que aparece en este manual. No se trata de un problema, sino de una mejora. En la fecha de su publicación, todas las características, descripciones e ilustraciones de este manual son correctas.
SLK1650_Manual_intl.qxd 5/14/2004 3:49 PM Page 32 temperaturas son bajas. A estas velocidades, algunas tarjetas madre quizá no sean capaces de adecuadamente detectar la velocidad del ventilador y pueden generar falsas advertencias sobre fallas del ventilador. Favor de referirse a su manual de la tarjeta madre para la configuración adecuada de la función de supervisión del ventilador. 1. 2. 3. 4. 5.
SLK1650_Manual_intl.qxd 5/14/2004 3:49 PM Page 34 Instalación del ventilador Se ha incluido un ventilador de refrigeración de 120 mm para montaje en la parte posterior y un ventilador optativo de 80 mm para montaje frontal. Garantía de calidad de 3 años de Antec (AQ3) Vea los detalles en: http://www.antec.com/warranty.html El ventilador posterior está instalado de modo que el aire se expulsa al exterior de la caja.
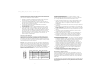
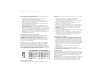
SLK1650_Manual_intl.qxd 5/14/2004 3:49 PM Page 36 SLK1650 / SLK1650B Mini Tower Case Boîtier Mini Tour Minitower Gehäuse Telaio Mini Tower Caja Minitorre 1 # 2 1 2 3 4 5 6 7 8 9 10 11 12 13 14 15 16 4 3 16 15 14 13 Description Top Panel Rear 120mm Fan blowhole Left Side Panel Front Bezel 5.25” Drive Bay Cover 3.5” Drive Bay Cover Front USB Ports Plastic Feet 3.
SLK1650_Manual_intl.
SLK1650_Manual_intl.qxd 5/14/2004 3:49 PM Page 41 Antec, Inc. 47900 Fremont Blvd. Fremont, CA 94538 tel: 510-770-1200 fax: 510-770-1288 Antec Europe B.V. Sydneystraat 33 3047 BP Rotterdam The Netherlands tel: +31 (10) 462-2060 fax: +31 (10) 437-1752 Technical Support: US & Canada 1-800-22ANTEC techsupport@antec.com Europe +31 (10) 462-2060 europe.techsupport@antec.com www.antec.com © Copyright 2004 Antec, Inc. All rights reserved. All trademarks are the property of their respective owners.