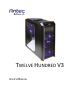
TWELVE HUNDRED V3 USER’S MANUAL
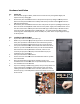
Congratulations on your purchase of the Antec Twelve Hundred V3. Antec’s Twelve Hundred V3 gaming case combines maximum performance, cooling and compatibility in a full-tower package. Thirteen drive bays, space for graphics cards as large as 17.5,” a CPU cutout, an internal 2.5” SSD drive mount and newly integrated USB 3.0 round off a robust foundation for your components.
Table of Contents Introduction 1.1 1.2 Case Specifications ....................................................................................3 Diagram......................................................................................................3 Hardware Installation Guide 2.1 2.2 2.3 2.4 2.5 2.6 2.7 2.8 2.9 2.10 Setting Up ..................................................................................................4 Motherboard Installation ................................................
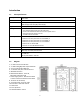
Introduction 1.1 Case Specifications Case Type Full Tower Color Black Dimensions 22.9” (H) x 8.4” (W) x 20.2” (D) 582 mm (H) x 213 mm (W) x 513 mm (D) Weight 31.3 lbs / 14.2 kg Cooling - 2 rear 120 mm blue LED exhaust fan - 1 top 200 mm Big Boy 200™ blue LED exhaust fan - 3 front 120 mm blue LED intake fans with front speed control - 1 window side panel 120 mm fan slot - 1 middle 120 mm fan bracket Drive Bays 13 Drive Bays: - External 3 x 5.25"; Internal 9 x 3.5" for HDD, or - External 6 x 5.
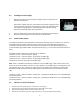
Hardware Installation 2.1 Setting Up 1. 3. Place the case upright on a flat, stable surface so that the rear panel (power supply and expansion slots) is facing you. Remove the panel thumbscrews from a side panel and o open pen it by sliding it towards yourself. Note: Place the panel thumbscrews carefully aside as they are NOT interchangeable with the HDD cage thumbscrews. Remove the panel thumbscrews from the other side panel and open it by sliding it towards you. Place the screws carefully aside.
2.3 Installing the Power Supply 1. With the case upright, place the power supply on the four silicone pads on the bottom of the case. Note: Power supplies with fans on the bottom of the power supply will need to be mounted so that the fan is facing the top of the case. Twelve Hundred V3 provides mounting holes for power supplies with standard mounting layouts to be installed upside up or upside down. 2. 3. Push the power supply to the back of the case and align the mounting holes.
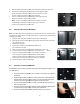
5. 6. 7. Slide the HDD cage back into the case and fasten it with thumbscrews. Connect the appropriate connector(s) from the power supply to the device(s). ce(s). Leave some slack in the connections so that you can easily access the fan filters for cleaning. There is a 120 mm fan pre-installed installed into each cage. Connect the 4-pin pin connector to the power supply. Note:: There is a middle fan bracket pre pre-installed on one of the HDD cages.
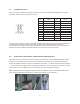
2.8 Cable Management There is a cable management compartment between the motherboard and right side panel. You can tuck or route excess cables in this compartment. 1. Remove both side panels 2. Choose the cables you would like to pass through the holes behind the motherboard tray and pull them out of the power supply chamber towards the right side of the case. 3. Use the cable ties provided to hold them in place. 4. Feed the cables back through the insertion point nearest the destination of the cable.
Connecting the Front I/O Ports Front I/O Ports and LEDs Note: Please refer to your motherboard manual for specific pin outs or location of front panel connectors. 1. Connect the Reset switch (labeled RESET SW) to the motherboard at the RST connector. Polarity (positive and negative) does not matter for switches. 2. Power Switch (labeled POWER SW) connects to the PWR connector on the motherboard. 3. There is no Power LED in this case.
3.3 AC’97/HD Audio Ports There is an Intel® standard 10-pin AC’97 connector and an Intel® 10-pin HDA (High Definition Audio) connector linked to the front panel of the case.
3.5 Rewiring Motherboard Header Connections There may come a time that you need to reconfigure the pin-out of a motherboard header connector. Examples could be for your USB header, audio input header, or some other front panel connector such as the Power Button connector. Before performing any work, please refer to your motherboard manual or your motherboard manufacturer's website to be sure of the pin-out needed for your connector.
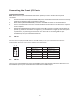
Front TriCool™ LED Intake Fans: The Twelve Hundred V3 comes with three 120 x 25 mm TriCool™ blue LED fans which are pre-installed in front of each HDD cage to cool the hard drives. These fans are installed so the air will be blown into the case. Each fan comes with a speed control knob at the front of the faceplate. Turn the knob clockwise to increase the speed. The lowest speed is 1200 rpm while the highest speed is 2000 rpm. See the following chart to get appropriate specification.
4.2 Washable Air Filters Front Air Filters – There is a filter located behind the faceplate of each HDD cage faceplates. There is a total of three front air filters that come with the case by default. To clean the filter: 1. Remove the cage thumbscrews fastening the HDD cage to the 5.25” drive bays and set them aside. 2. Slide the HDD cage forward about 1 or 2 inches. You will see the air filter behind the faceplate.
Antec, Inc. 47900 Fremont Blvd. Fremont, CA 94538 USA tel: 510-770-1200 fax: 510-770-1288 Antec Europe B.V. Stuttgartstraat 12 3047 AS Rotterdam The Netherlands tel: +31 (0) 10 462-2060 fax: +31 (0) 10 437-1752 Customer Support: US & Canada 1-800-22ANTEC customersupport@antec.com Europe europe.techsupport@antec.com www.antec.com © Copyright 2011 Antec, Inc. All rights reserved. All trademarks are the property of their respective owners.