A S S E MB LY I NSTR U C TI ONS Elevate Original Corner TM CAUTION Moving parts can crush. Use care when operating. CAUTION This table holds up to 300 lbs. of distributed weight and 90 lbs. over one leg. Part Number: ELBCzz-xx4 Anthro Corporation® | 10450 SW Manhasset Dr. | Tualatin, OR 97062 Toll-free: 800.325.3841 | Fax: 800.325.0045 | email: sales@anthro.com | anthro.com Outside the U.S. | Tel: 503.691.2556 | Fax: 503.691.
5 17 29 04 19 26 26 05 20 38 23 08 37 42 41 18 24 40 39 10 34 22 13 12 21 30 27 15 11 14 16 01 09 07 03 02 28 31 2 W E L C O ME Product Quantity Part Number 07 3.5" Grommet 2 175-5147-00 Thank you for purchasing Elevate,™Corner! If you have any questions or if we can help you in any way, please contact us at 800.325.3841. 08 Basetube End Cap 4 175-5158-32 09 Wire Managment Clip 3 175-5188-00 10 Crosstube End Cap 4 175-5190-32 This assembly requires two people.
PART S L IS T (CONTINUED) Product Quantity Part Number Product 26 20mm Socket Head Cap Screw 16 325-5272-00 27 #6-9x1" Flat Hd Screw 44 325-5716-00 28 3/4" Phillips Head Screw 4 325-5370-00 41 Leg 4 575-5018-00 29 Flat Washer 4 325-5379-00 42 Anthro Medallion 2 725-5014-00 30 Zip Tie Screw Mount 4 400-5152-00 43 Anthro 3 Way Wrench (not shown) 1 225-5196-00 44 Hex Driver (not shown) 1 375-5000-00 45 5/32" Hex Driver Bit (not shown) 1 375-5003-00 46 5mm Hex Key (not shown)
STEP 6 Assemble the Outside Legs ¡ Align a leg with the opening on the base tube so that the welded slot bracket on the legs is facing the hole on the base tube and that the cord comes out the top. Shelf Gusset (X) ¡ Attach with four Socket Head Cap Screws. Shelf Gusset (Y) Slot ¡ Repeat for the other leg. Align each shelf gusset with a leg as shown so that the side of the gusset doesn't block the cord. Slot Rear Attach each shelf gusset to a leg with four Socket Head Cap Screws.
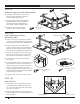
STEP 8 Assemble the Corner Base Assembly ¡ Attach a pair of Cross Tubes to one side of the Corner Shelf Cap using two Flat Washers and two 3.5" Bolts. Tighten the fasteners all the way. ¡ Repeat for the second pair of Cross Tubes. ¡ Align the Leg Plate over the Corner Shelf Cap and slide into place. Using a 7/16" socket, open end wrench, adjustable wrench, or the Anthro three-way wrench, tighten four Lock Nuts onto the threaded pins.
STEP 10 20mm Socket Head Cap Screw 325-5272-00 Connect the Legs to the Corner Base Assembly ¡ Using the 3/16" Hex Key, loosely attach the Corner Base Assembly to the Legs with Socket Head Cap Screws. ¡ Using the 5/32" Hex Driver (or the 5/32" Hex Bit and your electric driver/drill), attach the Outside Leg Assemblies to the top with 1" Button-hd PB Screws. ¡ Tighten all the screws except the outside screws on the Cross Tubes.
STEP 12 Install the Cable Troughs ¡ Align each cable trough with the flanges on each leg gusset and the pre-drilled holes on the shelf. Before installing the trough, make sure that cables are routed through the ends of the trough, not into the side of the trough. Secure the troughs to the gussets with Button Head Cap Screws. Secure the troughs to the shelf using 1" Button-hd PB Screws.
STEP 15 Home the legs ¡ Press down button until the table reaches its lowest point and stops moving. Release the button for 1-2 seconds. Press down button again for 3-5 seconds and you will see the table home itself. ¡ Press up button until the table tops at the highest point and hold for 3-5 seconds. Press the down button for 2-3 seconds, then the up button again until it tops at the highest point and hold again for 3-5 seconds. (The goal is to have the table hold at it’s highest point twice.