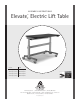
A S S E MB LY I NSTR U C TI ONS Elevate, Electric Lift Table TM Product Part# 36"w Single Surface ELTA136zz/xx4 48"w Single Surface ELTA148zz/xx4 60"w Single Surface ELTA160zz/xx4 72"w Single Surface ELTA172zz/xx4 Anthro Corporation® | 10450 SW Manhasset Dr. | Tualatin, OR 97062 Toll-free: 800.325.3841 | Fax: 800.325.0045 | email: sales@anthro.com | anthro.com Outside the U.S. | Tel: 503.691.2556 | Fax: 503.691.
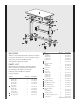
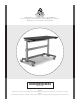
01 20 03 07 21 22 08 17 04 10 14 18 05 13 19 16 06 02 09 11 12 Product WE L C O M E Part Number Thank you for purchasing Elevate,™ Electric Lift Table! If you have any questions or if we can help you in any way, please contact us at 800.325.3841. 05 Cableway 36"w Elevate 1 48"w Elevate 1 60"w Elevate 1 72"w Elevate 1 225-2281-zz 225-2282-zz 225-2283-zz 225-2284-zz This assembly requires two people.
PART S L IS T (CONTINUED) 20 20mm Socket Head Cap Screw 16 325-5272-00 26 5mm Hex Key (not shown) 1 375-5014-00 21 3/4" Phillips Screw 4 325-5370-00 27 5/32" Hex Driver Bit (not shown) 1 375-5003-00 22 1-1/4" Button Head Screw 16 325-5178-00 28 10’ Power Cord (not shown) 1 400-5181-00 Product Product Quantity Part Number 23 Hex Driver (not shown) 1 375-5000-00 24 1/4" Hex Key (not shown) 1 375-5024-00 25 Rubber Mallet (not shown) 1 375-5022-00 Quantity Part Number 2 400-5
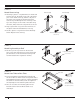
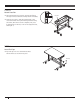
STEP 2 Attach Gusset to Legs Shelf Gusset (X) ¡ Attaching a gusset to a leg determines an outside and inside for the leg. The flange on the side of the gusset goes on the outside of the leg, and the cord goes on the inside of the leg. Before attaching the gusset, route the leg cord through the slot on the top of the leg so the cord goes to the inside of the table. Using the mallet, firmly attach the cord grommet to the slot.
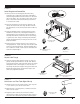
STEP 5 Install Keypad and Control Box Keypad Detail ¡ Select positions for the Keypad and Control Box, either the left or right side of the Table. Remember that the Keypad and Control Box must be on the same side of the Table. Also, the power cord comes off the back of the Control Box and should be positioned so it can reach the outlet. ¡ Place the Control Box on the shelf so that the cord outlets are at the back, then align the Box with the pre-drilled holes on the shelf. Secure with four Wood Screws.
STEP 8 Attach Cross Bar ¡ Using the keypad, move shelf all the way up. (Check the legs for excess lubricant and wipe down if needed.) Cross Bar ¡ Align the cross bar so that the tapered ends of the cross bar brackets line up with the leg brackets. Using the mallet, drive the cross bar completely into place (a few whacks on the left, a few on the right, then left, then right…). STEP 9 Insert End Caps ¡ Pop end caps into cross bar and base tubes. Use the mallet to set them into place.
STEP 10 Home the Legs Legs must be homed any time the table and legs are disconnected from power. If the legs are not homed at both the top and the bottom, the table will only move at half its normal speed. ¡ Press down button until the table reaches its lowest point and stops moving. Release the button for 1-2 seconds. Press down button again for 3-5 seconds and you will see the table home itself. ¡ Press up button until the table tops at the highest point and hold for 3-5 seconds.
Anthro Corporation® | 10450 SW Manhasset Dr. | Tualatin, OR 97062 Toll-free: 800.325.3841 | Fax: 800.325.0045 | email: sales@anthro.com | anthro.com Outside the U.S. | Tel: 503.691.2556 | Fax: 503.691.2409 *300-5373-00* 300-5373-00 Warranty: Elevate Single-surface Table has a Lifetime Warranty against manufacturing defects, two years for the electrical system. Cords and plugs are not warranted. Notices: Technology FurnitureTM and ElevateTM are trademarks of Anthro Corporation.