
User's Manual

MHPTV TX User Manual
MHPTV-USR-DOC-V3.0, 10/18/2019 Page 106 of 148
5. Local (Touch Screen) User Interface
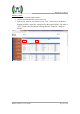
5.1 HOME SCREEN
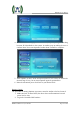
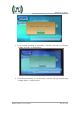
Turn on the power supply and the TX enters the initialization process, and after 5
seconds, the TX enters the home screen (as shown below).
The home screen is divided into 4 parts: Title Bar (left column), Power Metering
(upper right), Block Diagram (middle right) and Status Bar (lower right), as shown
below.
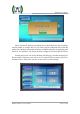
Title Bar: Shown in the picture above, the “Home” button is highlighted,
indicating the Home screen is now displayed. This TX Control Unit screen is a
touch screen. You may navigate to the other screens (Config, Log, Control, Help)
by simply touching the corresponding button in the Title Bar.
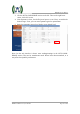
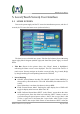
Power Metering
ON/OFF (Green) Button: Provides TX ON/OFF control. When GREEN (as
shown above), this indicates the TX is ON. When RED, this indicates the TX
is OFF.
Note: When there is an alarm, this button is always RED.
FWD: Forward Power Meter. Touching the white display box of FWD will
toggle its display units between “dBm” and “W”.
REFL: Reflected Power Meter. REJT” in the “Home” screen shows the value
of rejected power. Press the white box beside the “REJT” button, to enter a
screen showing all rejected power values. 1-PA TX has no reject load. 2-PA
TX has 1 reject load. 3-PA system has 2 reject loads. 4-PA TX has 3 reject
loads. 5-PA TX has 4 reject loads. If there is more than one “REJT” value, the