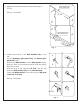
Preparation 1. After opening all boxes and packages, read this introduction carefully. Check that all of the needed parts are included in the package by marking all the components on the “Detailed Diagram of Shower Door Components”. Examine boxes and packages for shipping damage. If the unit has been damaged, has a finishing defect, or is missing parts, please contact our customer support department within 5 business days of the delivery date.
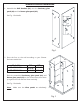
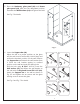
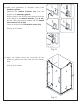
8 Detailed Diagram of Shower Enclosure Components 7 9 10 1 4 2 11 3 12 13 5 14 6 15 16 Parts List 01 02 03 04 05 06 07 08 Stationary glass panel Glass door Return glass panel Support bar Handle Hinge Wall anchor Round head screw ST4.2×25 1pc 1pc 1pc 2pcs 1pc 2pcs 6pcs 2pcs 09 10 11 12 13 14 15 16 Big head screw ST4.
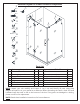
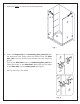
Shower Enclosure Installation 1. Assemble the Wall brackets (14) onto the Stationary glass panel (01) and the Return glass panel (03). See Fig. 1 for details. 1 2 Fig. 1 Fig. 2 2. Draw the line on the wall according to your Shower Enclosure model size. Model No SD-AZ03-01BN SD-AZ03-01CH W1 W2 34 5/16" 34 5/16" 46 5/16" 46 5/16" W1 W2 Place the assembled Stationary glass panel (01) and Return glass panel (03) on the shower base, butt them up against the wall and level them vertically. See Fig.
Glass panels must be on same level 3. Make sure the distance between the Glass panels is 23 7/8”. See Fig. 3 for details. 1 23 7/8” 2 Glass panels must be on same level 23 7/8” Fig. 3 4. Outline the position of the Wall brackets (14) on the wall. Set the Stationary glass panel (01) and Return glass panel (03) aside. Remove the Wall bracket from the Glass panels and by placing it back to the outlined position mark the drilling holes on the wall.
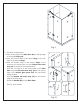
5. Place the Stationary glass panel (01) and Return glass panel (03) back into the designated position, assemble the Wall brackets (14) and tighten the bolts. See Fig. 5 for details. 1 2 Fig. 5 6. Locate the Support bar (04). Adjust the bar to a proper position on the glass and the wall. Level it horizontally. Hold it firmly and outline the bracket’s position on the wall. Remove the Support bar and detach the wall bracket from it.
. Repeat the Step 6 to mount the second support bar. Fig. 7 8. Attach the Hinges (06) to the Stationary glass panel (01) with the decorative bolts facing inside the shower. Bring the Glass door (02) into the Shower base between the two stationary glasses. Level up the Glass door next to the Stationary glass panel and fasten the hinges on the Glass Door. Make sure the top edges of the Glass door and both Glass panels are aligned. 1 See Fig. 8 and Fig. 9 for details. 2 Fig.
Fig. 9 1 4 2 5 xxx 9. Get three measurements: from the top edge of the Glass door (02) to the top edge of the upper Hinge (06); from the bottom edge of the upper Hinge to the top edge of the bottom Hinge; from the bottom edge of the bottom Hinge to the surface of the shower base Cut the Flanged anti-water strip (12) according to the measurements. Press the cut strips on to the vertical edge of the Glass door.
10. After final adjustment is complete secure both Stationary glasses. Assemble the Bottom brackets (15) onto the bottom of the Stationary glasses. Drill the holes in the Shower base through the holes in the flange of the Bottom brackets using Ø 1/8” drill bit. Fasten the bottom brackets with the Round head screw ST4.2×25 (08). Cover the screw with the Decorative covers (10). 1 4 2 5 See Fig. 11 for details. 3 Ø1/8” Fig. 11 11.
HOURS HEURES IMPORTANT WARNING: DO NOT USE THE SHOWER ENCLOSURE IN 24HOURS, SO THAT SILICONE GEL CAN GET TOTALLY DRY. Product Maintenance To ensure long lasting life for your acrylic back walls, wipe them off after each use with a soft cloth. To clean the acrylic back walls use non-abrasive sprays or cream based cleaners. Never use abrasive cleansers, metal brushes or scrapers that could scratch or dull the surface.