SHOWER DOOR INSTALLATION & CARE GUIDE For models: SD-AZ07-01 SD-AZ09-01 SD-AZ09-02 Please Note: This is a two person job. The glass doors are extremely heavy and it is highly recommended to use professional installers. For any questions or assistance simply call 1-844-44-ANZZI or visit us at www.ANZZI.com Rev.1.
Preparation 1. After opening all boxes and packages, read this introduction carefully. Check that all of the needed parts are included in the package by marking all the components on the “Detailed Diagram of Shower Door Components”. Examine boxes and packages for shipping damage. If the unit has been damaged, has a finishing defect, or has missing parts, do not accept the package and contact customer service immediately. 2.
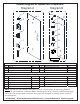
Detailed Diagrams of Shower Door Components Diagram A Diagram B 12 4 1 11 13 5 15 6 19 2 20 7 24 8 25 26 Diagram A 01 02 04 05 Glass door Handle Countersunk screw ST5×70 Hinge 1pc 1pc 8pcs 2pcs 06 07 08 Side strip ( 3 sections to cut) Bottom anti-water strip Bumper strip 1pc 1pc 1pc 17 18 19 20 Decorative screw cover Bottom bracket Anti-Water strip (Door) Anti-Water strip (Enclosure) 24 Wall bracket 1pc 1pc 1pc 1pc 2pcs Diagram B 11 12 13 15 25 26 Stationary glass Support bar Wal
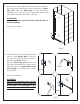
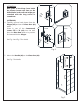
Style “A”: Single Shower Door Assembly and Installation NOTE: Use parts from Diagram “A” for the Single Shower door assembly and installation. Single Shower door 23”-30” Diagram A must be used for assembly 1. Attach the Hinges (05) to the Glass door (01). See Fig. 1 for details. ATTENTION: Never set your glass down directly onto a tile or concrete floor.
2. Place a piece of flat timber (5/8” thick) on the threshold or the shower base. Remove the corner pads from the Glass door (01). Place the Glass door on the flat timber. Carefully butt up the door with hinged side against the wall, adjust its position and level it vertically. ATTENTION: Please check with a level and be sure that the door is absolutely plumb. 5/8" See Fig. 2 for details. Fig. 2 3. Hold the door in place and mark the drill holes for both Hinges (05) on the wall.
ATTENTION: Back plate of the hinge from inside the shower locates too close to the drilled holes in the wall and might get scratched with the long screws or screwdriver. (OPTIONAL) 4. Carefully remove back plates from the Hinges (05) and set the Glass door (01) aside. Screw in rest of the Countersunk screws ST5 x 70 (04) into the wall, place the Glass door back to its position and reassemble the Hinges. inside inside inside See Fig. 4 and Fig. 5 for details. Fig. 4 5.
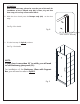
6. Get three measurements: from the top edge of the Glass door (01) to the upper body of the top Hinge (05); from the lower body of the upper Hinge to the upper body of the bottom Hinge; from the lower body of the bottom Hinge to 1/16” above the shower base. Cut the Side strip (06) according to the measurements. Notch the cut strips to be able to slide them into the Hinge to cover the space to the wall.
ATTENTION; Prior to the next step, please be sure the part of the wall for installation of the L-shaped strip (08) is clean, dry and free from soap, oil and any construction debris. 8. With the door closed press the Bumper strip (08) on the door edge. See Fig. 8 for details. Fig. 8 14”-30” large Stationary glass st be used for assembly 9. It is the last step for Style A products. See Fig. 9 for details.
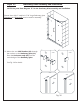
Style “B”: Stationary Glass Assembly and Installation NOTE: Use parts from Diagram “B” for the Stationary Glass assembly and installation. Shower door with 6” small or 14”-30” large Stationary glass Diagram A and Diagram B mu st be used for assembly 21. Mount the two Wall bracket (24) through the notches on the Stationary glass (11). Press the Anti-water strip (19) onto the vertical edge of the Stationary glass. outside outside See Fig. 10 for details. inside inside outside outside Fig.
22. Carefully butt the Stationary glass (11) up against the wall vertically. See Fig. 11 for details. outside inside Fig. 11 23. While securely holding the Stationary glass (11), close the Glass Door (01) and align the Stationary glass to it. If needed, adjust the position of the Stationary glass to make sure the AntiWater strip (19) makes tight contact to the Glass Door from top to bottom. Outline the position of the Wall brackets (24) on the wall from inside the shower. See Fig. 12 for details.
24. Open the Glass Door (01) and carefully set the Stationary glass (11) aside. Remove the Wall brackets (24) from the Stationary glass and replace it to the outlined position to mark the hole on the wall. Drill the hole using a Ø 5/16” drill bit, insert the Wall anchor (13) and fasten the Wall brackets to the wall with the Big flat head screws ST4.2×35 (15). inner part See Fig. 13 for details. Ø 5/16" Fig. 13 outside 25.
Style “B”: Support Bar* Assembly and Installation NOTE: Use parts from Diagram “B” for the Support Bar* assembly and installation. ATTENTION: If width of the Stationary Glass is 12” and over you must install Support Bar* for stability 27. Locate the Support bar* (12). Adjust the bar to a proper position on the glass and the wall. Level it horizontally. Hold it firmly and outline the bracket’s position on the wall. Remove the Support bar* and detach the wall bracket from it.
28. Apply the sealant along the connection of the Stationary glass to the wall and the Shower base or threshold. Use tool Silicone cleaner (25) to clean silicone. See Fig. 16 for details. Fig. 16 HOURS HEURES Waterproof Silicone IMPORTANT WARNING: DO NOT USE THE SHOWER ENCLOSURE IN 24HOURS, SO THAT SILICONE GEL CAN GET TOTALLY DRY. Maintenance To insure long lasting life for your acrylic back walls, wipe them off after each use with a soft cloth.