
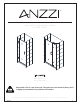
Installation Guide


3
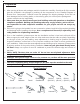
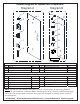
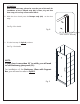
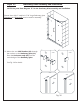
Detailed Diagrams of Shower Door Components
1
2
4
5
6
7
8
11
12
13
15
19
20
24
Diagram A
Diagram B
Diagram A
cp1 rood ssalG 10 06 Side strip ( 3 sections to cut) 1pc
cp1 eldnaH 20 07 Bottom anti-water strip 1pc
04
Countersunk screw ST5×70
scp2 egniH 50
Diagram
B
11 Stationary glass 1pc 17 Decorative screw cover 1pc
*cp1 rab troppuS 21 18 Bottom bracket 1pc
*cp1+scp2 rohcna llaW 31 19 Anti-Water strip (Door) 1pc
15
Big flat head screw ST4.2×35
2pcs+1pc* 20 Anti-Water strip (Enclosure) 1pc
* ATTENTION: All parts that marked with the star (*), not provided with 6” Stationary panel.
8pcs
08
Bumper strip
1pc
Wall bracket
2pcs
24
25
26
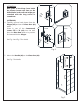
NOTE: Unpack your unit carefully and inspect it. Lay it out and identify all parts using detailed
diagram in your manual as a reference. Before discarding the carton, check for small hardware bags
that tend to fall to the bottom of the box. If any parts are damaged or missing, please contact us
for replacement.
*cp1+scp2 rohcna llaW 31 19 Anti-Water strip (Door) 1pc
15
Big flat head screw ST4.2×35
2pcs+1pc* 20 Anti-Water strip (Enclosure) 1pc
Wall bracket
2pcs
24
25
26
Silicone cleaner 1pc
Glass bottom protection seal 2pc