
Install Instructions


Residen al Standard Gas Water Heater Use and Care Guide • 17
INSTALLATION
Residen al Standard Gas Water Heater Use and Care Guide • 17
INSTALLATION
2
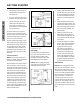
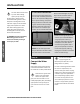
On the old water heater, turn
the control knob on the gas
control valve to the
OFF posi on.
Gas
control
knob
Figure 17 - Turn gas control/temperature knob OFF.
3
Turn the manual gas valve for
the water heater’s supply line
OFF.
4
Open a hot water faucet and
let the hot water run un l it is
cool (This may take 10 min
utes or longer).
Figure 18 - Let the hot water run until it is cool.
WARNING! Be sure the water runs
cool before draining the tank to reduce
the risk of scalding.
5
Connect a garden hose to the
drain valve and place the
other end of the hose in a
drain, outside, or in buckets. (Sedi-
ment in the bo om of the tank may
clog the valve and prevent it from
draining. If you can’t get the tank to
drain, contact a qualifi ed person.)
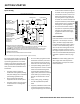
6
Turn the cold water supply
valve OFF.
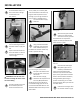
Figure 19 - Cold water supply in off position.
7
Using a standard fl at-blade
screwdriver, open the drain
valve. Sediment build up in
the bo om of the water heater may
hinder or prevent draining.
Figure 20 - Draining the old water heater.
8
Also open a hot water faucet
to help the water in the tank
drain faster.
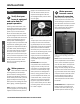
9
When the tank is empty,
disconnect the Temperature &
Pressure (T&P) Relief Valve
discharge pipe. You may be able to
reuse the discharge pipe, but do not
reuse the old T&P Relief Valve. A new
T&P Relief Valve comes with your new
water heater.
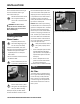
Figure 21 - Removing the T&P Relief Valve
discharge pipe.
10
Allow the vent pipe and dra
hood to cool. Once cooled,
disconnect the vent pipe from
the dra hood. You may need to
support the vent pipe un l the new
water heater is in place.
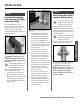
Figure 22 - Disconnect the vent pipe from the
draft hood.
11
Disconnect the water pipes.
Many water pipes are con-
nected by a threaded union
which can be disconnected with
wrenches. If you must cut the water
pipes, cut the pipes close to the water
heater’s inlet and outlet connec ons,
leaving the water pipes as long as
possible. If necessary, you can make
them shorter later when you install the
new water heater.
12
Confi rm the manual gas valve
for the water heater’s supply