
User manual


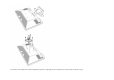


1. Remove the base.
2. Follow the manufacturer's instructions to assemble the wall mounting arm.
3. Place the wall mounting arm onto the back of the monitor. Line up the holes of the arm with the holes in the back of the monitor.
4. Insert the 4 screws into the holes and tighten.
5. Reconnect the cables. Refer to the user's manual that came with the optional wall mounting arm for instructions on attaching it to the wall.
4. Using the Monitor
Setting the Optimal Resolution
The recommended resolution for this monitor is 1680 by 1050. To setup the monitor to this resolution, follow the steps below.
1. Click START.
2. Click SETTINGS.
3. Click CONTROL PANEL.
4. Double click DISPLAY.
5. Click SETTINGS.
6. Set the resolution SLIDE-BAR to 1680 by 1050.
External Controls
Press the power button to turn the monitor on or off. The other control knobs are located at front panel of the monitor (See Figure ). By changing these settings, the
picture can be adjusted to your personal preferences.
* The power cord should be connected.
* Press the power button to turn on the monitor. The power indicator will light up.