User's Manual LCD TV L15X421 L20S421 L20W421 Q41T2001673 3A
USER’S MANUAL TABLE OF CONTENTS IMPORTANT SAFETY INSTRUCTIONS ------------------------------------- 2 PREPARATION ---------------------------------------------------------------------4 MOUNTING THE TV BASE································································ 5 OPERATING INSTRUCTIONS -------------------------------------------------7 Use of the remote control --------------------------------------------------7 To use the menus ------------------------------------------------------------8 Main menu
Glossary ------------------------------------------------------------------------25 Thank you very much for choosing the LCD TV. We recommend that you take a few minutes to read carefully through this manual before installing and switching on the TV. Please keep this manual in a safe place for your future reference. SAFETY: Lamp Disposal LAMP(S) INSIDE THIS PRODUCT CONTAIN MERCURY AND MUST BE RECYCLED OR DISPOSED OF ACCORDING TO LOCAL, STATE OR FEDERAL LAWS.
IMPORTANT SAFETY INSTRUCTIONS Read before operating equipment 1. 2. 3. 4. 5. 6. 7. Read these instructions. Keep these instructions. Heed all warnings. Follow all instructions. Do not use this apparatus near water. Clean only with a dry cloth. Do not block any of the ventilation openings. Install in accordance with the manufacturers instructions. 8. Do not install near any heat sources such as radiators, heat registers, stoves, or other apparatus (including amplifiers) that produce heat. 9.
13. The TV should be operated only from the type of power source indicated on the label. If you are not sure of the type of power supplied to your home, consult your dealer or local power company. 14. Unplug this apparatus during lightning storms or when unused for long periods of time. 15. Refer all servicing to qualified service personnel.
EXAMPLE OF ANTENNA GROUNDING AS PER NATIONAL ELECTRICAL CODE Note to the CATV system installer: This reminder is provided to call the CATV system installer’s attention to Article 820-40 of the NEC that provides guidelines for proper grounding and, in particular, specifies that the cable ground shall be connected to the grounding system of the building, as close to the point of cable entry as practical.
PREPARATION 1. Place the TV on a solid surface. Ensure that the TV is placed in a position to allow free flow of air. Do not cover the ventilation openings on the back cover. To prevent any unsafe situations, no naked flame sources, such as lighted candles, should be placed on or in the vicinity. Avoid heat, direct sunlight and exposure to rain or water. The equipment shall not be exposed to dripping or splashing. 2. Insert the aerial plug firmly into the aerial socket at the back of the TV.
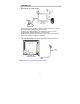
MOUNTING THE TV BASE The TV base will be separated with the TV unit. You should Install the base before you use the TV unit. Place the TV on its face on a soft blanket. Install the base stand with three screws. Place the TV on the table. Note: L15X421 does not need the screws to install.
3. Remote control: Remove the cover of the battery compartment. Insert the 2 batteries supplied (Type AAA 1.5V). 4. Power: Insert the power cord in the wall socket having an AC power supply. 5. Turn the TV on: Turn the main power switch on the right side of TV to ON. Press the secondary power button in front of the TV to turn it on. When the TV is ON, the LED may be green or Red When LED is green, the TV is working; when LED is Red, the TV is in idle mode for energy saving or Power Off.
USE OF THE REMOTE CONTROL MUTE POWER Temporarily interrupt the sound or restore it. Press to turn on/off the TV. The TV is never completely powered off unless it is physically unplugged. DISPLAY Press this button to Display Channel number on the right-top corner. 0~9/100 Digit buttons To select a TV channel. CH Press or ( or ) to browse through the TV channels,which are not erased. To view a blocked channel, use the digital buttons to access,the channel and enter your access code.
TO USE THE MENUS 1. 2. 3. 4. Press the MENU button to display or close main menu. Use the cursor up/down to select a menu item. Use the cursor left/right to enter a submenu or enable/disable the function. Press the MENU button to exit the menu. MAIN MENU Press the MENU button to enter the main OSD (On Screen Display). Adjust the items including Picture Setup, Sound setup, Child Lock Setup, Function Setup and TV setup.
When the input source is TV mode, the Sound Setup, Picture Setup, Child Lock Setup, Function Setup and TV Setup can be selected; shown in the figure below: Sound Setup (Same as in PC, TV, AV1, S-Video and Components modes) 1. The range of adjusting volume, bass and treble is from 0~100. 2. Select “ON” or “OFF” in sound selection to control the sound output. 3.
Picture Setting When the input source is in PC mode, you can select Brightness, Contrast, Position, Video noise, Sharpness, Auto Adjust, Info, Colour Temp., Red, Green, Blue and Reset to default; shown in the figure below: 1. 2. 3. 4. 5. 6. 7. 8. Brightness and Contrast: The range can be adjusted from 0~100. Position: There are two options, Horizontal and Vertical, which can be adjusted from -50 to +50. Video noise: There are two options, Phase and Clock, which can be adjusted from -50 to +50.
When the input source is in TV/AV1/S-Video/ mode, you can select Brightness, Contrast, Colour, Sharpness, Tint, Dyn. skin tone, Colour Temp., Public, Zoom and Reset to default respectively; shown in the figure below: When the input source is in Component mode, you can select Brightness, Contrast, Colour, Sharpness, Tint, White tone, Size and Reset to default respectively; shown in the figure below: 1. 2. 3.
4. 5. 6. 7. 8. Tint: The range can be adjusted from -50~+50; use this option to adjust the colour of picture. Dyn. Skin tone: When the Dynamic skin tone is ON, the skin tone of person in the picture becomes more vivid. Colour Temp.: There are three options of colour temperature provided for users - warm, normal and cold. Size: There are various functions provided for zoom in/zoom out. Reset: It is used to reset the picture settings to the factory default mode.
4. 5. 6. Sleep Timer: Set the sleeping timer and the alert function which indicates the time left. Closed Caption (CC) setting: Select CC1~CC4, TXT1~TXT4 or OFF. Reset: It is used to reset the OSD settings.
You can enter the Child Lock setting to set up the V-Chip level when you enter the correct password: 1. 3. Age: it may be set to Child, Teenager, Youth, Adult, Custom or OFF; when you select Custom, it can be set according to you preference. MPAA Rating: Select the movie ratings from low to high (alert) - G, PG, PG-13, R, NC-17, X and F. PG Rating: Shown in the figure below: 4. The empty box refers to unlocked; the solid box refers to locked. Reset to default: Reset to the factory default value. 2.
1. 2. 3. 4. 5. 6. 7. 8. Channel nr: Shows the current channel number. Tuning mode: Select the mode of TV signal - Cable\HRC Cable\IRC Cable\ Broadcast. System standard: NTSC-M, Auto. Auto search: Select "Auto Search" to search all signaled channel; when the searching is complete, it stays at the first channel with signal and all channels that have been located are stored. If you would like to stop "Auto Search" during the process, simply by pressing the function button. Fine tune: NTSC-M is seldom used.
CONNECT PERIPHERAL EQUIPMENT FRONT PANEL CONTROL KNOBS Power Key? : Press to turn on or off the TV. MENU Key? : Press to show the OSD menu and exit OSD menu at the TV. Down / Up Key? ? : Select the intended function by pressing these two keys, or switch the channels in the TV mode. + /- Key? ? : Press to confirm your function selection and adjustment volume. Source Key? : Press to select your input source. There is a wide range of video and audio equipment that can be connected to your TV.
PREPARATION Remove the back plate at the back of the TV as shown on the illustration opposite. Lay the LCD TV with the screen down on a table, as it will be easier to connect your peripheral equipment. Please take precaution not to damage the screen.
VIDEO RECORDER How to connect 1. Connect the supplied antenna cable to the RF IN port of your VCR. 2. Connect another FR cable from the port of your VCR to the antenna port of you TV set. If you have connected the video/audio cable to the video AV port, you may have better sound and picture when playing the VCR . If your VCR has an S-VHS video jack: For improved picture quality, connect a S-Video cable with the S-VIDEO input on the TV.
DVD PLAYER How to connect 1. Connect 3 separate components signal cables to the Y, Pb and Pr ports of the component signal of the DVD player, and the Y, Pb and Pr ports of the component signal of theTV set. 2. Connect the audio cable to the audio output port of the DVD player and the audio input port of the component signal of the TV set. How to use 1. Select COMPONENT. 2. Turn on the DVD set. CAMERA CAMCORDER VIDEO GAME SET… How to connect 1.
DIGITAL SET TOP BOX Connect the top box to the input port of the component signal. How to connect 1. 2. Connect 3 separate component signal cables to the Y, Pb and Pr ports of the component signal of the Digital TV/ Top Box, and the Y, Pb and Pr ports of the component signal of theTV set. Connect the audio cable with the audio port of the Digital TV/Top Box and the audio port of the TV set. How to use 1. 2. Select COMPONENT. Turn on the DVD set-Top box set.
TIPS Care of the screen Do not rub or strike the screen with anything hard as this may scratch, mar, or damage the screen permanently. Unplug the power socket before cleaning the screen. Dust the TV by wiping the screen and the cabinet with a soft, clean cloth. If the screen requires additional cleaning, use a clean, damp cloth. Do not use liquid cleaners or aerosol cleaners.
Product Specification Function 15" Screen (L15X421) Item LCD Panel Spec Screen Size 15” TFT-LCD Panel Aspect Ratio 4:3 Resolution 1024*768 (XGA) Display Area (opening) 304.128(H) × 228.096(V) HxV Pixel Pitch 0.297mm x 0.297mm Display Clors 16.2 million Lamp Type/Life 60000 hr Color Temperature VGA Function TV Function Video Input Cool / Warm/Normal Input support definition 1024*768 /60Hz Mini jack for stereo headphones Audio input (3.
Speaker (built-in): Two 2 watt speakers Audio output Audio output: L / R OSD Language English. French. German. Spanish. Portuguese. Traditional Chinese Headphone Mini-jack for stereo (3.
Function 20" Screen(L20S421) Item LCD Panel VGA Function TV Function Video Input Spec Screen Size 20” TFT-LCD Panel Aspect Ratio 4:3 Resolution 640 x480 (VGA) Display Area (opening) 408mm x 306mm HxV Pixel Pitch 0.21mm x 0.63mm Display Colors 16.2 million Lamp Type/Life 50000 hr Color Temperature Cool / Warm/Normal Input support definition 640*480 /60Hz Mini jack for stereo headphones Audio input (3.
Speaker (built-in): Two 3 watt speakers Audio output Audio output: L / R OSD Language English. French. German. Spanish. Portuguese. Traditional Chinese Headphone Mini-jack for stereo (3.
Function 20" Screen(L20W421) Item LCD Panel Spec Screen Size 20” TFT-LCD Panel Aspect Ratio 16 : 9 Resolution 1366 x768 (WXGA) Display Area (opening) 444.633mm x249.984mm HxV Pixel Pitch 108.5um x325.5um Display Clors 16.
Speaker (built-in): Two 3 watt speakers Audio output Audio output: L / R OSD Language English. French. German. Spanish. Portuguese. Traditional Chinese Headphone Mini-jack for stereo (3.
No power No picture Good picture but no sound Good sound but poor color Poor picture Snowy picture and noise Horizontal dotted line Television not responding to remote control Using a highly directional antenna may inprove the picture. *Check that the TV’s AC power cord is plugged into the mains socket. *Unplug the TV, wait for 60 seconds. Then reinsert plug into the mains socket and turn on the TV again. *Check antenna connections at the rear of the TV to see if it is properly connected to the TV.
GLOSSARY Audio / Video Inputs Located on the rear and the front of the receiver these connectors (RCA phono type plug) are used for the input of audio and video signals. Designed for use with VCRs (or other accessories) in order to receive higher picture resolution and offer sound connection options. S-Video Input Allows direct connection of high-resolution video sources, such as a Super VHS videocassette recorder, Laser Disc player, etc. Provides improved picture resolution, sharpness, and clarity.