LCD TV USER’S MANUAL TABLE OF CONTENTS INSTALLATION ---------------------------------------------------------- 1 For Your Safety ---------------------------------------------------- 1 IMPORTANT SAFETY INSTRUCTIONS ------------------------ 4 PREPARATION ---------------------------------------------------------- 6 OPERATING INSTRUCTIONS -------------------------------------- 8 Use of the remote control --------------------------------------- 8 Teletext ------------------------------------------------------
FOR YOUR SAFETY Before operating the TV please read this manual thoroughly. This manual should be retained for future reference. NOTICE The changes or modifications not expressly approved by the party responsible for compliance could void the user's authority to operate the equipment. Shielded interface cables and AC power cord, if any, must be used in order to comply with the emission limits.
Compliance Information CE Conformity for European Countries The device complies with the requirements of the EEC directive 89/336/EEC as amended by 92/31/EEC and 93/68/EEC Art.5 with regard to “Electromagnetic compatibility”, and 73/23/EEC as amended by 93/68/EEC Art.13 with regard to “Safety.” SRS and are registered trademarks of SRS Labs, Inc. This product is designed using SRS technology with permission from SRS Labs, Inc. LCD panel The LCD panel used in this product is mode of glass.
Declaration of RoHS Compliance This product has been designed and manufactured in compliance with Directive 2002/95/EC of the European Parliament and the Council on restriction of the use of certain hazardous substances in electrical and electronic equipment (RoHS Directive) and is deemed to comply with the maximum concentration values issued by the European Technical Adaptation Committee (TAC) as shown below: Substance Lead (Pb) Mercury (Hg) Cadmium (Cd) Hexavalent Chromium (Cr6+) Polybrominated biphenyls
IMPORTANT SAFETY INSTRUCTIONS Read before operating equipment 1. 2. 3. 4. 5. 6. 7. Read these instructions. Keep these instructions. Heed all warnings. Follow all instructions. Do not use this apparatus near water. Clean only with a dry cloth. Do not block any of the ventilation openings. Install in accordance with the manufacturers instructions. 8. Do not install near any heat sources such as radiators, heat registers, stoves, or other apparatus (including amplifiers) that produce heat. 9.
18. Tilt/Stability – All televisions must comply with recommended international global safety standards for tilt and stability properties of its cabinets design. y Do not compromise these design standards by applying excessive pull force to the front, or top, of the cabinet, which could ultimately overturn the product. y Also, do not endanger yourself, or children, by placing electronic equipment/toys on the top of the cabinet.
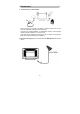
PREPARATION 1. Place the TV on a solid surface. Ensure that the TV is placed in a position to allow free flow of air. Do not cover the ventilation openings on the back cover. To prevent any unsafe situations, no naked flame sources, such as lighted candles, should be placed on or in the vicinity. Avoid heat, direct sunlight and exposure to rain or water. The equipment shall not be exposed to dripping or splashing. 2. Insert the aerial plug firmly into the aerial socket ANT IN 75Ω at the back of the TV.
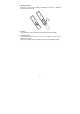
3. Remote control: Remove the cover of the battery compartment. Insert the 2 batteries supplied (Type AA 1.5V). 4. Power: Insert the power cord in the wall socket having an AC power supply . 5. Turn the TV on: Press the power button of the TV to turn it on. When the TV is ON, the indicator turns green. If the TV is in power off, the indicator in front of the TV illuminates amber.
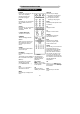
OPERATING INSTRUCTIONS USE OF THE REMOTE CONTROL DISPLAY Press this key to display: (1) the channel number when watching a TV program. (2) the input source when watching an AV program. POWER: Press to turn on/off the TV. The TV is never completely powered off unless it is physically unplugged. VIDEO Press this key you could select AV1, S-VIDEO, HDTV and HDMI. MUTE Temporarily interrupt the sound or restore it. SCART Press this key you could select SCART 1 SCART2 and SCART2-S.
TELETEXT Teletext is an information service organized like a magazine, which is provided by some TV stations in addition to regular television broadcasting. TELETEXT Press TELETEXT. The Teletext screen appears. To turn off the Teletext mode, press TELETEXT again. MIX Press MIX to superimpose the teletext over a normal broadcast picture. Press again to return to Teletext mode. SIZE Press SIZE repeatedly to display the upper teletext part, the lower teletext part and then to return to the normal.
To use the menus 1. 2. 3. Press the MENU button to display or close main menu. Use the cursor up/down to select a menu item. Use the cursor left/right to enter a submenu or enable/disable the function. 4. Press the MENU button to exit the menu. MAIN MENU Press the MENU button to enter the main OSD (On Screen Display). Adjust the items including Picture Setup, Sound setup, Options Setup, Installation Setup(TV setup) and PC Setup(only in pc mode).
Balance : adjust the balance between left / right channels as required using the < / > button. Bass : adjust the bass level as required using the < / >button. Treble : adjust the treble level as required using the < / > button. SRS WOW : Using < / >, activate(On) or deactivate(Off) SRS function. SRS is an audio technology which improve the sound quality. Reset : Return to default settings. Press OK or < / > buttons to return to default settings. Press the MENU button to exit the Sound menu.
Options Setup: This menu allows to select the language for the menus as well as the colour of the screen when there is no video input. It allows also to set an automatic shut-off time. Menu Language : To select the language for the menus. Menu Timeout : To set an automatic shut-off time for Menu. Using < / >buttons select 5>10>20>30>40>50 seconds. Menu Background : Select Opaque or Transparent type. Sleep Timer : To set an automatic shut-off time. Using < / > buttons select Off >15>30>45>60>90>120 minutes.
In PC Setup, main menu is different from the one in TV Installation Setup(TV setup). Please select PC as main input. R Gain G Gain B Gain H Position : use the < / > buttons to move the picture horizontally on the screen. V Position : use the < / > buttons to move the picture vertically on the screen. Phase : use the < / > buttons to move the picture phase on the screen. Auto Sync : this function is used to automatically adjust the VGA input. Press the < / > buttons to start the adjustment process.
Installation Setup : Installation Setup involes selecting all the settings required to be able to search for and store all the channels you can receive. Make sure that the television is switched on and follow all the steps in turn specified on this page. Auto. Installation : Select Auto. Installation. Press OK button to display the Auto. Installation. Country : Select the relevant country using the < / > buttons.
Select Man. Installation using the \/ button. Press the OK button to display the Manual. Installation menu. Use the /\ / \/ buttons to select each option. Prog. Number : Allow to select the program on which you want save a new channel or a program you want to modify. Using the < / > buttons, select the program. Frequency : Allows to enter a specific frequency for tuning. Using the \/ botton, select the Frequency option and press the OK button.
Once a channel has been found and named, use the \/ botton to select the Store prog. option. Using the < / > buttons, select Save, Insert or Delete and press the OK button to confirm. Swap prog : Allows to swap 2 programme numbers. Using the /\ / \/ buttons select the Prog. number option. Using the < / > buttons, select the program to be moved. Using the \/ botton, select the Swap prog option. Using the OK botton, enter the swap function. Using the 0-9 digit, enter the new programme number(3 digits).
INPUT SELECTION To select TV/VIDEO source: To select desire input source, press the SOURCE button to display the selection menu. Using the /\ / \/ buttons to select each input sources. Press the OK button to display the desire input source.
DTV MENU (L32W781A) First-Time Installation When the system is first switched on, the Reference Application attempts to configure itself for the first time. This is called ”First Time Installation”. The user is then asked if they wish to perform an automatic tune for services. Automatic tuning functionality is described later in this document. When the automatic tune finishes and services have been found, the lowest number service is selected and a banner describing that service is shown.
Edit Favourites Lists A favourites list enables the user to select a subset of services they consider favourite. The Reference Application allows the user to have up to five different favourites lists. Favourites lists are defined in the favourites dialog that can be accessed by selecting the favourites button on the channel list dialog and via the Main Menu. Press the OK button on your remote control to add the channel to the highlighted favourites list.
Configuration Time Zone: Press RIGHT/LEFT to select the time zone you are in. Press DTV MENU to exit this screen. (Inc. GMT/CET) DST: Press RIGHT/LEFT to select or deselect DST mode, Press DTV MENU to exit this screen. Subtitle: Press RIGHT/LEFT to select subtitle on or Off, Press DTV MENU to exit this screen. Banner: 2/4 seconds. Favorite Mode: Press RIGHT/LEFT then select to choose favourite mode. Press DTV MENU to exit this screen.
Installation Automatic Search Manual Search First Time Installation Automatic Search Automatic search is the ability for the reference application to scan each other (Frequency) for services. Whilst performing an automatic tune no service will be selected. A dialog is displayed during automatic tuning that shows the progress of the scan through the channels. The user may cancel automatic tuning.
Manual Search Manual tuning: Channel Number: Signal Quality: Signal Level Manual search allows the user to scan an individual channel (frequency) for services .The user can perform a manual tune by selecting an option on the “Main Menu”. Whilst performing a manual tune no service will be selected. The user enters the channel number to be scanned; only those channels supported by the tuner may be entered.
First time installation Choose this will return to the original condition, you can choose country as first time in installation. And search channel again. When you select it, you will see as following: Are you sure your want to delete all channels and settings for first time installation? Common Interface YES No Common Interface If no CA module is inserted, then the system display “No common interface mode detected”. If a CA module without a smartcard is inserted.
CONNECT PERIPHERAL EQUIPMENT CONTROL KNOBS / Key : Press to confirm your function selection and adjustment. 1,2: 3,4: Up / Down Key : Press to perform select function and channel. 5: MENU Key : Press to show the OSD menu and exit OSD menu. 6: Input Key : Press to select your input source. 7: Power Key : Press to turn on or off the TV. There is a wide range of video and audio equipment that can be connected to your TV. The following connection diagrams show you how to connect them.
PREPARATION Lay the LCD TV with the screen down on a table, as it will be easier to connect your peripheral equipment. Please take your precautions not to damage the screen.
VIDEO RECORDER How to connect 1. Connect the antenna cable to the RF IN port of your VCR. 2. Connect another RF cable from the port of your VCR to the antenna port of you ATV set. If you have connected the video/audio cable to the video AV port, you may have better sound and picture when playing the VCR . If your VCR has an S-VHS video jack: For improved picture quality, connect a S-Video cable with the S-Video input on the ATV.
CAMERA CAMCORDER VIDEO GAME SET How to connect 1. Connect the camera, camcorder and game set to the ports of the audio/video set. 2. The camcorder may get better picture by connecting a S-VHS cable between the S terminal and the Audio set. How to use it 1. Select the video AV or S terminal input. 2. Enable the exterior AV equipment.
HEADPHONE 1. 2. 3. The headphone jack is located at the side of the TV. The MUTE key on the remote control works on both internal speaker and the headphone. Use volume key to adjust the volume. TIPS Care of the screen Do not rub or strike the screen with anything hard as this may scratch, mar, or damage the screen permanently. Unplug the power socket before cleaning the screen. Dust the TV by wiping the screen and the cabinet with a soft, clean cloth.
BEFORE CALLING SERVICE Please make these simple checks before calling service. These tips may save you time and money since charges for receiver installation and adjustments of customer controls are not covered under your warranty.
GLOSSARY Audio / Video Inputs Located on the rear and the front of the receiver these connectors (RCA phono type plug) are used for the input of audio and video signals. Designed for use with VCRs (or other accessories) in order to receive higher picture resolution and offer sound connection options. S-Video Input Allows direct connection of high-resolution video sources, such as a Super VHS videocassette recorder, Laser Disc player, etc. Provides improved picture resolution, sharpness, and clarity.
Product Specification Feature 32” Wide screen Built-in Full channel Tuner(DTV, Analog) with DVB-T, Nicam, Teletext. Graphic (D-SUB) HDMI Items Specification Screen Size LCD Panel Contrast Ratio Brightness Response Time Lamp Type/Life 32” TFT-LCD Panel 1500:1 500cd / 6.
Items Specification Audio Speaker (built-in): 10W 10W Headphone Mini-jack for stereo (3.5ø) Output Audio Output: L / R Line Output (RCA L/R) DTV S/PDIF(RCA COAXIAL) OSD language Table Stand Wall Mount Power Supply Power Power Consumption Panel Tilt Forwards/Backwards/ Rotation English, Spanish, French, Italian, German, Dutch, Portuguese, Polish, Danish, Finnish, Swedish, Russian Included Yes AC100V~240V, 50/60Hz < 180W None Dimension W x H x D (withstand) 805.9mm x 604.95mm x 239.
Use universal/Sky remote to control AOC TVs: The power ON/STB, VOL +/-, CH Up/Dn of AOC LCD TVs (most models sold since 2006) can be operated by universal control or Sky remote control. The three digits code is "606". Setup procedures on Sky remote control: 1. Press "tv" key on SKY remote to enter TV mode, turn on AOC TV. 2. Press and hold "select" and "red" keys on Sky remote simultaneous for about 1.5 seconds until LED blinks twice. 3. Enter "606" 3 digits code. 4.