LCD TV User Manual LC32H063D LC42H063D TÉLÉVISION À HAUTE DÉFINITION INTERFACE MULTIMÉDIA HAUTE DÉFINITION 1 www.aoc.com 2010 AOC. All Rights Reserved.
This manual provides as an operational guide to user. All statements, technical information, and recommendations in this manual and in any guides or related documents are believed reliable, but the accuracy and completeness thereof are not guaranteed or warranted, and they are not intended to be, nor should they be understood to be, representations or warranties concerning the products described.
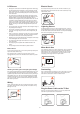
Table of Contents IMPORTANT INFORMATION ..............................................................................................................................................3 WARNING ..............................................................................................................................................................................................................................................3 CAUTION ........................................................................
Energy Star Important Information WARNING CAUTION Please keep the factory default settings as shipped, in which the product can meet Energy Star requirements. RISK OF ELECTRIC SHOCK DO NOT OPEN ATTENTION Important Safety Information RISQUE DE CHOC ELECTRIQUE, NE PAS OUVRIR PRECAUCION 1) 2) 3) 4) 5) 6) 7) Read these instructions. Keep these instructions. Heed all warnings. Follow all instructions. Do not use this apparatus near water. Clean only with a dry cloth.
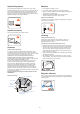
Wall-Mount Usage Instructions Wall-Mount installation requires the use of a Wall-Mount Bracket. When installing or removing the TV, using a Wall-Mount Bracket, be sure to use qualified contractors. If not properly secured during installation or removal from the Wall-Mount Bracket, the TV may fall and cause serious injury. Installation Placement It is recommended to watch the TV at a distance of 3 -7 times which of the screen height, and in moderate brightness.
LCD Screen Electric Shock Although the LCD screen is made with high-precision technology Do not touch the AC power cord or the TV with a wet hand. If you plug/unplug the AC power cord from the TV with a wet hand, it may cause electric shock. and has effective pixels of 99.99% or more, black dots or bright points of light (red, blue, or green) may appear constantly on the LCD screen. This is a structural property of the LCD panel and is not a malfunction.
Optional Equipment Batteries Do not install optional equipment too close to the TV set. Keep optional equipment at least 11.875 inches (30 cm) away from the TV set. If a VCR is installed in front of the TV set or beside the TV set, the picture may become distorted. Picture distortion and/or noisy sound may occur if the TV set is positioned in close proximity to any equipment emitting electromagnetic radiation. Do not dispose of batteries in a fire.
Install on the wall Sound 11 7/8 inches 30 cm If a snapping or popping sound from the TV is continuous or frequent while the TV is operating, unplug the TV and consult your dealer or service technician. It is normal for some TV’s to make occasional snapping or popping sounds, particularly when being turned on or off. ? 4 inches 10 cm ding~ 4 inches 10 cm Pong~ Leave at least this space around the set.
Dolby License Notice and Trademark Acknowledgement Volume Adjustment Adjust the volume so as not to trouble your neighbors. Sound carries very easily at night. Therefore, closing the windows or using headphones is suggested. When using headphones, adjust the volume so as to avoid excessive levels, as hearing damage may result. Manufactured under license from Dolby Laboratories. Dolby and the double-D symbol are trademarks of Dolby Laboratories.
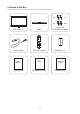
Contents in the Box After unpack the TV box, please check the TV and all accessories are well presented and undamaged.
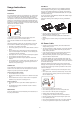
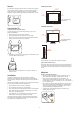
Controls & Connections 1. VOL + Press to increase the sound volume level. Volume - 2. VOL - Press to decrease the sound volume level. Channel 3. CH ▲ Press to select the next higher program number. 4. CH ▼ Press to select the next lower program number. 5. MENU Press to open or exit the OSD (on-screen display) menu. 6. INPUT Press to select the input source. Volume + Channel Menu Input Power Speaker Speaker Power Indicator IR Receiver 7.
Buttons located at the right side of the TV will operate the same as these buttons on the remote control. Button HDMI/PC LAST Description POWER Press to turn on and off the TV or target controlled device. SET Set device code for the device which you want to control. TV/DVD/STB/ AUX TV/ AV/ COMP/ HDMI/PC Press TV, DVD, STB, or AUX to switch the device which you want to control. Press TV, AV, COMP or HDMI/PC separately to select the input directly.
Button Description CC Press repeatedly to change the closed caption type as CC Off / CC On / CC On With Mute. Play Execute “Play” function on DVD or other devices. When your controlled device is TV, there is no function. Pause Execute “Pause” function on DVD or other devices. When your controlled device is TV, there is no function. Stop Execute “Stop” function on DVD or other devices. When your controlled device is TV, there is no function. Replay Execute “Replay” function on DVD or other devices.
Set-Up Inserting Batteries into the Remote control Insert two size AA batteries (supplied) to the diagram inside the battery compartment of the remote control. Attaching the Base IMPORTANT: The Base of the AOC LCD TV must be assembled prior to usage. 1. Place the TV set facing down on a soft and flat surface (blanket, foam, cloth, etc.) to prevent any damage to TV set. 2. Carefully align and insert the Base to the stand 3. Secure the screws on the bottom of the base. 4.
Connecting TV Cable System or VHF/UHF Antenna System You can enjoy standard-definition and high-definition digital programming (if available in your area), along with standard-definition analog programming. This TV is capable of receiving unscrambled digital programming for both cable and external VHF/UHF antenna. It is strongly recommended that you connect the antenna/cable input using a 75-ohm coaxial cable to receive optimum picture quality.
Composite/ S-Video Signal Connection AV IN AV AV IN S-VIDEO S-VIDEO S-VIDEO Audio PC Connection Use the TV as a monitor for your PC shown below with the HD15 to HD15 connection. This TV can also be connected to a PC with DVI or HDMI output. (Refer to the separate Quick Setup Guide.) VGA IN PC Connect the PC IN jack to the PC using the HD15- HD15 cable with ferrite core (analog RGB) and audio cable.
PC Input Signal Reference Chart After connecting the PC to the TV, set the output signal from the PC according to the chart below. Presetting PC Mode Standard Resolution Horizontal Frequency (kHz) Vertical Frequency (Hz) VESA VESA VESA VESA VESA VESA VESA VESA VESA 640 x 480 800 x 600 1024 x 768 1280 x 720 1280 x 768 1280 x 1024 1440 x 900 1680 x 1050 1920 x 1080 31.469 37.879 48.363 44.772 47.396 63.981 55.469 65.29 67.5 59.94 60.317 60.004 59.855 59.995 60.02 59.901 59.
USING AOC TV Turning the TV On and Off You can turn on the TV by using power switch button on the TV set or on the remote controller. Initial Wizard (1/8) Please select language... English Spanish French Next Cancel Navigate: Select: OK Initial Setting When you first start up this AOC LCD TV set, please follow the Initial Wizard to your AOC LCD TV. 1. Selecting Language Select your preferred language: English, Spanish or French 1 Press ▲/▼ to select “Language”, and press OK/ENTER. 2.
A. Selecting Time Zone Inital Wizard (3/8) Please select Time Zone... NST MST AST PST EST CST AKST HST Previous Cancel Navigate: 1 Select: OK Press ▲/▼/◄/► to select “Time Zone” which you located then press OK/ENTER.
B. Manually enter the time Initial Wizard (3/8) Please enter the time... Year 2010 Month Jan Day 1 Time 12:02 AM OK Previous Cancel Navigate: Select: OK Year 1 Press ▲/▼ to select “Year” then press OK/ENTER. 2 Press ◄/► to adjust then press OK/ENTER. Month 1 Press ▲/▼to select “Month” then press OK/ENTER. 2 Press ◄/► to adjust then press OK/ENTER. Day 1 Press ▲/▼ to select “Day” then press OK/ENTER. 2 Press ◄/► to adjust then press OK/ENTER.
3. Select “Eco” mode or “Vivid” mode When you turn on TV in the first time, you can choose “Eco” mode to decrease backlight level to save the power consumption or “Vivid” mode to enhance picture contrast and sharpness. Initial Wizard (4/8) Please select Eco/Vivid mode... Eco Vivid Previous Cancel Navigate: 1 Select: ENTER Press ▲/▼ to select “Eco” or “Vivid” for display setting. 4. Select TV RF tuning band Initial Wizard (5/8) Please select TV RF tuning band...
5. Search TV channel Initial Wizard (6/8) Please check if RF cable is connected properly... Start Previous Cancel Navigate: 1 Select: OK Press ▲/▼ to select “Previous” or “Cancel” for RF Tuning setting. Press OK/ENTER will execute channel searching. Initial Wizard (7/8) Searching, Please wait... Searching Analog CH CH 100 Analog Channels Found 66 Digital Channels Found 55 100% Cancel Navigate: 1 Select: OK Press ▲/▼ to select “Cancel” for RF Tuning setting.
Viewing Mode Selection For TV input with SD programs Normal Mode Zoom1 Mode Suitable for viewing conventional 4:3 programs in their normal format. Use these aspect modes to zoom in and to reduce the black bars. Wide Mode Zoom2 Mode The original content in this mode has to fill the entire screen of the display. Use these aspect modes to zoom in and to reduce the black bars. For TV input with HD programs Normal Mode Zoom1 Mode Suitable for viewing conventional 4:3 programs in their normal format.
Switching Input Source On AOC TV, you can choose signal source on the remote control directly, or press “Source” to choose the signal source on the display menu. 1. When choosing signal source on the remote control directly: Press the following keys to switch input source. HDMI/PC HDMI/PC LAST ADD FAV PHOTO 2. WIDE When using INPUT key to choose signal source: HDMI/PC Source List 0. TV 1. AV LAST 2. Component 3. VGA 4. HDMI 1 5. HDMI 2 ADD FAV 6. HDMI 3 PHOTO WIDE 7.
OSD Manual Setting Channel Search CHANNEL Cable Tuning Band Channel Strength Auto CH Search Add on CH Search Channels List Channel Labels FAV Channel Setting Move OK ENTER Select Return EXIT Exit 1 Press MENU to call out MENU. 2 Press ▲/▼ to select “Channel” 3 Press ▲/▼ to select “Auto CH Search”, and then press OK/ENTER. , and press OK/ENTER. The submenu of CHANNEL menu in TV mode shows as below. 1) Tuning Band: Select TV source signal from the Air (antenna) or Cable (CATV).
Changing Channel/Flashback On AOC TV, you can change channel on the remote control directly, or press CH ▲/▼ on the side of the TV to choose the channel. 1. Press the number keys directly to change the channel. 2. Press the CH ▲/▼ to change channel. 3. Press LAST to go to the previous channel.
Changing Volume, Mute and Sound Mode 1. Press VOL+/- to change the volume. 2. Press MUTE to mute the TV. 3. Press AUDIO to change surround mode: Music, Speech and Personal. For more details, please refer to “Adjust Audio Setting”.
Adjust Video Setting VIDEO Eco Picture Mode Brightness 48 Contrast 48 Sharpness 50 Color 63 Tint 0 Color Temp Move OK ENTER Cool Select Return EXIT Exit 1 Press MENU to call out MENU. 2 Press ▲/▼ to select “VIDEO” 3 Press ▲/▼ to select Video Settings: Picture Mode, Brightness, Contrast, Sharpness, Color, Tint, Color Temp, Noise Reduction, Adaptive Contrast, DCR, Backlight, Aspect Ratio, Preset, and press OK/ENTER to enter. 4 Press ◄/► to adjust. 5 Press EXIT to exit.
Adjust Audio Setting AUDIO Personal Sound Mode Bass 32 Treble 32 Balance 0 Audio Source Stereo SPDIF PCM On Speaker Move OK ENTER Select Return EXIT Exit 1 Press MENU to call out MENU. 2 Press ▲/▼ to select “Audio” 3 Press ▲/▼ to select Audio Settings˖Sound Mode, Bass, Treble, Balance, Audio Source, Audio Language, SPDIF, Speaker, Multi Language, AVL, SRS, Preset, and press OK/ENTER to enter. 4 Press ◄/► to adjust. 5 Press EXIT to exit. Audio Setting Items , and press OK/ENTER.
Adjust PC Setting This setting is only available in PC mode. VGA H-Position 17 V-Position 13 Clock 8 Phase 2 Auto Adjust Preset Move OK ENTER Select Return EXIT Exit 1 Press MENU to call out MENU. 2 Press ▲/▼ to select “PC” 3 Press ▲/▼ to select PC Settings: H. Position, V. Position, Clock, Phase, Auto Adjust, Preset, and press OK/ ENTER to enter. 4 Press ◄/► to adjust. 5 Press EXIT to exit. PC Setting Description H. Position Adjusts the Horizontal positioning. V.
Feature Setup FEATURE English Menu Language Time Password Setting Parental Control Closed Captions Off Analog Captions CC1 SERVICE1 Digital Captions Move OK ENTER Select Return EXIT Exit 1 Press MENU to call out MENU. 2 Press ▲/▼ to select “Feature” 3 Press ▲/▼ to select Setting items: Menu language, Time, Password Setting, Parental Control, Closed Captions, Analog Captions, etc. and press OK/ENTER to enter. 4 Press ◄/► to adjust. 5 Press EXIT again to exit. , and press OK/ENTER.
3 Press ▲/▼ to select “Time Zone”. Press ◄/► to adjust Time Zone which you located and press OK/ENTER. 4 Press ▲/▼ to select “Daylight Savings”. Press ◄/► to on/off Daylight Savings and press OK/ENTER. 5 For manually Time Mode setting, press ▲/▼ to select “Year”, “Month”, “Day”, and “Time”. Press ◄/► to adjust “Year”, “Month”, “Day”, and “Time”, and press OK/ENTER. 6 Press EXIT to exit. 3. Password Setting: Change the 4-numeral parental control password.
5. Closed Captions: Select a closed caption option. (Off / On / With Mute) 6. Analog Captions: Select an analog caption option. (CC 1-4 / TEXT 1-4) 7. Digital Captions: Select a digital caption option. (SERVICE 1-6) 8. Digital Captions Setup: Provide numerous options for setting the digital closed caption style in the sub-menu. Items Size Description Set to Automatic or Customer mode. If Custom mode is selected, user can modify the detail styles described below.
10. Input Labels: User can edit the input labels. 11. Component Setting: This option only shows and is available in component mode, which provides fine tuning component display. [Phase] – Adjust Picture Phase to reduce Horizontal-Line noise. The tuning range is from 0 to 100. [Preset] – Restore the default component setting values. 12. MultiMedia Menu: [JPEG Viewer] – This option shows the settings for the photo play function from USB storage device.
Multimedia List 1. JPEG Viewer Exit JPEG Viewer Control: Description Image Delay Set display time for each picture in slide show. There are three options: Fast, Slow, and Normal. Start Slide Show Enter Slide Show mode. Rotate Photo Rotate selected picture. (0/90/180/270). Back to Upper Folder Return to the upper folder. Back to Root Folder Return to root folder. Back To Browser Return to Browser mode. (Photo page with control menu.) Exit Exit JPEG Viewer and return to original source.
Time Shift Control: Description USB Disk Storage Format Format USB disk and locate a fix area for Time shift feature used. Start Time Shift Recording Start time shift function, freeze video and start record DTV Function. • USB Disk Storage Format: FEATURE Format Format USB Disk. It Will Erase All The Current Data ! Continue ? Yes Move OK ENTER Select 1 No Return EXIT Exit Press ◄/► to select “Yes” or “No” to format the USB Disk.
• Time Shift operation was shown as below: Time Shift 13:00:00 12:20:50 / 12:32:40 Definition • 12:20:50 Present the video time (play point). Synchronized to Timer icon. • 12:32:40 Present the live time (record point). Synchronized to Orange bar. • 13:00:00 Present the predict time. The point all buffer is just occupied. • If the predict time is crossed day line to start time. A “+” will be added to tail. See below case. Time Shift 00:30:00+ 23:40:20 / 23:49:40 Pause (Also be used to Start recording).
Troubleshooting Condition No picture No picture Cannot receive any channels TV is locked to one channel Cannot receive or select The TV turns off No picture from some video Poor picture The quality of the images is not as good as what I saw at the store Double images or ghosts Only snow and noise appear on the screen Dotted lines or stripes No color/Dark picture/Color is not correct/The picture is too bright Noisy picture Explanation / Solution Check the Power Saving settings.
Dimensions & Specifications Model LC32H063D/LC42H063D Panel size LC32H063D: 800 mm diagonal (31.
Index A N Adaptive Contrast, 27 Antenna, 6, 38 Aspect Ratio, 27 Audio, 26, 28, 37 Audio Language, 28 Audio Setting, 26, 28 Audio Source, 28 Auto Adjust, 29 Auto Search, 24 AVL, 28 Noise Reduction, 27 P Panel size, 38 PC Connection, 15 PC Setting, 29 Personal, 26 Phase, 10, 29, 37 PICTURE, 11 Picture Mode, 37 Picture Setting, 27 Power, 4, 5, 37, 38 Preset, 16, 27 Presetting PC Mode, 16 Presetting Video Mode, 16 B Backlight, 27 Balance, 28 Bass, 28 B/L control, 30 Brightness, 27 R Remote Control, 11, 17,
Appendix A Introduction: Welcome to use AOC LCD TV! This LCD TV also included one universal remote control and allows you to control up to 4 home theater devices with one easy to use, compact remote control. Just install batteries and follow the instructions in “Programming Device Control” to program the universal remote to control your equipment. PROGRAMMING DEVICE CONTROL To program this remote to control home theater devices, follow the steps below.
USING LEARNING This universal remote control includes a Learning feature (some models may not include Learning) so you can add functions that are unique to your home entertainment devices (e.g.,VCR Tracking Up or Down). However, there are some considerations. Learning Precautions Your original remote controls must be in working order for learning to work properly. Learned keys are mode-specific, so each one can store a unique function for each mode.
PROGRAMMING CHANNEL LOCK Channel control can be locked so that the Nova remote controls a single device’s channel-changing functions, regardless of operating mode. This is often enabled by users who watch all broadcast TV through one device (e.g., a cable set-top box). The affected keys are 1 through 0, CH+, CH-, and LAST. Locking All Channel Controls to One Device To lock all channel-control functions to a specific device, follow these steps: 1. 2.
4. Enter the series of commands you want the macro to execute (up to 15 commands). 5. Press and hold SET until the red LED blinks twice, and then release. Now, when you press the preset macro key , the remote sends the series of commands you have entered, regardless of what mode you are in. For example, you could program a macro key to turn on both your TV and cable box and select a particular channel. To clear the macro, repeated steps 1-5 above, but do not enter a series of commands at step 4.
Appendix B MANUFACTURER’S CODES Setup Codes for Audio Amplifiers Adcom Anthem Bose Carver Durabrand Elan GE Harman/Kardon JVC Left Coast Lenoxx Marantz McIntosh Modulaire NEC Optimus Philips Pioneer Polk Audio RadioShack RCA Realistic Shure Sony Soundesign Victor Wards Yamaha 30577, 31100 32220 30674 30892 31561 30647 30078 30892 30331 30892 31561 30892 30251 30395 30264 30395, 30823 30892 30823 30892 30395 30823 30395 30264 30689, 30815 30078 30331 30078 30354, 30133 Setup Codes for Audio Accessorie
Capetronic Carver Coby Curtis Mathes Daewoo Denon Emerson Fisher Garrard Grundig Harman/Kardon Hitachi iLive Inkel Insignia Integra iSymphony JBL JVC Kawasaki Kenwood KLH Koss Lexicon LG Linn Liquid Video Magnavox Marantz McIntosh Micromega Mitsubishi Musicmagic Myryad Nakamichi Norcent Nova Onkyo Optimus Oritron Outlaw Panasonic Philips Pioneer Polaroid Polk Audio Proscan RadioShack RCA Realistic Revox Rio Samsung Sangean Sansui Sanyo Sharp Sharper Sherwood Sherwood Newcastle Sonic Blue Sonic Frontiers Son
Setup Codes for Cable Converters A-Mark ABC Accuphase Acorn Action Active ADB Americast Amino Archer BCC Bell South British Telecom Century Cisco Clearmaster ClearMax Cool Box Coolmax Digeo Director Fosgate GE General Instrument Gibralter GMI GoldStar Hamlin Hitachi i3 Micro Insight Jerrold Memorex Mitsubishi Motorola Multitech Myrio Nova Vision Novaplex Pace Panasonic Paragon Penney Philips Pioneer Pulsar Quasar RadioShack RCA Regal Runco Samsung Scientific Atlanta Sejin Sony Sprucer Starcom Supercable S
Setup Codes for Cable/PVR Combos Americast Amino Cisco Digeo General Instrument Jerrold Motorola Myrio Pace Pioneer RCA Scientific Atlanta Sony Supercable Thomson Zenith 00899 01822 01877, 01982 01187, 02187 00810 00810 01376, 00810, 01187, 01106, 01982 01822 01877, 00237, 01982 01877 01256 01877, 01982 01006 00276 01256 00899 Setup Codes for CD Players Acoustic Research Aiwa Arcam Audio Research Burmester Cairn California Audio Cambridge Soundworks Carver Curtis Mathes Denon DKK DMX Electronics Fishe
Rotel SAE Sansui Sanyo Sharp Sherwood Sonic Frontiers Sony Sugden Sylvania Symphonic TAG McLaren Tandy Tascam Teac Technics Thule Audio Victor Wards Yamaha Yorx 30157, 30420 30157 30000, 30157 30000, 30087 30180 30180 30157 30490, 30000, 30100, 31364, 30185 30157 30157 30180 30157 30032 30393, 30420 30490, 30180, 30393, 30420 30029 30157 30072 30032, 30157, 30053, 30087 30490, 30036, 31292 30000 Setup Codes for DVD Players 3D LAB Accurian Advent Afreey Aiwa Akai Alba Alco Allegro Amphion Media Works AMW
Emerson Enterprise Entivo Enzer ESA Firstline Fisher Funai Gateway GE Go Video Go Vision GoldStar Goodmans Gradiente Greenhill Grundig Harman/Kardon Hello Kitty Hitachi Hiteker Humax iLo Initial Insignia Integra IRT JBL Jensen JMB JVC Kawasaki Kenwood KLH Kloss Koss Lasonic Lecson Lenoxx LG LiteOn Loewe Logix Magnasonic Magnavox Marantz McIntosh Medion Memorex Microsoft Minato Mintek Mitsubishi NAD Naiko NEC Nesa NexxTech Norcent Onkyo Oppo Optimus Oritron Palsonic Panasonic Philco Philips 20591, 20675, 20
Proscan ProVision Qwestar Radionette RadioShack RCA Realistic Reoc Rio Rotel Rowa Saba Sampo Samsung Sansui Sanyo Schneider Schwaiger Sensory Science Sharp Sharper Image Sherwood Sherwood Newcastle Shinsonic Slim Art Sonic Blue Sony Sova Superscan SVA Sylvania Symphonic Tatung Teac Technics Technika Terapin Tevion Theta Digital Thomson Tivo Toshiba Unimax Universum Urban Concepts US Logic V 21064, Venturer Vizio Xbox Yamaha Yamakawa Zenith Zeus Zoece 20522 20778 20651 20741 20571 20522, 20571, 20717, 20790
Setup Codes for DVD/PVR Combos Controlled by the DVD Go Video Humax LG Panasonic Philips Pioneer RCA Sharp Sony Sylvania Tivo Toshiba 21730 21500, 21588 20741 20490 21340 20631, 21512 20522 21256 21033, 21070 20675 21512 21503, 21510, 21588 Setup Codes for Home Automation Accutek Amana Bionaire Da-Lite Draper Frigidaire GE GoldStar Holmes Kenmore Lasko LG Lightolier Lutron Marmitek One For All PCS RadioShack Screen Research Security System Sharper Image SmartLinc Universal Universal X10 Whirlpool Wind
Next Level Panasonic Pansat Philips Primestar Proscan RadioShack RCA Samsung SKY Sony Star Choice Star Trak Thomson Tivo Toshiba UltimateTV Ultrasat Uniden Voom Zenith 00869 00247, 00701 01807 01142, 00749, 01749, 00775, 00819, 01076, 00722, 00099, 01442 00869 00392, 00566 00566, 00775, 00869 00392, 00566, 01142, 00775, 00855, 00143, 01392, 01442 01377, 01142, 01276, 01108, 01109, 01442, 01609 00099 00639, 01639, 01640 00869 00772, 00869 00392, 00566 01142, 01442, 01443, 01444 00749, 01749, 00790, 01285 01
Controlled by the VCR DirecTV Hughes Network Systems Philips Samsung Tivo 20739 20739 20739 20739 20739 CARE Keep the remote dry. If it gets wet, wipe it dry immediately. Use and store the unit only in normal temperature environments. Handle the remote gently and carefully. Don’t drop it. Wipe the remote with a damp cloth to keep it looking like new. Modifying or tampering with the internal parts can cause damage and invalidate the warranty.