English This manual provides as an operational guide to user. All statements, technical information, and recommendations in this manual and in any guides or related documents are believed reliable, but the accuracy and completeness thereof are not guaranteed or warranted, and they are not intended to be, nor should they be understood to be, representations or warranties concerning the products described.
Table of Contents Important Information...............................................................................................................................................3 English WARNING ...............................................................................................................................................................................................................................................3 CAUTION .............................................................
Important Safety Instructions 1) 2) 3) 4) 5) 6) 7) Read these instructions. Keep these instructions. Heed all warnings. Follow all instructions. Do not use this apparatus near water. Clean only with a dry cloth. Do not block any the ventilation openings. Install in accordance with the manufacturer’s instructions. 8 ) Do not install near any heat sources such as radiators, heat registers, stoves, or other apparatus (including amplifiers) that produce heat.
Usage Instructions Wall-Mount Wall-Mount installation requires the use of a Wall-Mount Bracket. When installing or removing the TV, using a Wall-Mount Bracket, be sure to use qualified contractors. If not properly secured during installation or removal from the Wall-Mount Bracket, the TV may fall and cause serious injury. Installation English Placement It is recommended to watch the TV at a distance of 3 -7 times which of the screen height, and in moderate brightness.
LCD/LED Screen Electric Shock Although the LCD/LED screen is made with high-precision Do not touch the AC power cord or the TV with a wet hand. If you plug/unplug the AC power cord from the TV with a wet hand, it may cause electric shock. English technology and has effective pixels of 99.99% or more, black dots or bright points of light (red, blue, or green) may appear constantly on the LCD/LED screen. This is a structural property of the LCD/ LED panel and is not a malfunction.
English Optional Equipment Batteries Do not install optional equipment too close to the TV set. Keep optional equipment at least 11.875 inches (30 cm) away from the TV set. If a VCR is installed in front of the TV set or beside the TV set, the picture may become distorted. Picture distortion and/or noisy sound may occur if the TV set is positioned in close proximity to any equipment emitting electromagnetic radiation. Do not dispose of batteries in a fire.
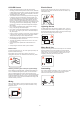
Sound Install on the wall ? ding~ 4 inches 10 cm 4 inches 10 cm Pong~ Leave at least this space around the set. 4 inches 10 cm Installed with stand Carrying the TV 11 7/8 inches 30 cm Carry the TV in the specified manner To avoid dropping the TV and causing serious injury, be sure to follow these guidelines: Before carrying the TV, disconnect all cables. Carrying the large size TV requires two or more people.
English Volume Adjustment Canadian notice Adjust the volume so as not to trouble your neighbors. Sound carries very easily at night. Therefore, closing the windows or using headphones is suggested. This Class B digital apparatus meets all requirements of the Canadian Interference Causing Equipment Regulations. When using headphones, adjust the volume so as to avoid excessive levels, as hearing damage may result. Servicing is a trademark of SRS Labs, Inc.
Contents in the Box English After unpack the TV box, please check the TV and all accessories are well presented and undamaged.
Controls & Connections English 1. Power Power 2. MENU Press to open or exit the OSD (on-screen display) menu. 3. CH Press to select the next higher program number. 4. CH Press to select the next lower program number. 5. VOL Press to increase the sound volume level. 6. VOL Press to decrease the sound volume level. 7. INPUT Press to select the input source. Menu Channel Channel VOL VOL Press to turn on / off (standby) the TV set.
Buttons located at the right side of the TV will operate the same as these buttons on the remote control. COMP Description POWER Press to turn on/off the TV. TV Press to choose TV source mode. AV Press to choose CVBS source mode. COMP Press to choose Component source mode. HDMI/PC Press repeatedly to choose HDMI or PC source mode. 0-9 Press to enter TV channel number to select channel. PRE CH Press to display the previous channel or source. VOL +/- Press + or - to adjust the volume.
Set-Up Inserting Batteries into the Remote control English Insert two size AAA batteries (supplied) to the diagram inside the battery compartment of the remote control. Attaching the Base IMPORTANT: The Base of the AOC TV must be assembled prior to usage. 1. Place the TV set facing down on a soft and flat surface (blanket, foam, cloth, etc.) to prevent any damage to TV set. 2. Carefully align and insert the Base to the TV. 3. Gently push the Base towards the TV, and then fasten the base with M3 screws .
Connecting TV You can enjoy standard-definition and high-definition digital programming (if available in your area), along with standard-definition analog programming. This TV is capable of receiving unscrambled digital programming for both cable and external VHF/UHF antenna. It is strongly recommended that you connect the antenna/cable input using a 75-ohm coaxial cable to receive optimum picture quality.
Composite Signal Connection English AV IN AV CVBS CVBS CVBS PC Connection Use the TV as a monitor for your PC shown below with the HD15 to HD15 connection. This TV can also be connected to a PC with DVI or HDMI output. (Refer to the separate Quick Setup Guide.) VGA IN PC Connect the PC IN jack to the PC using the HD15- HD15 cable with ferrite core (analog RGB) and audio cable.
PC Input Signal Reference Chart Standard Resolution Horizontal(kHz) Frequency(Hz) VESA 640 x 480 31.469 59.94 VESA 800 x 600 35.156 56.250 VESA 800 x 600 37.879 60.317 VESA 1024 x 768 48.363 60.004 VESA 1360 x 768 47.72 59.799 WXGA+ 1440 x 900 55.935 59.887 WSXGA 1680 x 1050 64.674 59.884 FHD 1920 x 1080 67.
USING AOC TV English Turning the TV On and Off You can turn on the TV by using power switch button on the TV set or on the remote controller.
Language Setting Menu language Menu timeout Sleep timer Super contrast DCR B/L Control Closed caption Analog caption Reset all Move 1 M EN U / Exit English Feature English 20S Off Off Off 100 Off Off No Select Exit Press MENU/EXIT to call out MENU. , and press OK. 2 Press ▲/▼ to select “Feature” 3 Press ▲/▼ to select "Menu Language", and press OK. 4 Press ◄/► to adjust. 5 M EN U / Exit Press MENU/EXIT to exit.
Viewing Mode Selection English 4:3 Mode Zoom1 Mode 16:9 Mode Zoom2 Mode Suitable for viewing conventional 4:3 programs in their normal format. The original content in this mode has to fill the entire screen of the display. Use these aspect modes to zoom in and to reduce the black bars. Use these aspect modes to zoom in and to reduce the black bars.
Switching Input Source On AOC TV, you can choose signal source on the remote control directly, or press Source to choose the signal source on the display menu. When choosing signal source on the remote control directly: Press the following keys to switch input source. English 1. COMP COMP PRE CH Add Fav Display Fav M EN U / Exit Wide EPG MTS CC 2.
OSD Manual Setting Channel Search English This setting is only available in TV mode. Channel Program No. Tuning mode System standard Auto search Fine tuning AFC Skip Move 1 M EN U / Exit 3 Cable NTSC-M 0 On Off Select Exit Press MENU/EXIT to call out MENU. , and press OK. 2 Press ▲/▼ to select “Channel ” 3 Press ▲/▼ to select "Tuning mode", and press OK. Select the mode of TV signal as Cable or Air. 4 Press ▲/▼ to select "System standard", and press OK. Set as NTSC-M, Auto, PAL-M or PAL-N.
Changing Channel/Flashback English On AOC TV, you can change channel on the remote control directly, or press CH ▲/▼ on the side of the TV to choose the channel. CH. 2 FM Mono 1. Press the number keys directly to change the channel. PR 2. Press the CH to change channel. 3. Press PRE CH to go to the previous channel.
Changing Volume, Mute and Sound Mode English 1. Press VOL to change the volume. 2. Press MUTE to mute the TV. 3. Press Audio to change audio mode. For more details, please refer to “Adjust Audio Setting”.
Adjust Video Setting Preset Brightness Contrast Color Tint Sharpness Noise reduction Color temp. Size Move 1 M EN U / Exit English Video Personal 50 52 56 0 50 Low Cool 16:9 Select Exit Press MENU/EXIT to call out MENU. , and press OK. 2 Press ▲/▼ to select “VIDEO” 3 Press ▲/▼ to select Video Settings: Preset, Brightness, Contrast, Color, Tint, Sharpness, Noise reduction, Color temp, Size, and press OK to enter. 4 Press ◄/► to adjust.
Adjust Audio Setting Audio English Personal 0 0 0 FM Mono Off Off Preset Bass Treble Balance Sound mode SRS AVL Move 1 M EN U / Exit Select Exit Press MENU/EXIT to call out MENU. , and press OK. 2 Press ▲/▼ to select “Audio” 3 Press ▲/▼ to select Audio Settings: Preset, Bass, Treble, Balance, Sound mode, SRS, and AVL and press OK to enter. 4 Press ◄/► to adjust. 5 M EN U / Exit Press MENU/EXIT to exit. Submenu items Description Preset Designed for different types of sound mode.
Adjust PC Setting This setting is only available in PC mode. English VGA Auto Adjust H.Position 0 V.Position 0 Clock 0 Phase 0 Move 1 M EN U / Exit Select Exit Press MENU/EXIT to call out MENU. , and press OK. 2 Press ▲/▼ to select “VGA” 3 Press ▲/▼ to select VGA Settings: Auto adjust, H.Position, V.Position. Clock, Phase and press OK to enter. 4 Press ◄/► to adjust. 5 M EN U / Exit Press MENU/EXIT to exit. PC Setting Description Auto Adjust Auto sync.
Feature Setup Feature English Menu language Menu timeout Sleep timer Super contrast DCR B/L Control Closed caption Analog caption Reset all Move 1 M EN U / Exit English 20S Off Off Off 100 Off Off No Select Exit Press MENU/EXIT to call out MENU. , and press OK. 2 Press ▲/▼ to select “Feature” 3 Press ▲/▼ to select Feature Settings: Menu Language, Menu timeout, Sleep timer, Super Contrast, DCR, B/L Control, HDMI Overscan, Closed caption, Analog caption, Reset all, and press OK.
Parental Control: This setting is only available in TV, CVBS modes. Child lock Off MPAA rating PG rating Can.English Can.French Channel Lock Source Lock Password setting Off Move 1 M EN U / Exit English Parental E E Select Exit Press MENU/EXIT to call out MENU. , and press OK. 2 Press ▲/▼ to select “Parental” 3 Press ▲/▼ to select Child lock, and press OK. Press numeric buttons to enter the password (default password is 0000).
3. PG rating: English 1 Press ▲/▼ to select PG Rating, and press OK. 2 Press ▲/▼/◄/► to select a rating, then press OK to lock or unlock the rating. The rating you locked and all higher ratings will be locked. 3 M EN U / Exit Press MENU/EXIT to exit. Note: If you lock or unlock the A (all) rating, all the ratings (D, L, S, V and FV) are locked or unlocked. 4. Can.English: 1 Press ▲/▼ to select Can.English, and press OK. 2 Select the rating you want to lock.
8. Password Setting: Press ▲/▼ to select Password Setting, and press OK. English 1 2 Enter old password Press Number Key to enter the old password. .... PR 3 Enter new password Press Number Key to enter the New password. .... PR 4 Confirm new password Press Number Key to enter the New password. .... PR 5 M EN U / Exit Press MENU/EXIT to exit.
Troubleshooting English Condition No picture No picture Cannot receive any channels TV is locked to one channel Cannot receive or select The TV turns off No picture from some video Poor picture The quality of the images is not as good as what I saw at the store Double images or ghosts Only snow and noise appear on the screen Dotted lines or stripes No color/Dark picture/Color is not correct/The picture is too bright Noisy picture Explanation / Solution Check the Power Saving settings.
Model Panel Size Resolution TV System Channel coverage LE22H138 546mm(21.5”) 1920 x 1080 NTSC standard PAL-M & PAL-N Air: 2 through 69 Cable TV: 1 through 125 LE24H138 609.7mm(24.0”) 1920 x 1080 NTSC standard PAL-M & PAL-N Air: 2 through 69 Cable TV: 1 through 125 Speaker Antenna impedance Power source Standby power consumption Video/Audio Terminals 3W x 2 75Ω 100-240V ~ 50/60Hz, 2.0A <1W Side AV x1: Video/Audio Input/Audio output. Video/Audio Input VIDEO: 1 V(p-p), 75 ohm, negative sync.
Index P Panel size, 35 PC Connection, 14 PC Setting, 28 Personal, 25 Phase, 10, 28, 34 Picture Mode, 34 Picture Setting, 26 Power, 4, 5, 34 Preset, 15, 26 Presetting PC Mode, 15 Presetting Video Mode, 15 A English Adaptive Contrast, 26 Antenna, 6, 35 Aspect Ratio, 26 Audio, 25, 27, 34 Audio Language, 27 Audio Setting, 25, 27 Audio Source, 27 Auto Adjust, 28 Auto Search, 23 AVL, 27 R Remote Control, 11, 16, 22, 24, 26, 34 Reset All, 29 Resolution, 15, 35 B BACK, 11 Backlight, 26 Balance, 27 Bass, 27 B/