
Manual


10
6. OPERATING INSTRUCTIONS
6.1 OVERVIEW
Press the switch once (Position 1 in the overview).
The display (Position 2 in the overview) is activated and
shows the charging level of the Powerpack as a
percentage (Position 13 in the overview).
6.2 CHECKING THE CHARGING LEVEL OF
THE POWERPACK
6.3 CHARGING THE POWERPACK
Use a USB charger with a 2 A output to charge the
Powerpack (not included in delivery!). Insert the USB-C
connector of the charging cable (Position 11 in the
overview) into the USB-C input (Position 3 in the
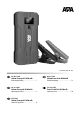
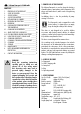
1 Switch
2 Display
3 USB-C input
4 USB output
5 LED light
6 EC5 starting help
connection
7 Control lamp Smartbox
Figure 1: Overview
8 Smartbox jump lead
9 Terminal clamp, black (-)
10 Terminal clamp, red (+)
11 USB-C charging cable
12 Bag
13 Charging level in %
14 Voltage
15 Current
16 Input / output
overview) of the Powerpack. Insert the USB-A
connector of the charging cable into the charger.
Connect the charging device to a socket.
The display shows the charging progress as a
percentage, 1% - 99%. At 100%, the battery of the
Powerpack is completely charged.
After charging, rst remove the charger from the socket
and then disconnect the charging cable from the charger
and the Powerpack.
6.4 JUMP START FOR 12 V VEHICLES
1. Switch o the ignition and all consumers on your
vehicle.
2. Ensure that the battery capacity of the Powerpack is
still at least 75% and that the battery callipers of your
vehicle battery are not soiled or oxidised.
3. Connect the Powerpack and the jump lead by
inserting the connector of the Smartbox (Position 8 in
the overview) of the jump lead into the starting help
connection (position 6 in the overview) of the Power-
pack. The LED light (Position 5 in the overview) is acti-
vated. Ensure that the connector is inserted rmly and
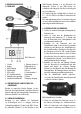
securely. The control lamp (Position 7 in the overview)
of the Smartbox ashes alternately red/green.
4. First connect the red terminal clamp (Position 10 in
the overview) of the jump lead with the positive pole,
and then the black terminal clamp (Position 9 in the
overview) with the negative pole of the vehicle bat-
tery. The terminal clamps must have a rm and secure
contact to the battery poles.
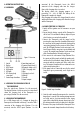
5. If the jump leads are connected correctly, the control
lamp shines green permanently, and a single tone is
issued.
Figure 2: Control lamp Smartbox
6. Start the vehicle motor. Do not operate the starter for
longer than 3 seconds. If the starting attempt was not
successful, wait at least two minutes before trying
again. After a third failed attempt, do not start a fur-
ther attempt and instead check your vehicle for faults.
7. Disconnect the jump lead from the Powerpack. Then
remove the terminal clamps from the vehicle battery.