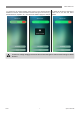
WiFi Operation Manual by 26 APAC HSNAP Series HSNAP25 HSNAP35 HSNAP50 HSNAP70 HINAP25 HINAP35 HINAP50 HINAP70 HONAP25 HONAP35 HONAP50 HONAP70 HSNAP80 HINAP80 HONAP80
TERMS & CONDITIONS 1. DEFINITIONS App means the TFIAC App you can download to your Device to operate your APAC HSNAP Series. Australian Consumer Law (‘ACL’) is Schedule 2 of the Competition and Consumer Act 2010. Device means your smart phone/ tablet (Android. 4.1+ or Apple iOS6.0+) through which you have downloaded the App.
INTRODUCTION WIFI COMPATIBILITY / CONNECTIVITY APAC Split Type Wall Mounted Air Conditioner models HSNAP25 / HSNAP35 / HSNAP50 / HSNAP70 / HSNAP80 are fitted with built-in WiFi connectivity. Using the TFIAC App (available from Apple App Store or Google Play) it is then possible to use a smart phone or tablet to operate these appliances remotely. A WiFi router (paired with the appliance via the App) is used to control the Air Conditioner(s).
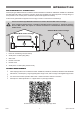
WIFI SET UP Pairing With a Mobile Device & WiFi Network 1. Follow the instructions provided with the Air Conditioner to turn on the Air Conditioner that is to be paired. 2. Select the mobile device for pairing (for best results only pair one mobile device and one AC device at a time). 3. Open the App, if prompted, give the App permission to use the mobile device's camera. WiFi WiFi ONLY one device may be paired at a time! WiFi -- 4.
WIFI SET UP 5. An APAC welcome page is displayed briefly to confirm a successful activation. The Device List page will open, select Add device to continue on to the configuration page and the name of WiFi network selected in step 2 will automatically fill the WiFi name: field to confirm that this network was found. -- 6. Enter the password for the WiFi network into the Password: field and select Start the configuration.
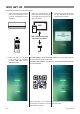
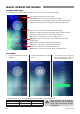
WIFI SET UP DEVICE LIST PAGE After opening the App the Device List page is displayed, select the desired AC device that you wish to control.
WIFI SET UP To change the AC devices display name, press on the desired device’s name for 3 seconds. Select the Name text field and type a new name (e.g. Master Bedroom, Upstairs, etc.), then press the save to apply the change. NOTE APAC To delete an AC device, slide device name bar to the left and select delete. To effect no change simply press the AC device name bar again to exit the name change or delete function.
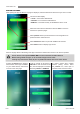
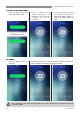
BASIC OPERATION MODES STANDBY MODE PAGE Air Conditioner is plugged in with the power turned on, but is not in an operational mode.
BASIC OPERATION MODES COOLING & HEATING MODES 1. Press the Mode button and select either Cool or Heat. 2. Press < or > button to set the desired temperature. The temperature can be set within a range of 16 ~ 31°C in 1 increments. 3. Press the FAN button to select the desired fan speed from Auto, Low, Med, or High, the default fan speed setting is Auto. FAN MODE 1. Press the Mode button and select Fan. NOTE APAC 2.
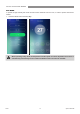
BASIC OPERATION MODES DRY MODE In periods of high humidity this mode removes excess moisture from the room, in order to prevent mould and mildew. 1. Press the Mode button and select Dry. NOTE APAC When operating in Dry mode, the temperature and fan speed can not be adjusted as these are It is automatically controlled by the unit. Turbo and ECO functions are also not available.
ADVANCED OPERATION MODES TIMER OPERATION There are two types of timers that can be set to control AC operations automatically at desired time intervals: Timer on turns on the AC appliance at specified times and or days using a set of pre-selected parameters. Timer off turns off the AC appliance at specified times and or days. Both the on and off timers can be set for either a single non-repeating operation or for continued periodic operation.
ADVANCED OPERATION MODES CREATING AN OFF TIMER Available Off Timer Setting Parameters Off Time - sets the time the appliance will turn off 1. Press the Timer button to open the Timer Setting page. Weekly-Timer Setting - sets periodic repeat operation 2. Select the Timer off tab and press the plus (+) symbol to create a new timer setting, using the desired Timer Setting parameters. 3. Tap Save the create the new timer and return to the Timer Setting list page.
ADVANCED OPERATION MODES SWING MODE 1. To start or stop swing motion of the louvres, press the Swing button to open the Swing page. 2. To start or stop up/down swing of the louvres press the VerticalWind button. 3. To start or stop left/right swing of the louvres (where fitted) press the Horizontal-Wind button. TURBO MODE This mode allows you to cool indoor air quickly in summer or warm it quickly in winter. 1.
ADVANCED OPERATION MODES TURBO MODE OPERATING PARAMETERS In COOLING mode, the unit is set to 16°C, auto fan speed and continuous circulation of vertical & horizontal flow. In HEATING mode, the unit set to 31°C, auto fan speed and continuous circulation of vertical & horizontal flow. NOTE Once the room temperature has reached a comfortable level, press the Turbo button again to deactivate the Turbo function and return the AC appliance back to normal cooling or heating operation.
ADVANCED OPERATION MODES 1. Confirm that Cool, Heat or Auto modes are selected, Sleep mode is not available in any other mode. 2. Press Sleep button to turn on start Sleep function. 3. Pressing the "SLEEP" button again will cancel sleep mode. NOTE APAC While Sleep mode is on, any attempt to change modes will also cancel the Sleep mode function.
CONTACTS by Product Sales and Service Australia Pty. Ltd. Head Office National Helpline (Mon-Fri 8am - 5.30pm EST) Phone: 1300 555 545* Fax: 1300 555 655* 100 Atlantic Drive, Keysborough VIC 3173 E-mail: enquiry@rinnai.com.au For further information visit: www.rinnai.com.au P.O. Box 460 Braeside, Victoria 3195 ABN 74 005 138 769 AU45204 Rinnai has a Service and Spare Parts network with personnel who are fully trained and equipped to give the best service on your Rinnai appliance.