User Manual
For your Safety Warning To prevent electric shock or other injury, please do not disassemble or repackage this product. To prevent a fire, electric shock, or device malfunction, please do not use this product in a wet environment such as a bathroom. During operation, do not expose the product in areas above 35°C (95°F) or below 5°C (41°F).
Table of contents Chapter 1 Introduction................................................................ 1 Features....................................................................................... 1 System Requirements.................................................................. 1 Chapter 2 Package Contents ..................................................... 1 Chapter 3 The Remote Control .................................................. 2 Changing the Battery of the Remote Control ..........
Chapter 1 Introduction Features Plays back most media file formats. Plays media files from your PC with Apacer wireless adapter via wireless network. (Apacer wireless adapter is optional) Built-in 2.5” SATA II HDD. Supports USB external storage devices. Supports NTFS, FAT32 and HFS+ file systems. Supports both NTSC and PAL TV systems. Supports video output to full-HD 1080p. Supports HDMI and component video output. System Requirements Supported OS: Windows 2000/ME/XP/Vista/Win 7, Mac OS 10.
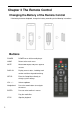
Chapter 3 The Remote Control Changing the Battery of the Remote Control If the battery becomes depleted, change the battery according to the following instructions: Buttons POWER POWER on or off the media player. HOME Return to the main menu. MUTE Mute audio output, and press again to resume. DISPLAY Display current status, including track number and time elapsed/remaining. SETUP Enter the Setup Menu directly to change system settings. VOL + / Navigational Volume up/down.
RETURN Return to the previous screen when navigating the menus. FAST Press to fast rewind or fast forward the current playback. REWIND/FAST Press repeatedly to select faster rewind or fast forward speeds. FORWARD PAUSE/STEP Press to pause current playback. Press again to step to the next frame. Press ENTER button to resume playback. PREVIOUS Press to go the previous file when playing media. Press to page up the file list at File Browser. NEXT Press to go the next file when playing media.
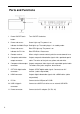
Parts and Functions 1 Power ON/OFF touch Turn ON/OFF the device button: 2 Power and access Green Lights up: The power is on. indicator for Media Player: Red Lights up: The media player is in standby mode. 3 Power and access Blue LED Lights up: The power is on indicator for PC Link: Blue LED Blinks: Data access 4 Remote receiver: When using the remote control, point the remote towards here.
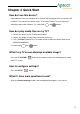
Chapter 4 Quick Start How do I use this device? Copy media files from your computer to an external USB storage device or an internal USB hard drive. Then connect this device to your TV or Home Theater. The User Interface is somewhat intuitive like a Browser. Try starting with and buttons. How do I play media files on my TV? 1. Connect this device to your TV with correct cables. 2. Plug the AC adapter into the Power Connector to turn it on. 3.
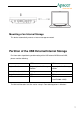
Chapter 5 USB Connection Mounting the USB External Storage Compatibility 1. This device supports FAT16/32, NTFS, and HFS+ file systems. 2. This device supports external USB HDDs, USB Flash drives, and USB card readers. 3. This device does not support USB external CD/DVD/BD/HDDVD/other ODD drives. Mounting of a USB External Storage This device automatically mounts a USB external storage connected. Mounting the Internal Storage Compatibility 1. This device supports FAT16/32, NTFS, and HFS+ file systems. 2.
Mounting of an Internal Storage This device automatically mounts an internal storage connected.
* The Disk Management of Windows Vista/XP/2000 can only create a FAT32 partition up to 32GB. Media Files for Playback This device can play back the following media files: Video Photo** Audio Subtitle MPEG-1 (MPG/DAT), MPEG-2 JPEG MP3 SRT (AVI/ISO/IFO/MPG/VOB), BMP WMA SUB MPEG-4 (AVI/Xvid/ASP/AVC GIF WAV SMI HD/H.264), WMV, FLV, MKV, TIF LPCM/PCM SUB+IDX RM/RMVB, TS, m2ts, mts, TP, PNG AAC SSA MJPEG, MOV, VC-1 OGG FLAC Dolby@ Digital AC3* DTS@ * 2-Channel only.
Chapter 6 TV Connection Connecting to AV Equipments HDMI Connection The HDMI connector can output both digital audio/video signals. Many HDTV sets and digital AV receivers support this type of connection. (HDMI cable not provided) To a TV: To an AV receiver: If the HDMI cable is disconnected in playback, this device will stop playback immediately.
Composite Audio/Video Connection The composite audio/video is compatible with most TV sets and AV amplifiers (receivers.) Yellow: Video signal; White: Left audio channel; Red: Right audio channel. 1. Connect one end of the composite (Red, White, Yellow) cable to the player’s composite jack. 2. Connect the other end to your television’s composite jack. Component Video Connection (Y/Pb/Pr) If your TV supports Component Video input (Y/Pb/Pr), you can connect it for better video quality.
OPTICAL Audio Connection For a high quality digital audio, you can connect this connector to an AV receiver which is equipped with a digital audio decoder. (Cable not provided) Power Connection 1. Connect the DC jack of the AC adapter to the connector marked “DC 5V”, plug the other end into an electrical outlet. Network Connection (Supports wireless LAN only with Apacer wireless adapter) 1. Connect the Apacer wireless dongle to the player’s USB connector.
Power on/off 1. Power on Touch the power button which is located at the front of the device. After the player is on, the power indicator on the front panel will light up. The device will then boot to the media player’s user interface. 2. Power off Press the power button on the remote control or touch the power button which is located at the front of the device. The user interface of the media center will be off, but the unit will still be on. This is indicated when the power led light is red.
Chapter 7 Main Menu 1. Power on the media player. 2. After a few second, the system will enter a main menu. To enter the main menu, press on the remote control too. 3. Press to select All, Music, Movies, or Photo, Setup, option on the main menu, and press to select. Press to enter. Chapter 8 Setup The Setup option allows you to configure music, video, network, photo and system settings. Select Setup option on the main menu or select on the remote control to enter the Setup menu.
Digital Output 1. Press to enter. 2. Press or to select from HDMI RAW, HDMI LPCM, HDMI LPCM MULTI CH, SPDIF LPCM, and SPDIF RAW to enable or disable the function. 3. Press to confirm or press to exit. HDMI LPCM: It is the default setting, and provides 2 channels audio output. HDMI RAM: It is the original bit stream and will provide a better audio output quality. HDMI LPCM It is the original LPCM multi channel audio output.
16:9: Compress the image to convert the whole image. Select when a 16:9 TV is connected. Brightness Select to set brightness levels. 1. Press 2. Press to enter. or to adjust brightness. The new setting is previewed on screen. to confirm or press 3. Press to exit. Contrast Select to set contrast levels. 1. Press 2. Press to enter. or to adjust contrast. The new setting is previewed onscreen. 3. Press to confirm or press to exit. DNR Select to adjust DNR. 1. Press 2. Press to enter.
TV System Use it to select the video display resolution. to enter. 1. Press 2. Press and on the remote control to set the TV system, depending on your TV resolution. 3. Press to confirm or press to exit. Note: By pressing TV SYSTEM button on the remote control, the video output format can be switched in the following sequence: HDMI AUTO NTSC PAL 480P 576P 720P 1080i 1080P and so on.
Wireless Setup Before configuring the WLAN settings, please check the following: 1. Make sure the WLAN USB Adapter is connected to the USB port. 2. Make sure there is a wireless router or an AP (Access Point) on the network, or your PC is equipped with a wireless network adapter/card. 3. Make sure media player is in the effective range of the WLAN. 4. Press to enter Wireless Setup. 5. Press to select a Network or Name. Press to enter Connection Mode. Press to return. 6.
Infrastructure It is used to connect computers with (AP): wireless network adapters, also known as wireless clients, to an existing wired network with the help from wireless router or access point. Get SSID Name System will search for an existing SSID (Service Set Identifier) auto. And select the access point you wish to access from the SSID list. Note: In the Security list, WEP (Wired Equivalent Privacy) and WPA (Wi-Fi Protected Access) means the network is encrypted, i.e.
Peer to Peer It is used to connect wireless clients (Ad Hoc): directly together, without the need for a wireless router or access point. Ad Hoc Setup Set the Wireless SSID, Wireless Security, and Host IP for the Ad Hoc connection. Press to enter. Press to return. Note: Both the player and your PC need to use the Ad Hoc mode, share a common SSID, and be put into the same IP range. Select to confirm and go to the next step. If the test is ok, the network information will be displayed.
Text Encoding Use it to select to choose the subtitle encoding language. (Please check your subtitle encoding format and make sure the subtitle files are located in the same folder first.) 1. Press 2. Press to enter. or to select the subtitle language. 3. Press to confirm or press to exit. System Upgrade Use it to upgrade firmware from USB device. 1. Please copy the Upgrade firmware to USB device first. 2. Press 3. Press to enter. or to select System Upgrade. 4. Press to confirm or press to exit.
MISC Setting Press or on the remote control to select the MISC option. Press to enter. Resume Play Use it to resume playback. 1. Press 2. Press to enter. or to enable (ON) or disable (Off) this function. 3. Press to confirm or press to exit. Slide Show Timing Select to set photo slide show time. 1. Press 2. Press to enter. or to select interval photo time you require. 3. Press to confirm or press to exit. Transition Effect Select to set the transition effect of photos. 1. Press 2. Press 3.
Background Music Use it to select to play the music file and view photo at the same time. 1. Press to enter. or 2. Press to enable (Folder, Favorite) or disable (Off) this function. Favorite : “My Music“ is used for background music. 3. Press to confirm or press to exit. Screen Saver Screen Saver could save power. 1. Press 2. Press to enter. or to enable (ON) or disable (Off) this function. 3. Press to confirm or press to exit.
Chapter 9 Playing Media All option allows you browse and play music, photo and movie files stored on the external USB devices, internal HDD, or your PC (Network). 1. Press buttons to select All function or on the main menu, press or to select the external USB devices, internal HDD or NET. Press to enter. USB 1. Press 2. Press to enter USB option. or to select the external USB devices which the media is stored. Press to confirm. 3. All directories and supported media files will be displayed.
NET You can streaming playback the multimedia files shared on the wireless local area network. At first, please make sure that you have read “Network Setting” and made the right settings. 1. Press 2. Press to enter NET option. or select the multimedia files shared at your PC name in your local workgroup. Press to confirm. 3. Enter User ID and Password, press to confirm. 4. All directories and supported media files will be displayed.
2. While browsing high definition video files (resolution up to 720p / 1080i / 1080p) via WLAN, the video might be buffering. It is normal due to the limit of network speed or signal strength. 3. Due to different network conditions, sometimes the workgroup might not be accessed or shown in the list. You could to use ‘My_Shortcuts’ to browse shared files. Chapter 10 Playing Movies You could watch videos on your TV with using the Media Player. 1.
Movies Playback controls Use these buttons on the remote control to control media playback: Button Function Stop Stop the playback. Enter Play the media files. FR/FF Press to fast rewind or fast forward the current playback. Press repeatedly to select faster rewind or fast forward speeds: 1.5x, 2x, 4x, 8x, 16x, 32x. Press ENTER button to resume playback. PAUSE/STEP Press to pause current playback. Press again to step to the next frame. Press ENTER button to resume playback.
Copy Copy the video file that you like to “My Movie“ in the internal HDD. Movies Playback Options Repeat Repeat Title: Play current media file repeatedly. Repeat All: Play all media files stored inside unit repeatedly. Repeat Off: Disable Repeat function EDIT Use it to organize your files at file browser. 1. Press or to select the file, press EDIT button to enter. 2. Press or to select Copy, Rename, Delete and to confirm. Cancel. Press Cancel: Exit Edit menu. Rename: Enter new name.
display. The external and internal subtitle can be switched. Press (2) to confirm or RETURN to exit. or Text Encoding: Press to confirm or RETURN to exit. for the subtitle file. Press (3) or Time Sync: Press to choose the encoding to modify the external subtitle time. The negative value means that the subtitle is shown earlier, and the positive value means that the subtitle is to confirm or RETURN to exit. delayed. Press (4) or Color: Press to confirm or RETURN to exit. subtitle.
Chapter 11 Playing Music You could listen music on your TV using the Media Player. 1. If you want to playback music, press or buttons to select Music or All option on the main menu, press button to confirm. 2. Press or to select the device which the media is stored from USB, HDD or NET and press the to confirm. You can also press the MUSIC button on the remote control to directly enter the file browser windows of the HDD devices. 3. Press or to select files that you want to listen.
Mode Press Mode button to enter Folder/Files thumbnail view function. Press Mode button again to change view mode. Folder: Display the first photo in the same folder. Copy Copy the video file that you like to “ My Music “ in the internal HDD. Music Playback Options Repeat Repeat 1: Play current media file repeatedly. Repeat All: Play all media files stored inside unit repeatedly. Repeat Off: Disable Repeat function. EDIT Use it to organize your files at file browser. 1.
Chapter 12 Playing Photo You could browse photos on your TV using the Media Player. 1. If you want to view Photos, press or buttons to select Photo or All option on the main menu, press button to confirm. 2. Press or to select the device which the media is stored from USB, HDD or NET and press the to confirm. You can also press the PHOTO button on the remote control to directly enter the file browser windows of the HDD devices. 3. Press or to select files that you want to browse.
Photo Playback Options Rotate Press Edit to continue the playback. Use it to organize your files at file or to rotate the photo. Press the NEXT/ENTER button browser. 1. Press or the file, press to select EDIT button to enter. 2. Press or to select Copy, Rename, Delete and Cancel. Press to confirm. Cancel: Exit Edit menu. Rename: Enter new name. Press OK option to change or press to exit. Delete: Delete the file. Copy: Copy file to “My Photo“ folder.
Slideshow Press Slideshow button on the remote control to execute the photo slideshow directly. 1. My Photo: The photos in the “My photo“ folder of the internal HDD are displayed automatically. 2. USB: The photos in the external USB device are displayed automatically. Chapter 13 Advanced Features Net Storage The media player allows other PC’s in the local area network to access its USB ◎ ◎ storages. The IP address of the media player is shown in the Network setting window of the Setup menu.
My Favorite The media player provides the My Favorite function to arrange media files easily. 1. Press the My Favorite button on the remote control to enter the My Favorite sub-menu. 2. Press or to choose “My Movie“, “My Music“ and “My Photo”, then press or to choose the media files that you want to play, then press to enter. 3. Press to to exit. play or press Note Pressing the My Favorite button at the first time will create 3 folders on the internal HDD.
Chapter 14 Troubleshooting Problem Possible Cause Solution TV screen does not display normally. ◎ Video setting is not correct. ◎ Press the TV SYSTEM button to switch output TV system. ◎ Ensure that HDMI/AV/YPbPr cable is properly connected to the correct port on both TV and media player. ◎ When using HDMI cable to connect TV, please choose “1080P“ option, If your TV could support 1080P. ◎ When using component video cable, please choose “720P“option.
Problem Possible Cause toward the remote receiver. ◎ Battery is not assembled Solution the receiver when in operation. ◎ Check the battery direction. properly. ◎ Battery became depleted. ◎ Replace the battery. Some folders are not listed in files manager windows. ◎ These folders may be ◎ Change the attribute of these Some files can’t be played back. ◎ These files are compressed “Hidden”, “Encrypted”, “Compressed” or “System Folder”. by Windows. ◎ The formats of these files are not supported.
Problem Possible Cause Solution instead of standard DVI connectors. ◎ Incorrect audio setting. ◎ If the media player connects Amplifier with HDMI cable, change Digital Audio setting from HDMI LPCM to HDMI RAW on Setup option. The audio or subtitle is not the language you have selected. ◎ This movie doesn’t come with Can’t fast forward, rewind, slow motion, step play. ◎ Some movie files prohibit Distorted booting image or incorrect color while playback.
Chapter 16 Product Specifications Specifications DEVICES SUPPORT Internal device 2.5” SATAII HDD External USB devices USB Flash drive / USB external HDD / USB external Card Reader File System FAT32 or NTFS or HFS+ INTERFACE USB USB 2.0 type A Connector x 1 AUDIO/VIDEO INTERFACE HDMI HDMI connector x 1 Composite output Video + Audio R/L (3.5mm phone jack x 1) Component Video Y, Pb, Pr (3.
Analog Audio Digital Audio Stereo HDMI LPCM / HDMI RAW / SPDIF LPCM / SPDIF RAW DATA OUTPUT POWER SUPPLY Input AC 100-240 V, 50/60Hz Output DC 5V, 3A BATTERY OF REMOTE CONTROL AAA batteries WORKING ENVIRONMENT 5°C ~ 35°C, Humidity 8% ~ 80% STORAGE ENVIRONMENT 0°C ~ 40°C, Humidity 5% ~ 95% GENERAL Dimensions 179.9 (W) x 35.2 (H) x 109.9 (D) mm Weight 235g (w/o HDD) Specifications are subject to change without notice. “This product is protected by certain intellectual property rights of Microsoft.
The copyright on this user manual remains with out company. No part of this user manual may be transmitted, reproduced or changed. The product specifications, design and this user manual’s content are subject to change without notice.