
User Manual


Rack ATS AP44xx User Manual92
Firewall menus
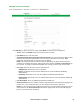
Path: Configuration > Security > Firewall > Configuration
Enable or disable the firewall functionality. The configured policy is listed by default. Select the Enable
check box to enable the firewall. The check box is un-checked by default.
• Click Apply to confirm a firewall policy you have selected to enable. The Firewall Confirmation
page will open.
–The Confirmation page contains a recommendation to test the firewall before enabling. It is
not mandatory.
– The first hyperlink goes to the Firewall Policy page.
– The second hyperlink goes to the Firewall Test page.
– Click Apply to enable the firewall and return to the Configuration page.
– Click Cancel to return to the Configuration page without enabling the firewall.
• Click Cancel: No new selection will be enabled. You stay on the Configuration page.
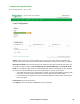
Path: Configuration > Security > Firewall > Active Policy
Select an active policy from the Available Policies drop-down list, and view the validity of that policy.
The current active policy is displayed by default; you can select another from the list.
• Click Apply to enable your changes. If a different firewall was selected and enabled, the change
is effective immediately. If a newly configured firewall policy has been selected, it is
recommended that you test the new firewall before enabling it. (See Configuration above.)
• Click Cancel to restore the original active policy and stay on the Active Policy page.
Path: Configuration > Security > Firewall > Active Rules
When a firewall is enabled, this read-only page lists the individual rules that are being enforced by a
current active policy. See the Create/Edit Policy section (page 93) for descriptions of the fields (Priority,
Destination, Source, Protocol, Action, and Log).
Path: Configuration > Security > Firewall > Create/Edit Policy
Create a new policy; delete or edit an existing policy
NOTE: While deleting an active enabled firewall policy cannot be done, editing a running policy can be
done but is not recommended as changes are applied immediately. Instead, disable the firewall, edit the
policy, test it, and then re-enable the policy.
Create a new policy: Click Add Policy, and type in the file name for the new firewall file. The filename
should have a .fwl file extension. If left without a file extension, .fwl will be appended to the name
automatically.
• Click Apply: If the filename is legal, the empty file firewall policy file will be created. It will be
located in the /fwl folder with the other policies on the system.
• Click Cancel to return to the previous page without creating a new firewall file.