
User Manual

Rack ATS AP44xx User Manual8
DHCP
You can use an RFC2131/RFC2132-compliant DHCP server to configure the TCP/IP settings for the
Rack ATS.
1. The Rack ATS sends out a DHCP request that uses the following to identify itself:
– A Vendor Class Identifier (APC by default)
– A Client Identifier (by default, the MAC address of the Rack ATS)
– A User Class Identifier (by default, the identification of the application firmware installed on the
Rack ATS)
– A Host Name (by default, apcXXYYZZ with XXYYZZ being the last six digits of the ATS serial
number). This is known as DHCP Option 12.
2. A properly configured DHCP server responds with a DHCP offer that includes all the settings that
the Rack ATS needs for network communication. The DHCP offer also includes the Vendor
Specific Information option (DHCP option 43). The Rack ATS can be configured to ignore DHCP
offers that do not encapsulate the APC cookie in DHCP option 43 using the following
hexadecimal format. (The Rack ATS does not require this cookie by default.)
Option 43 = 01 04 31 41 50 43
– The first byte (01) is the code.
– The second byte (04) is the length.
– The remaining bytes (31 41 50 43) are the APC cookie.
See your DHCP server documentation to add code to the Vendor Specific Information option.
NOTE: By selecting the Require vendor specific cookie to accept DHCP Address check
box in the Web UI, you can require the DHCP server to provide an “APC” cookie, which
supplies information to the Rack ATS.
For additional information on supported DHCP options, see “Configure TCP/IP and
communication settings for IPv4 and IPv6” on page 96.
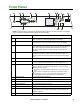
Local access to the CLI
You can use a local computer to connect to the ATS and access the CLI.
1. Select a serial port at the local computer and disable any service that uses that port.
2. Use the serial communication cable (940-0144A) to connect the selected port to the serial port on
the front panel of the ATS.
3. Run a terminal program (such as HyperTerminal
®
) and configure the selected port for 9600 bps,
8 data bits, no parity, 1 stop bit, and no flow control. Save the changes.
4. Press
ENTER up to 3 times to display the User Name prompt.
5. Use apc for the user name and password.
6. See “Configure TCP/IP settings in the CLI” on page 9 to finish the configuration.