
Owner's manual
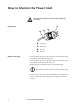
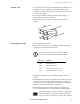
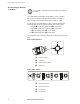
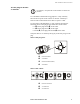
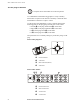
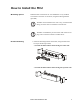
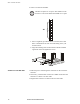
Table Of Contents

How to Shorten the Power Cord
Rack Power Distribution Unit 5
Cut the cord
1. Cut the outer cord sleeve to the desired length. Be careful not to cut
through the four wire bundles. The cord must remain at least
4.9 feet (58.8 inches) long from unit to end. Remove the cut sleeve
from the wire bundles.
2. Cut each wire bundle, making sure each is approximately 1.5
inches from the end of the cord sleeve.
3. Strip approximately 0.5 inches of insulation from each wire
bundle.
Reassemble the plug
1. Twist together any loose wires.
2. Fully insert each wire into its coordinating terminal on the plug
face before you tighten the terminal screw.
3. Tighten the terminal screws to a minimum torque of 18 inch-
pounds.
4. Slide the plastic plug case back around the face of the plug. Align
the tab on the case with the corresponding opening on the plug
face. Secure the case by tightening two of the screws in the side of
the case to a minimum torque of 10 inch-pounds.
5. Reattach the strain relief to the plug, using the remaining two
screws. Tighten the screws to a torque of 16 to 20 inch-pounds.
Note
Insert only the bare copper wires into the terminals.
Do not tin the wires that hold the strands together.
Wire color Terminal
Red Terminal marked “Y”
Black Terminal marked “X”
Green Ground pin, has a green screw
White No markings, has a silver prong
Verify that the plug is connected properly by performing
the test procedures on page 6 (for AP7580 or AP7583),
page 7 (for AP7581 or AP7584), or page 8 (for AP7582).