
User manual


35KVM Switch KVM2132P, KVM2116P, KVM1116P User Manual
Manual Mouse Synchronization. If the local mouse pointer goes out of sync with the remote system's
mouse pointer there are several methods to bring them back into sync.
1. Perform a video and mouse auto sync by clicking the Video Settings icon on the Control Panel
(see page 30).
2. Perform an Auto Sync with the Video Adjustment function (see “Video Settings” on page 30, for
details).
3. Invoke the Adjust Mouse function with the Adjust Mouse hotkeys (see “Adjust mouse” on
page 28, for details).
4. Move the pointer into all 4 corners of the screen (in any order).
5. Drag the Control Panel to a different position on the screen.
6. Set the mouse speed and acceleration for each problematic server attached to the switch. See
“Additional Mouse Synchronization Procedures” on page 108, for instructions.
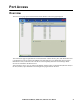
Control Panel Configuration
Click the Control Panel icon to open a dialog box. Configure the items and graphical settings on the
Control Panel.
Item Function
Customize
Control Panel
Select which icons display in the Control Panel. Check the icons to be visible. Unchecked icons
will not be displayed
Control Panel
Style
Enabling Transparent makes the Control Panel semi-transparent so that the display underneath
can be seen. When Enabled, the Control Panel displays as an icon until the mouse is moved over
it, then the full panel opens.
Screen Options • If Full Screen Mode is enabled, the remote display fills the entire screen.
• If Full Screen Mode is not enabled, the remote display appears as a window on the local
desktop. If the remote screen is larger than can fit in the window, move the mouse pointer to the
screen border closest to the area you want to view and the screen will scroll.
•If Keep Screen Size is enabled, the remote screen is not resized.
• If the remote resolution is smaller than that of the local monitor, its display appears like a
window centered on the screen.
• If the remote resolution is larger than that of the local monitor, its display is centered on the
screen. To access the areas that are off screen, move the mouse to the corner of the screen that is
closest to the area you want to view and the screen will scroll.
•If Keep Screen Size is not enabled, the remote screen is resized to fit the local monitor's
resolution.
Scrolling
Method
If the remote screen display is larger than your monitor, you can choose how to scroll to the areas
that are off-screen.
• Select Mouse Movement to scroll the screen when the mouse pointer is moved to the screen
border.
• Select Scroll Bars to open scroll bars around the screen borders that can be used to scroll to the
off-screen areas.
Bus Info If Bus Info is enabled, the number of the bus you are on, as well as the total number of users on
the bus, displays on the bottom row center of the Control Panel (Bus No./Total Users).
Snapshot Configure the KVM switch's screen capture parameters.
• Path: The directory where captured screens will automatically get saved. Click Browse to
navigate to the directory, then click OK. If a directory is not specified here, the snapshot is
saved to your desktop.
• Click a radio button to save the captured screen as a BMP or a JPEG (JPG) file.
• With JPEG, the quality of the captured file can be adjusted with the slider bar. Higher quality
will improve the appearance and increase the file size.
Keyboard Pass
Through
When enabled, the Alt-Tab key press is passed to the remote server and affects that server. If it is
not enabled, Alt-Tab acts on your local client computer.