
Operating instructions


1-7
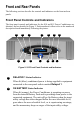
STATUS Push Button
When pressed, provides unit status for: Input and Output Voltage,
Input and Output Voltage, Input and Output Frequency,
Telephone and Internet contact information, Model and Serial
Number, Firmware (FW) Version number, Source (Standby,
Battery, or Utility) and Estimated Runtime (in hours or minutes),
Estimated Runtime (in hours) with a Fuel (as a percentage with
bar graph) indication, as well as System Load (in watts), and Load
(as a percentage with bar graph).
This push button can also be used to set a default screen, a screen
that is displayed all the time.
Vacuum Fluorescent Display (VFD)*
Conveys information about unit and power status. It is also used to
display information when making settings changes to the unit.
*Note - The VFD and Light Emitting Diodes (LEDs) can be
dimmed or turned off independently of each other via the front
control panel SETUP push button.
Up Arrow Push Button
This button is used to change parameters (increase or turn on) for
various user-selectable settings such as: Audible Alarms,
Sensitivity, Display Dimmer, LED Dimmer, Go To Bat If,
Outlet 1 & 2 Delay (in seconds), Low Bat Warning, Bat Rep
Date, etc.
LOW BATTERY Status Indicator
When lit (orange) indicates the Battery Pack charge level is low.
When this indicator turns on, the user can set the value (from 2 to
25 minutes) to allow time to shut off power before the Battery Pack
is fully discharged. When lit, leave the unit plugged in to allow
batteries to recharge. The unit does not have to be powered on for
batteries to recharge.
3
4
5
6