Smart-UPS® RC External Battery Pack Tower/Rack-Mount 4U SRC96XLBP SRC96XLBP2S English 990-3486A 01/2009
Introduction Overview The American Power Conversion (APC®) SRC96XLBP external battery pack (XLBP) connects to an APC Smart-UPS® RC. Together these units provide extended protection for electronic equipment (load) from utility power blackouts, brownouts, sags and surges. The UPS and the XLBP together provide continuous power from the batteries until utility power returns to safe levels or the batteries are fully discharged. Inventory Read the Safety Guide before installing the unit.
Specifications Environmental Specifications Temperature Maximum Elevation Operating 0° to 40° C (32° to 104° F) Storage -15° to 30° C (5° to 86° F) charge UPS battery every six months 30° to 70° C (86° to 158° F) charge UPS battery every three months Operating 3,000 m (10,000 ft) Storage 15,000 m (50,000 ft) Humidity 0 to 95% relative humidity, non-condensing This unit is intended for indoor use only. Select a location sturdy enough to handle the weight.
Installation Units may vary in appearance from those depicted in this manual. Always place UPS above XLBPs in rack-mount configuration. Connect all battery strings. Failure to do so may cause equipment damage. Refer to Physical Specifications in this manual and the Safety Guide before installing unit. Unit is heavy. Batteries must be removed from unit prior to installation. 1. Remove screws securing battery compartment door. Remove door. su0224a su0223a 2.
Install and connect batteries This unit is equipped with battery modules. Install batteries into unit beginning with batteries at the bottom. su0225a Each string must be connected to battery connectors on chassis. 1. Install batteries. 2. Connect batteries. 3. Replace battery compartment door and secure door with screws previously removed. x2 su0213a x2 x2 su0216a Install bezel 1. Fit three tabs on the bottom inside edge of bezel into slots in chassis. 2. Tip bezel forward.
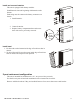
Position unit for mounting in rack The unit is heavy. Use caution when positioning unit. NOTE: The holes for securing rack-mount brackets are plugged. Remove the appropriate plugs prior to installing brackets on the unit. su02 14a x8 Install rack-mount brackets Four pan head screws and four washers must be used to secure each rack-mount bracket to unit. x4 s u 02 15a x4 su0248a Secure 2-post rack to floor Install units in rack The UPS and XLBPs should be installed at or near bottom of rack.
Install and connect batteries This UPS is equipped with battery modules. Each module must be connected to battery connectors on chassis. su0226a 1. Install batteries. 2. Connect internal batteries. x2 x 2 su0218a x2 3. Replace battery compartment door and secure door with screws previously removed. SRC96XLBP / SRC96XLBP2S User Manual su0220a Install bezel 1. Fit three tabs on inside edge of bezel into slots in chassis. 2. Tip bezel toward chassis.
Connect XLBPs to UPS UPS XLBP XLBP XLBP su221a Tower configuration Rack-mount configuration UPS XLBP XLBP su222a XLBP su264a There is small cover over each external battery pack connector on the UPS and XLBP.
Configure UPS parameters This configuration affects the accuracy of the predicted runtime calculations the UPS performs while running on battery power. Refer to the Battery String Configuration tables at the end of this section for detailed instructions. Smart-UPS RC models must be programed to recognize the number of battery strings connected to the UPS. There are four options available for configuring the UPS to recognize the number of battery strings 1.
Configure the number of battery strings using NMC terminal mode 1. Once the blank terminal window is open: 2. Press ENTER to initiate terminal mode. Press ENTER multiple times, until the prompt User Name: is displayed. Follow the prompts. Type slowly, waiting until each character appears on the screen prior to typing the next character. Network Management Card defaults: • User Name: apc • Password: apc 3. Press 1 and ENTER to select Device Manager.
Configure UPS connection settings using UPS terminal mode Connect the serial cable to the serial port on the back of the UPS. If using USB communication to the UPS, disconnect USB cable prior to connecting serial cable. 1. Open a terminal program, such as HyperTerminal From the Desktop, go to: Start, Programs, Accessories, Communication, HyperTerminal 2. Follow the prompts to choose a name and select an icon. Disregard the message, "...must install a modem," if it is displayed. Click Cancel 3.
Smart-UPS SRC XLI Models - Configure Number of Battery Strings Each 96 V battery string consists of two 48 V battery modules. Count the number of battery strings being used and enter that number.
Contact Information APC Worldwide Customer Support Customer support for this or any other APC product is available at no charge in any of the following ways: • Refer to the APC Web site to access documents in the APC Knowledge Base and to submit customer support requests. – www.apc.com (Corporate Headquarters) Connect to localized APC Web sites for specific countries, each of which provides customer support information. – www.apc.com/support/ Global support searching APC Knowledge Base and using e-support.
Maintenance, Transport, and Service Replace battery modules This UPS has easy-to-replace, hot-swappable battery modules. Replacement is a safe procedure, isolated from electrical hazards. You may leave the UPS and connected equipment on during the replacement procedure. Once the batteries are disconnected the connected equipment is not protected from power outages. Refer to the appropriate replacement battery user manual for battery module installation instructions. See your dealer or contact APC at www.
Two-Year Warranty The limited warranty provided by American Power Conversion (APC®) in this statement of Limited Factory Warranty applies only to products you purchase for your commercial or industrial use in the ordinary course of your business. Terms of warranty APC warrants its products to be free from defects in materials and workmanship for a period of two years from the date of purchase.