User’s Manual English APC SmartSmart-UPS® 1000/750VA 230/120/100VAC 1U Rack Mount Uninterruptible Power Supply 990-1086A 09/02
Introduction American Power Conversion Corporation (APC) is the leading national and international manufacturer of state-of-the-art uninterruptible power supplies, redundant switches, power management software, and related equipment. APC products protect hardware, software, and data from power disturbances in business and government offices throughout the world.
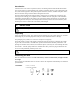
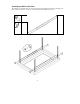
Installing the Rails in the Rack The UPS fits in a standard 46.5-cm (19-inch) rack. Mounting brackets and rails are packaged separately within the main box. Cleats for rack mounting are preinstalled on the UPS.
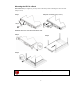
Mounting the UPS in a Rack The UPS is heavy. To lighten it, you may remove the battery before mounting the unit in the rack (Steps 1 and 2). Step 1 Step A Step 2 Be careful-the battery is heavy. Step B Install the UPS at or near the bottom of the rack. Step 3 Step 4 Step 5 Check to make sure the rack will not tip after installing the UPS into the rack.
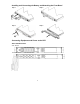
Installing and Connecting the Battery and Attaching the Front Bezel Step 1 Step 2 Step 3 Step 4 Connecting Equipment and Power to the UPS SMART-UPS REAR PANEL 230V Models 120/100V Models 4
1. Connect equipment to the UPS. Note: Do not connect a laser printer to the UPS. A laser printer draws significantly more power than other types of equipment and may overload the UPS. 2. Add any optional accessories to the Smart-Slot. 3. Using a power cord, plug the UPS into a two-pole, three-wire, grounded receptacle only. Avoid using extension cords. • 120/100V models: The power cord is permanently attached to the rear panel of the UPS. 4. Turn on all connected equipment.
2: OPERATION SMART-UPS FRONT PANEL 230/100V Models 120V Models Power On Power Off Online The online LED illuminates when the UPS is supplying utility power to the connected equipment. If the LED is not lit, the UPS is either not turned ON, or is supplying battery power.
AVR Trim This LED illuminates to indicate the UPS is compensating for a high utility voltage. AVR Boost This LED illuminates to indicate the UPS is compensating for a low utility voltage. On Battery When the on battery power LED is lit the UPS is supplying battery power to the connected equipment. When on battery, the UPS sounds an alarm—four beeps every 30 seconds. Overload The LED illuminates and the UPS emits a sustained alarm tone when an overload condition occurs.
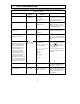
3: USER CONFIGURABLE ITEMS NOTE: SETTINGS ARE MADE THROUGH SUPPLIED POWERCHUTE SOFTWARE OR OPTIONAL SMART SLOT ACCESSORY CARDS. FUNCTION FACTORY DEFAULT USER SELECTABLE CHOICES DESCRIPTION Automatic Self-Test Every 14 days (336 hours) Every 7 days (168 hours), On Startup Only, No Self-Test This function sets the interval at which the UPS will execute a self-test. Refer to your software manual for details.
NOTE: SETTINGS ARE MADE THROUGH SUPPLIED POWERCHUTE SOFTWARE OR OPTIONAL SMART SLOT ACCESSORY CARDS. FUNCTION FACTORY DEFAULT Low Battery Warning. USER SELECTABLE CHOICES Brightly lit: Low battery warning interval is about two minutes. Dimly lit: Low battery warning interval is about five minutes. Off: Low battery warning interval is about eight minutes. PowerChute interface software provides automatic, unattended shutdown when approximately two minutes (by default) of battery operated run time remains.
4: STORAGE, MAINTENANCE, AND TRANSPORTING Storage Store the UPS covered and positioned as for proper functioning, in a cool, dry location, with the batteries fully charged. At -15 to +30 °C (+5 to +86 °F), charge the UPS battery every six months. At +30 to +45 °C (+86 to +113 °F), charge the UPS battery every three months. Replacing the Battery Module This UPS has an easy to replace, hot-swappable battery module. Replacement is a safe procedure, isolated from electrical hazards.
5: TROUBLESHOOTING Use the chart below to solve minor Smart-UPS installation and operation problems. Refer to the APC web site, www.apc.com, for assistance with complex UPS problems. PROBLEM AND POSSIBLE CAUSE UPS WILL NOT TURN ON Battery not connected properly. button not pushed. SOLUTION Check that the battery connector is fully engaged. Press the button once to power the UPS and the connected equipment. UPS not connected to utility power supply.
PROBLEM AND POSSIBLE CAUSE SOLUTION THE OVERLOAD LED IS LIT AND THE UPS EMITS A SUSTAINED ALARM TONE The UPS is overloaded. The connected equipment exceeds the specified “maximum load” as defined in Specifications at the APC web site, www.apc.com. The alarm remains on until the overload is removed. Disconnect nonessential equipment from the UPS to eliminate the overload.
PROBLEM AND POSSIBLE CAUSE SOLUTION UPS OPERATES ON BATTERY ALTHOUGH NORMAL LINE VOLTAGE EXISTS UPS input circuit breaker tripped. Reduce the load on the UPS by unplugging equipment and resetting the circuit breaker (on the back of UPS) by pressing the plunger in. Very high, low, or distorted line voltage. Inexpensive fuel powered generators can distort the voltage. Move the UPS to a different outlet on a different circuit. Test the input voltage with the utility voltage display (see below).
Service If the UPS requires service do not return it to the dealer. Instead, follow these steps: 1. Review the problems discussed in the Troubleshooting section of this manual to eliminate common problems. 2. If the problem persists, contact APC Customer Service through the APC web site, www.apc.com/support. Note the model number of the UPS, the serial number, and the date purchased.
6: REGULATORY AND WARRANTY INFORMATION Regulatory Agency Approvals and Radio Frequency Warnings 230V MODELS This is a Class A product. In a domestic environment this product may cause radio interference, in which case the user may be required to take corrective actions. 120V MODELS This equipment has been tested and found to comply with the limits for a Class A digital device, pursuant to part 15 of the FCC Rules.
Declaration of Conformity Limited Warranty American Power Conversion (APC) warrants its products to be free from defects in materials and workmanship for a period of two years from the date of purchase. Its obligation under this warranty is limited to repairing or replacing, at its own sole option, any such defective products. To obtain service under warranty you must obtain a Returned Material Authorization (RMA) number from customer support.