INSTALLATION & OPERATING MANUAL 2-IN-1 KITCHEN FAUCET F A U C E T - U N N
PRIOR TO INSTALLATION • Make sure you have all necessary parts by checking the product components (Page 2).
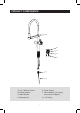
PRODUCT COMPONENTS A B C D E F G A. 2-In-1 Kitchen Faucet E. Three Screws B. Rubber Washer F. Faucet Adapter (1/4” tubing quick-connect adapter) C. Metal Washer G. 1/4” Tubing D.
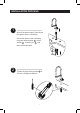
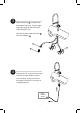
INSTALLATION PROCESS 1 Shut off the water supply. Place faucet through the hole in countertop. Secure the faucet to the countertop using the rubber washer 1 , metal washer 2 , mounting nut 3 , and three screws provided. 1 2 3 4 2 Tighten the three fixing screws 4 on nut with a Phillips screwdriver.
3 Attach waterlines 5 to angle stops and tighten until snug. Turn on angle stops and check for leak (DO NOT TURN FAUCET ON). Connect the pure water inlet hose 6 with Filter Adapter 7 . 6 5 7 4 Connect the 1/4” tubing into the output connection of the filtration system (not including). Gently pull back on the tubing to ensure the connction is completely secure.
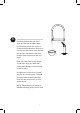
5 Pull the hose assembly out of the spout and remove the spray head by unscrewing it from the hose in a counterclockwise direction. Be sure to hold the end of the hose down into the sink and turn the faucet to the warm position where it mixes hot and cold water. Flush the water lines for two minute. This flushes away any debris that could cause damage to internal parts. Check for leaks. Re-tighten any connections if necessary, but do not overtighten.
www.FreeDrinkingWater.com 301 Brea Canyon Road City of Industry, CA 91789 1-800-880-4808 © This manual is copyrighted by APEC Inc. Under the copyright laws, this manual may not be reproduced in any form, in whole or part, without the prior written consent of APEC Inc. Manual print Ver. 1.1, 2023 Aug.