GREEN CARBON WATER CONDITIONER CHLORINE & CHLORAMINES REMOVAL SYSTEM INSTALLATION INSTRUCTION & OWNER’S MANUAL Ver 2.0 www.FreeDrinkingWater.
Please keep this Owner’s Manual for future reference. It contains helpful information on how to maintain and care for your APEC Green Carbon Water Conditioner. Thank you for choosing APEC Green Carbon Premium Water System. Please read and become familiar with instructions and parts needed before proceeding with the installation. Copyright: This manual is copyrighted by APEC Inc.
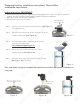
Parts List for Green Carbon Conditioning System Installation Kit (2 packages): Package #1: Media tank and filter system installation kit.
Green Carbon Sytem Media Flush kit: 1 each 1” Dura Coupling FPT PVC Adapter (D2466) 1 each 1” MPT x 3/4” FPT PVC Dura Bushing (D2464) 1 each 3/4” FHT x 3/4” MPT x 1/2” FPTB Garden Hose Brass Adapter (A-679) Media tank: Funnel X1 Tank with In/Out Valve X1 Package #2: Water treatment system media. Water Treatment Media The media weight varies from 27.5 lbs. to 55 lbs., depending on the system model.
Product Operation and Specifications Rated Service Flow (GPM): • • GreenCarbon- 10 GreenCarbon- 15 8-10 GPM 10-15 GPM Rated Capacity (Gallons): • • Holds 9.1 Gallons in the GreenCarbon- 10 Tank Holds 16.7 Gallons in the GreenCarbon-15 Tank Minimum Working Pressure (PSIG): 25 PSI Operating Temperatures: 36-120 Degrees Fahrenheit pH Range: 7-11 pH Plumbers Notice: If this of any other system is installed in a metal (conductive) plumbing system, i.e.
Preparing tank for installation instructions. Please follow installation steps below: Safety Instructions IMPORTANT! • Wear proper eye protection (ex. tightly fitting safety goggles), face mask, hand gloves, protective clothing, etc when installing water treatment media into tank for installation. • Wash your hands and face after installation. • Please Keep out of reach of children. Counterclockwise to unscrew In/Out Valve Step 1. Unscrew in/out valve from the top of the tank. (See Figure.
System Installation: This is an overview for the system installation. Wall IN INCOMING WATER SUPPLY OUT GOING WATER TO HOUSE OUT Shut Off Valve Whole House Filters INPUT INLET DOWNFLOW UPFLOW INLET OUTPUT Figure. 1 1. Turn off water supply where it enters the building. 2. Install a shut off valve (if needed) then install the Whole House Sediment Filter in the vertical position. Make sure the flow direction is correct. Plumbing pipes are not designed to support the weight of the filter.
Flushing the Carbon in the Carbon Tank: Use provided parts V3007, D2466, D2464, A-679. Once the media tank is installed on the main water pipe, you must Flush Out the Carbon media for 10-15 minutes or until the water runs clear. To flush the media turn the Bypass Valve to Normal Operation Mode. (See figure. 3). Once the bypass valve is open, find the outside garden hose faucets that are located nearest the Green Carbon Tank and open the faucets all the way to flush the system.
Carbon Tank Installation 1. The bypass valve comes complete with O-rings, split rings and black quick connector nuts. Install the bypass valve by pressing the valve onto the head of the tank and hand tighten both black quick connect nuts. 2. When running the piping for the Green Carbon Water Conditioner, connect the incoming water supply to the DOWN-FLOW INLET (Input) side. Connect the water supply line going into the house to the UP-FLOW INLET (Output) side. (See Figure.
Bypass Valve Operation Mode Normal Operation Mode: Water flows through the Bypass Valve and into the Green Carbon Conditioner supplying treated water into the house. (See Figure 5) OUT GOING WATER TO HOUSE INCOMING WATER SUPPLY INPUT UPFLOW INLET INLET DOWNFLOW OUTPUT Figure. 5 Bypass Operation Mode: Water flows through the Bypass Valve without entering the Green Carbon Conditioner and the water entering the house is untreated.
Carbon Conditioner Overview 1. During the carbon flush, the pressure can start to drop off. If this happen, turn off the water and let the tank sit about 30 minutes to allow the carbon to settle down off of the basket inside the tank. Pressure drop can occur as there is air trapped in the carbon bed that needs to be released from the tank. If the pressure continues to drop after 30 minutes, let the system stand for 72 hours. After 72 hours, slowly turn the water supply back on and continue the carbon wash.
WARRANTY POLICY For a period of ten years from the date of original purchase, APEC will replace any part of the filter housing, tank heads, and the bypass valves that APEC finds to be defective in operation due to faulty materials or workmanship with the exception of the replaceable media, which shall be prorated. The customer pays only for shipping. Service schedule depends on local input water quality.
Advanced Purification Engineering Corp. 1320 S Johnson Drive City of Industry, CA 91745 For questions or comments please visit our website at: www.FreeDrinkingWater.com For technical support contact us at: Techsupport@freedrinkingwater.