
Instructions / Assembly


14
Stage
2
nd
Stag
e
3
r
d
Stage
4
th
Stage
1
st
DRAIN
LINE
1
st
Stage - Sediment pre- r
2
nd
Stage - Carbon pre- r
3
rd
Stage - Membrance and housing
4
th
Stage - Carbon post-filter
DRAIN WATER
INPUT WATER
DRINKING
WATER
TO ICEMAKER OPTION
W
G
H
A
Z
Y
DRINKING WATER FAUCET
SINK
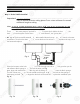
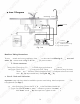
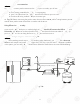
Option 1 Diagram
Fig. 11A
Details on Tubing Connections:
To ensure a smooth and correct installation, please connect the water lines following the sequence and
order outlined below. Refer to Fig.11 & 11A for proper point locations.
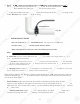
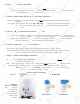
1. Point Z - Faucet connection:
Tubing color: Clear tubing. Connect the CLEAR tubing to the base of the RO faucet.
Fitting type: Quick Connect Fitting: Simply push Clear Tubing into Quick Connect Fitting. No Insert,
Sleeve or Nut needed here. (Attach threaded and of faucet adapter to the faucet metal
stem. No teflon tape needed here). See Fig.9A (Page 10)
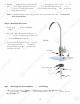
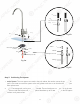
2. Point X - Feed water connection:
Important: Insert and sleeve Must be installed to prevent water leaking. Metal compression nut must be
fully tightened! (See Page 7)
Tubing color: Red tubing. Connect the RED tubing to the Feed Water Needle Valve.
Fitting type: See Fig. 5C (Page 7). Metal compression nut fitting. Use plastic sleeve.
Add “insert” to tubing. No teflon tape here. Tighten nut with wrench.
1
4
Stage
2
n
d
S
ta
g
e
3
r
d
S
ta
ge
4
th
Sta
ge
1
st
D
RAIN
LIN
E
1
1
stst
S
S
t
t
agag
e e
-
S
ed
iment
pr
e-
r
2
nd
d
S
S
t
t
ag
e
-
C
a
r
bon
pr
e
-
r
3
r
d
S
t
ag
e
-
Mem
b
rance an
d
h
ousin
g
4
t
h
S
t
ag
e
-
C
arbon post-filte
r
DRA
DRA
IN
IN
W
A
TER
A
A
INPINP
UT
UT
W
A
TER
A
A
DR
DRI
NKI
NKI
NG
NG
WAWA
WA
WA
TE
TE
T
TE
E
ER
A
A
A
A
A
A
A
TO
T
ICEMAKER
O
PTI
O
N
W
G
H
A
Z
Z
Y
DRINKING W
A
TER
A
A
F
AU
C
ET
SIN
K
OO
p
p
p
t
i
on 1 D
i
agram
Fig. 1
1A
Details on Tubing Connections:
To ensur
e
e
a
smooth and correct installation,
p
leas
e
e
coco
n
nn
ect the water lines
f
ollowin
g
th
e
e
sese
qu
q
ence and
or
der
oo
utut
li
li
ne
n
d
be
lo
w.
R
ef
er
t
o
r
Fig.11 & 11
A
f
or
or
p
p
ro
ro
per point locations.
A
1.
1.
P
P
oi
oi
nt
Z - F
auce
t
co
nn
ec
t
io
n
:
Tubi
ng
color: Clear tubi
ng
. Co
nn
nn
ec
ec
t
t
th
th
e CLEAR tubi
ng
to the base o
f
th
h
e
e
RO
RO
f
aucet.
F
itting type: Quick Conn
ec
c
t
t
FiFi
tt
tt
in
in
g: Sim
pl
y push Clear Tubing
in
n
to
to
Q
Q
ui
ui
ck
ck
Connect Fitting. No Insert
,
Sleeve
o
r
r
Nu
N
t
ne
ne
d
ed
ed here. (Attach threaded an
d
d
ofof
ff
au
au
cet adapter to the
f
aucet meta
l
stem.
No
No
t
t
efef
lo
lo
n tape needed here). See Fig.9A
(
(
PaPa
gege
1
1
0
)
2
. Point X - Feed water connection
:
I
mportant:
I
nsert and sleeve Must be installed to prevent water leaking. Metal compression
nu
u
t
t
mu
mu
st
st
be
f
ully tightened! (See Page 7
)
Tu
bi
bi
ng
n
color: Red tubi
ng
. Connect the RE
D
D
tutu
bi
bi
n
ng
to the Feed Water Needle Valv
e.
.
Fi
Fi
tttt
in
in
g type: See Fig. 5C
(P
age
7)
.
Me
Me
ta
ta
l
l
c
co
mpression nut
f
itting. Use
pl
asti
c
c
sl
sl
ee
ee
v
ve
.
A
dd
“in
se
rt” to tubi
ng
g
.
NoNo
t
ef
lon tape here. Tighten nut with
wr
r
en
e
ch
ch
.