
Instructions / Assembly


21
How to Replace Stage-3 Membrane:
1) Turn OFF the cold water supply to RO system. Turn OFF tank ball-valve. Lift up RO faucet lever briefly to
relief the built-up pressure inside the RO system. This will make opening the housings easier.
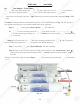
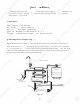
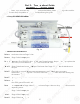
2) See Fig. 14 Page 20. Locate the Membrane housing on the system (labeled “Membrane”). Remove
the WHITE tubing from the housing’s cap at point D. To remove tubing, Push In and Hold Down on
the collet ring square against the fitting. With the collet held in this position the tube can be removed.
Open up the cap (turn counter-clockwise) See Fig. 14A. Using a plier, remove the used membrane for
disposal.
3) Once the membrane is removed, please tilt the RO system at an angle to drain out residual water from
inside the membrane housing and insert the new membrane using a plier. Push membrane into housing.
Avoid touching the Membrane with your hands to prevent contamination!
4) Important! Make sure the “double-ring” end of the membrane goes into the housing first as shown in
Fig. 14B. The membrane cannot filter water if it’s inserted in the WRONG direction!
How to Replace Stage-4 Carbon Filter:
The Stage-4 Pre-Carbon filter is located above the 1st stage sediment filter (See Fig. 14 Page 20).
For ease of access, please tilt the filters to a convenient position then do the following:
Step 1. Disconnect tubing from Point H & Point J, discard used Filter.
Step 2. Snap on the new filter onto the 2 holding clips. Make sure the Flow direction “arrow ”
the filter is pointing towards the output direction. Reconnect tubing to both ends of the new
filter.
Add a little bit lubricant on double o-rings.
Turn counter-clockwise to
open the membrane
housing cap.
Fig. 14A
Fig. 14B
21
How to Replace Stage-3 Membrane:
1
)
T
urn OFF the
co
co
ld
ld
w
w
ater supply to RO system. Turn
O
O
FFFF
tt
an
an
k ball-valve. Lift up RO faucet le
ve
r
r
brbr
ieie
fl
fl
y to
TT
relie
f
the
b
uiui
lt
lt
-u-u
pp
pressure inside the RO system.
T
hi
hi
s s
wiwi
ll
ll
make opening the housings eas
ie
e
r.r.
2)
See
Fi
i
g.g.
1
1
4
4
Page 20. Locate the Membra
ne
e
h
h
ou
ou
si
s
ng on the system (labeled “Mem
br
br
an
an
e”
e”
).
)
Remove
the
WHWH
IT
IT
E tubing
f
rom the housing’s ca
p
p
at
a
po
o
i
in
t D
. To remove tubing, Push In
an
n
d
d
Ho
Ho
ld Down on
th
t
e
co
co
llet ring square against the
f
itti
ng
ng
.
WiWi
th
th
the collet held in this position
th
th
e
e
tu
t
be
be
can be removed.
Op
Op
en up the cap (turn counter-cl
oc
c
kwkw
isis
e)
e)
See Fig. 14
A
. Using a plier, r
em
m
ovov
ee
thth
e
e
used membrane
f
o
r
d
di
sposal.
3
) Once the membrane is
r
r
emem
ovov
eded
, please tilt the RO system at an angle to drain out residual water
f
rom
i
nside the membrane
ho
o
us
us
in
in
g
g
a
an
d insert the new membrane using a plier. Push membrane into housing.
Avoid touching the M
em
br
br
an
an
e with your hands to prevent contamination!
4)
I
mportant
!
Make sure the “
double-ring” end of the
me
e
mb
mb
rane goes into the housing first as
sh
ow
ow
n
n
in
in
F
i
g. 14
B
. The membrane cannot
f
ilter water i
f
it’s ins
er
er
te
te
dd
in
i
the WRONG direction
!
Ho
w
w
to
to
R
R
eplace Stage-4 Carbon Filter:
Th
Th
e
e
S
St
age-
4
Pre-Carbon
f
ilter is loca
te
e
d
d
ab
ab
ov
ov
e the 1st stage sediment
f
ilter
(S
S
ee
ee
FiFi
g.
g
14 Page 2
0
)
.
Fo
Fo
r ease o
f
access, please tilt the
f
i
lt
t
erer
s s
toto
a
a
convenient position then do t
he
e
f
f
olol
lo
lo
wing
:
Step 1.
D
isconnect tubin
g
g
fr
fr
o
om
P
oi
nt H & P
oi
nt
J
,
discard
usus
eded
FF
il
i
te
r.
Step 2. Snap on
thth
ee
nene
w
w
f
ilter onto the 2 holding clips. M
ak
e
su
su
re the Flow direction “arrow
”
the
f
ilter is
po
po
in
in
ting towards the output direction.
R
e
connect tubing to both ends o
f
the new
filt
er
.
r
r
A
dd
a
little
b
it
l
l
ub
ub
ri
c
a
nt
t
o
o
n
doub
le
o-
r
i
n
g
s
.
T
urn counter-c
lo
o
ck
ck
wi
wi
se
se
t
o
o
op
en the mem
br
br
an
an
e
e
housin
g
ca
p.
Fig. 14A
Fi
F
i
g. 14
B