
Installation Guide


9
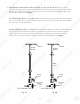
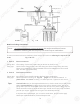
Fig. 6C
4. Needle Valve: See Fig. 6C. Screw the Needle Valve onto the Adaptor tightly. Apply 6-8 rounds
of Teflon tape onto Needle Valve before attaching it to the Adaptor.
To open needle valve: Turn needle handle counter-clockwise.
To close needle valve: Turn needle handle clockwise.
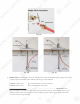
Test for leaks at this point: Close the Needle Valve (turn needle handle clockwise all the
way in to close) Turn ON the cold water supply to the sink faucet. If the Needle Valve or the
Adaptor leaks, check the connection and try applying more Teflon tape or tighten the brass
nut some more to stop the leak.
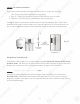
Fig. 6D Fig. 6E
9
Fig.
6C
4
. Needle Valve
:
See
Fig.
6C
. Screw the Needle Valve onto the Adaptor tightly. Apply 6-8 rounds
of T
eflon ta
pe
onto Needle Valve before attachin
g
it to the Ad
ap
to
r.
T
T
T
o
open
needle valve
:
T
urn needle handle counter-clockwise.
TT
T
o
c
l
ose
needle valve:
T
urn needle handle clockwis
e.
TT
Test for leaks at this point
:
p
Close the Needle Valve (turn needle handle
clockwise
a
ll th
e
way in to close) Turn ON the cold water supply to the sink
f
aucet. I
f
the Needle Valve or the
Adaptor leaks, check the connection and try applying more Te
f
lon tape or tighten the brass
nut some more to stop the leak.
Fig.
6
D Fig.
6
E