
Installation Guide


12
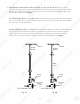
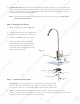
Black Locating Washer
Lock Washer
Lock Nut
Faucet Adapter
Tubing
Counter Top
Counter Top
Opening
Chrome Base
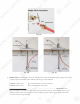
Step 4: Mounting The Faucet
1. Mount the faucet as shown in Fig.10.
Fig. 10
2.
Attach threaded end of faucet adapter to the
faucet metal stem. No teflon tape needed here.
3. Connect the Clear line to the faucet.
3. The faucet has a solid metal handle
that controls the flow of purified water
exiting the faucet. Turn the handle to
horizontal position to release the water
and vertically to shut off.
3. For Porcelain Sink: Porcelain enameled sinks can readily be chipped if care is not exercised
when drilling the hole. Before starting the drill motor, apply firm downward pressure on the bit
until a crunching occurs. This will help keep the drill bit from walking when starting the hole.
A small pilot hole will also aid the drill bit.
Note: Immediately after the hole drilling is done, clean up all metal chips, as metal chips
will stain the porcelain!!
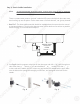
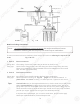
Step 5: Positioning The System
1. Main System: The main system can stand in the sink cabinet. No need
to mount the system to the wall. If you prefer to mount the system to the
wall, please make sure it can be taken down easily for filter replacement.
2. Tank: The storage tank can also lay on its side if needed. The tank works fine in this
position. If the tank cannot fit under the kitchen sink, it can be placed elsewhere up to 20 feet
away from the RO system without much pressure loss.
1
2
Bl
ac
k
Locati
ng
Was
h
e
r
L
oc
k
Wa
s
h
e
r
L
oc
k
N
u
t
LkN
t
F
a
u
cet A
d
ap
t
e
r
T
u
b
in
g
C
ounte
r
T
o
p
C
ounte
r
To
p
O
penin
g
C
hr
o
me
B
a
se
Step 4: Mounting The Fauce
t
1. Mount the
f
aucet as shown in F
i
g.10.
F
i
g. 1
0
2
. Attach threaded end o
f
f
aucet ad
ap
ter to the
f
aucet metal stem. No te
f
lon tape needed here.
3
. Connect the
C
l
ea
r
l
ine to the
f
aucet.
3
. The
f
aucet has a solid metal handle
that controls the
f
low o
f
puri
f
ied wate
r
e
xiting the
f
aucet. Turn the handle to
horizontal position to release the wat
er
and vertically to shut o
ff
.
3
.
F
o
r P
o
r
ce
lain
S
ink
:
Porcelain enameled sinks can readily be chipped i
f
care is not exercised
when drilling the hole. Be
f
ore starting the drill motor, apply
f
irm downward pressure on the bit
until a crunching occurs. This will help keep the drill bit
f
rom walking when starting the hole.
A small pilot hole will also aid the drill bit.
N
ote
:
Immediately a
f
ter the hole drilling is done, clean up all metal chips, as metal chips
will stain the porcelain!
!
Step 5: Positioning The Syste
m
1
.
M
ain System
:
The main system can stand in the sink cabinet. No need
to mount the system to the wall. I
f
you pre
f
er to mount the system to the
wall,
pl
ease make sure it can be taken down easi
ly
f
or
f
ilter re
pl
acement.
2
.
Ta
nk: The storage tank can also lay on its side i
f
needed. The tank works
f
ine in this
position. I
f
the tank cannot
f
it under the kitchen sink, it can be placed elsewhere up to 20
f
eet
away
f
rom the RO system without much pressure loss
.