
Installation Guide


6
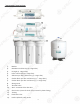
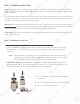
Fig. 4A - Needle Valve Installation.
Attach the needle valve (C) to water supply adapter (A). Please apply 5-6 wraps of
teflon tape to needle valve prior to connecting it to the water supply adapter (A).
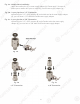
Fig. 4B - If your pipe has a 1/2” Connection.
By attaching the 1/2” x 3/8” converter (B) to the Male end of the water supply adapter
(A), you now have a 1/2” Male and Female water supply adapter.
Fig. 4C - If your pipe has a 3/8” Connection.
By attaching the 1/2” x 3/8” converter (B) to the Female end of the water supply
adapter (A), you now have a 3/8” Male and Female water supply adapter.
Fig. 4A
Fig. 4B
1/2” Connection 3/8” Connection
Fig. 4C
6
Fig. 4
A
-
Needle Valve Installation.
Attach the needle valve (C) to water supply adapter (A). Please apply 5-6 wraps o
f
te
f
lon t
ap
e to needle valve
pr
ior to connectin
g
it to the water su
pp
ly
ada
pt
er
(
A)
.
F
i
g. 4
B
-
I
f
your pipe has a 1/2” Connection.
B
y attaching the 1/2” x 3/8” converter (B) to the Male end o
f
the water supply adapte
r
(
A), you now have a 1/2” Male and Female water supply adapter.
Fig. 4
C
-
I
f
your pipe has a 3/8” Connection.
B
y attaching the 1/2” x 3/8” converter (B) to the Female end o
f
the water supply
adapter (A), you now have a 3/8” Male and Female water supply adapter.
Fig
.
4A
Fig 4
A
F
i
g. 4
B
1/
2” Connectio
n
3/
8” Connectio
n
Fig. 4
C