PC60 Premium Multi-Parameter Tester (pH/EC/TDS/Salinity/Temp.) Instruction Manual APERA INSTRUMENTS, LLC www.aperainst.com V6.
Thank you for purchasing Apera Instruments PC60 Premium Multi-Parameter Tester. Please carefully read this instruction manual before using the product in order to have an accurate and reliable test result, and avoid unnecessary damages to the meter or probe. For video tutorials, please go to support.aperainst.com Contents 1. Battery Installation ................................................................................................................................. 3 2. Keypad Functions ...........
1. Battery Installation Please install batteries according to the following steps. *Please note direction of batteries: All POSITIVE SIDES (“+”) FACING UP.
3. Complete Kit Diagram - 2 4. Preparation Before Use If it is first-time use or the tester hasn’t been used for a long time, pour some 3M KCL solution in the probe cap (about 1/5 of the probe cap) and soak the probe for 15-30 minutes. When not in use, we recommend store the pH probe in the storage 3M KCL solution in the probe cap to keep the sensor’s accuracy. But even if stored dry, it won’t do any permanent damage to the sensor.
. pH Calibration Things needed in addition to what’s in the box: A clean cup, distilled water (8-16oz), and tissue papers for rinsing and drying the probe. 5.1 Short press to turn on the meter; rinse the probe in distilled water, shake the meter in the air and use tissue paper to dap off excess water (never rub or wipe the sensor). 5.2 Pour certain amount (about half volume of the calibration bottle) of pH 7.00 and pH 4.00 buffer solution in separate calibration bottles; 5.
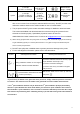
1) 6.86 pH, Measurement 2) 9.18 pH or Range>7.00pH 12.45 pH 1) 6.86pH 1) 7.00 pH 2) 4.01 or Wide 3-point 2) 4.00 or 1.68 pH 1.68pH, Measurement 3) 10.01 or 12.45 pH 3) 9.18 pH or Range 12.45 pH b) For pH Calibration buffer solutions, we recommend that users replace new buffer solution 1) 7.00 pH 2) 10.01 or 12.45 pH after 10 to 15 times of use to keep the standard buffer’s accuracy. Do NOT pour the used calibration solutions back into the solution bottles in case of contamination.
6.pH Measurement Short press to turn on the tester. Rinse the probe in distilled water and dry it. Dip the probe in sample solution, stir gently, and allow it to stand still in the solution. Get readings after comes up and stays. 7. Conductivity Calibration 7.1 Press key to switch to conductivity measurement mode. Rinse the probe in distilled water and dry it. 7.2 Pour certain amount (about half volume of the calibration bottle) of 1413μS/cm and 12.
Calibration Indication Icon Calibration Standards Measuring Range 84 μS/cm 0 - 200 μS/cm 1413 μS/cm 200 - 2000 μS/cm 12.88 mS/cm 2 - 20 mS/cm c) The tester has been calibrated before leaving the factory. Generally, users can use the tester directly or users can test conductivity buffer solutions first. If the error is large, then calibration is needed.
i) For the self-diagnosis information, please refer to the table below: Symbol Self-Diagnosis information How to fix Wrong conductivity buffer solution, which exceeds the recognizable range of the meter. 1. Check if buffer solution is correct 2. Check if electrode is damaged. Is pushed before measurement is stable Wait for the smile icon to come up and then press ( comes up and stays) 9. Parameter Setting 9.
pH Standard Buffer Solution Series Icons USA series NIST series 1.68 pH and 4.00 pH 1.68 pH and 4.01 pH 7.00 pH 6.86 pH 10.01 pH and 12.45 pH 9.18 pH and 12.45 pH Three-point calibration b) Automatic lock (P2): Select “On” to activate auto lock function. When reading is stable for more than 10 seconds, the tester will lock the value automatically, and HOLD icon will display on LCD. Press key to cancel auto hold.
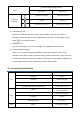
TDS Factor 0.40 to 1.00 Range 0 to 10.00 ppt Range 0 to 50˚C (32-122˚F) Resolution 0.1˚C Accuracy ±0.5˚C Salinity Temp. 11. Icons and Functions ① Calibration points indication: ② Stable Measurement: ③ Reading value Auto. Lock: HOLD ④ Self-Diagnostic Information: Er1, Er2 ⑤ Low-Voltage warning: flashes, reminder of battery replacement ⑥ Three-Color backlight: Blue—Measurement Mode; Green—Calibration Mode; Red—Alarm; ⑦ Auto. Power off in 8 minutes if no operation. 12.
13. Warranty We warrant this instrument to be free from defects in material and workmanship and agree to repair or replace free of charge, at option of APERA INSTRUMENTS, LLC, any malfunctioned or damaged product attributable to responsibility of APERA INSTRUMENTS, LLC for a period of TWO YEARS (SIX MONTHS for the probe) from the delivery.