Owner’s Manual 512D, SW8-APR & SW-12 © 2001 Aperion Audio, all rights reserved.
Aperion Audio Owner’s Manual Table Of Contents Aperion Audio Difference ............................................................. 1 DiAural® Breakthrough ............................................................... 1 What You’ll Need For Installation................................................... 2 Choosing The Right Wire, Cables & Connectors ............................... 3 Placement: ........................................................................... 4 - 7 - Stereo Placement ..........
www.aperionaudio.com Thank you for purchasing Aperion Audio™ loudspeakers. Your new speakers incorporate the very latest audio technology, yet they are built with old-fashioned care and craftsmanship. We designed your new Aperion Audio sound system to give you years of listening pleasure. Whether you’re enjoying music or watching a film in your home theater, Aperion Audio speakers will deliver pure and accurate sound.
The Aperion Audio Difference Now that you’ve decided to invest in a home theater system, you know that movie viewing has been forever transformed by surround sound. Dolby® Digital or DTS® surround sound immerses us in the action of movies by transporting the sound stage to the center of the theater, allowing acoustic elements emanating from every direction to roll over us as we watch the film. It’s thrilling to hear the teeth-shattering bass of explosions and other action elements.
What You’ll Need for Installation A little planning will make your installation a breeze. You’ll want to have all of the necessary equipment and supplies by your side before you begin. You’ll save yourself the headache of a lastminute trip to the store mid-installation. For your convenience, Aperion Audio carries high-quality wires, cables, and connectors. Visit our web site www.aperionaudio.com if you need these accessories.
Choosing the Right Wires, Cables, and Connectors Speaker Wire: We recommend using speaker wire that is at least 14 gauge. (For runs longer than 15 feet, use 12 gauge or larger.) The wire should be cut into equal lengths for each pair of speakers and long enough to reach from the rear of your amplifier or receiver to where the speakers will be placed in the room, keeping excess wire to a minimum.
Stereo Placement For two channel music listening, there are two speakers—one left and one right. Where a speaker is placed will influence the way it sounds. Sound consists of waves, and they can be reflected, absorbed and diffracted. You can have no bass at all or incredible booming bass depending on your speaker placement. Your room acoustics will play a large role in set-up and some experimentation is necessary to get the best results.
5.1 Home Theater Placement Optimizing A Theater Set-Up For Surround Sound Home theater and multi-channel music has introduced a new speaker configuration to home audio. Instead of the large floor mounted stereo speakers of the ‘70’s and 80’s, your Aperion Audio sound system is comprised of 5 smaller satellite or bookshelf speakers designed to carry mid-range and upper tones, with a separately powered subwoofer to handle the lower bass frequencies.
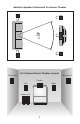
Left and Right Front Speakers Try to place the front speakers in the same plane as your TV (flush with the screen), separated by 45° when viewed from the seating position. They should be positioned at the same height as the listeners’ ears when seated. 28-inch stands will put your speakers at the correct height. Center Speaker A good position for the center speaker is right on top of your TV (or just below, if your TV is mounted high).
Satellite Speaker Placement For Home Theater 45° 5.
Making The Connection First, turn off the power and unplug from the electrical outlet your audio equipment before making any connections. Connecting to a 5-Way Binding Post 5 Way Binding Post If you’re using banana clips, just insert the clip into the end of each terminal. Be sure that the knobs on each terminal are screwed down tight so that they don’t rattle. If your receiver or amp has clip connectors, you will have to use either bare wire or a pin connector at that end of the wire.
Stereo Connection - Low Level Sub Output This is the preferred connection method if your receiver has a "Subwoofer Out" on its rear panel. Refer to your receiver or amplifier owner's manual for specific hook-up information. The powered subwoofer is connected to the receiver's subwoofer output jack by a shielded audio signal cable with RCA plugs at each end.
Stereo Connection - Speaker Level Sub Output There are a few reasons why one might choose to use the speaker level inputs on the subwoofer instead of the low level inputs. RCA terminated coaxial cable can be hard to find in long lengths. Some older stereo receivers or preamplifiers are not equipped with "subout" or “pre-out” jacks or you may want bypass the hi/lo filters on your AVR receiver, thereby activating the sub's crossover which will allow you more control in selecting the crossover point.
5.1 Home Theater Connection - Low Level Sub Output Center Left Front Right Front - + - + - + Rear L R Front R L - + - + - + - + - + Center Left Surround A/V Receiver Processor/Amplifier Sub Out Right Surround - + - + Low Level Sub Output SW-12 Amplifier Shown While setting up a home theater system is more complicated than a stereo system, it doesn’t have to be difficult. Please refer to the diagram on this page for complete speaker wiring instructions.
5.
Setting the Aperion Audio SW-12 Subwoofer In addition to the high and low-level speaker connections on the rear of your subwoofer, you will see three round knobs and two switches. The first knob, labeled “phase” allows you to adjust the polarity of your subwoofer. The second knob, “crossover” sets the crossover frequency and the “level” knob controls the sub’s volume. The power switch has three settings - on, off and auto.
Setting the Aperion Audio SW8-APR Subwoofer In addition to the high and low-level speaker connections on the rear of your subwoofer, you will see two round knobs and two switches. The first knob, labeled “level,” controls the subwoofer’s volume. The second knob, “crossover frequency,” sets the crossover frequency. The power switch has three settings - on, off and auto. When the switch is set in the “auto” setting, it will automatically turn the sub on when a signal is present.
Listening We recommend that you break-in the speakers prior to listening, so you will want to give them a few days of playing at low and medium volumes. Similar to an athlete stretching before a track meet, breaking in the speakers will limber-up the driver components so that they are ready to perform their very best. Once your speakers have been broken-in, use your AVR (audio/video receiver) or DVD player’s surround sound set-up mode to select proper speaker configuration.
Adjusting Your Room or Speakers for best performance Room acoustics have just as much effect on sound quality as the speakers themselves. In order to obtain the best sound, the way the recording engineers and movie-producers intended, you may need to make just a few minor adjustments to your room set-up. Small adjustments can yield big results in accurate sound performance. Some equipment and room adjustments are listed below: 1. Speaker balance for Front L and R.
Troubleshooting Setting up a home theater system can seem like a daunting task. The speaker connections are usually the easiest part. It is important to plan out how you will be connecting your components and speakers before you start. Read the instructions provided with your components even if you don’t usually read instructions. You will save yourself a lot of time and potential aggravation. Below are possible solutions to some common problems. I'm certain all my equipment is hooked up correctly.
Why is there no sound from the rear channels? Make sure the speakers are attached to the rear channel outputs, and your receiver is in surround sound mode. A simple test for correct set-up of your receiver and speakers is to use the test tone function of your receiver or decoder. Refer to your receiver’s manual for instructions on how to perform this test.
Technical Specifications: Aperion Audio 512D-LR & 512D-C Frequency response (+/- 3 dB): 60hz to 20Khz Nominal speaker impedance: 6-8 ohms Maximum recommended power (continuous): 50 watts Maximum recommended power (average): 100 watts Maximum recommended power (peak): 150 watts Minimum recommended power: 50 watts Sensitivity/efficiency (1 watt @ 1 meter): 86 dB Speaker enclosure type: 2 Way Vented, Video Shielded Tweeter (diameter): 1” Woofers (diameter): 5.25” Dimensions (HxWxD): 6.75” X 11” X 6.75” (7.
Limited Warranty Aperion Audio provides a limited five (5) year warranty on it's speakers and a one (1) year limited warranty on subwoofer amplifiers which covers all defects in material and workmanship with the following specific exceptions: · Damage caused by improper installation or adjustment · Damage caused by accident, unreasonable use, or neglect · Damage caused by an act of God · Damage from failure to follow instructions contained in the Owner's Manual · Damage from repairs performed by so