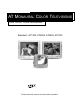
Standard - AT1302, AT2002, AT2402, AT2702 AT MONAURAL COLOR TELEVISIONS INSTRUCTION MANUAL Standard - AT1302, AT2002, AT2402, AT2702 A P E X DIG ITAL IN C .C OM Please read this manual carefully before operation.
APEX Digital,Inc. 2919 E.
Instruction Manual TABLE OF CONTENTS INTRODUCTION Safety Precautions ..........................................................................................................................2 Specifications ..................................................................................................................................5 Feature Content ..............................................................................................................................
Standard - AT1302, AT2002, AT2402, AT2702 BEFORE YOU BEGIN... Congratulations! You have purchased an APEX Digital Television, one of the finest Color Televisions on the market today. This manual will guide you in the use of the many exciting features found on APEX Digital televisions. These features will enhance your viewing experience, making your television viewing more enjoyable than ever before.
Instruction Manual BEFORE YOU BEGIN... (continued) Important Safety Instructions CAUTION PLEASE READ THESE INSTRUCTIONS, KEEP THESE INSTRUCTIONS AND HEED ALL WARNINGS. FOLLOW ALL INSTRUCTIONS. Electrical energy can perform many useful functions. This TV set has been engineered and manufactured to assure your personal safety. However improper use can result in potential electrical shock or fire hazards.
Standard - AT1302, AT2002, AT2402, AT2702 BEFORE YOU BEGIN... (continued) Precautions (continued) Damage Requiring Service - Refer ALL servicing to qualified service personnel. Please disconnect your TV set from the wall and contact your local APEX service agent immediately if any of the following conditions are met: a. lf the power cord or plug is damaged or frayed. b. lf liquid has been spilled or objects have fallen into the TV set. c. lf the TV set has been exposed to rain or water. d.
Instruction Manual BEFORE YOU BEGIN... (continued) FCC Warning Class B Computing Device Information to User This equipment has been tested and found to comply with the limits for a Class B Digital Device pursuant to part 15 of FCC Rules. These limits are designed to provide reasonable protection against harmful interference in a residential installation.
Standard - AT1302, AT2002, AT2402, AT2702 BEFORE YOU BEGIN...
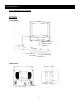
Instruction Manual Front and Rear Unit Profiles AT1302 Front panel MAIN POWER SWITCH INFRARED SENSOR POWER LED TV/VIDEO SELECT MENU SELECT CHANNEL SELECT VOLUME ADJUST Rear panel VIDEO IN VIDEO OUT See the figure at right.
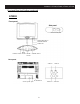
Standard - AT1302, AT2002, AT2402, AT2702 Front and Rear Unit Profiles (continued) AT2002 Front panel Side panel AV IN on the side panel MAIN POWER SWITCH INFRARED SENSOR POWER LED MENU TV/VIDEO SELECT SELECT VOLUME ADJUST CHANNEL SELECT Rear panel AUDIO IN RF ANTENNA IN See the figure at right..
Instruction Manual Front and Rear Unit Profiles (continued) AT2402 Front panel MAIN POWER SWITCH INFRARED SENSOR POWER INDICATOR VIDEO MENU - VOL + MENU - CH + CHANNEL SELECT TV/VIDEO SELECT SELECT VOLUME ADJUST Rear panel RF ANTENNA IN See the figure at right..
Standard - AT1302, AT2002, AT2402, AT2702 Front and Rear Unit Profiles (continued) AT2702 Front panel INFRARED SENSOR POWER INDICATOR MAIN POWER SWITCH VOLUME FRONT A/V INPUT MENU SELECT SELECT Rear panel ANTENNA IN CHANNEL SELECT TV/VIDEO ADJUST See the right figure.
Instruction Manual Remote Control Features Function (p. 11, ) Keypad (p.11) Used for volume control and child lock Used to select channels by number 100+ (p. 11) Used for channels over 99 Timer (p. 13) Accesses the Timer menu Scan (p. XX) The TV will scan all active channels Picture (p. XX) Selects the various Picture Modes Recall (p. XX) Returns to the last channel viewed CC (p. XX) Activates Closed Captioning Standby (p. 11) Turns the TV On or Off CH + / (p.
Standard - AT1302, AT2002, AT2402, AT2702 INSTALLATION - Please read the safety instructions in this manual completely before installation. - Install your TV in an area where direct sunlight will not fall upon the screen. - Soft, indirect light is best for television viewing. - Allow enough space (at least 4 in.) between the TV and any wals or enclosures for proper ventilation.
Instruction Manual INSTALLATION (continued) Connecting A/V Equipment The following are diagrams showing basic instructions for attaching external equipment, like a VCR or DVD player, to your TV set. Please refer to operation manuals of external audio/video equipment that will be connected to your set for additional instructions. PLEASE TURN ALL POWER IS OFF BEFORE CONNECTING DEVICES TOGETHER. Connect VCR's RF OUT terminal to the ANTENNA IN jack located on the real panel of the TV.
Standard - AT1302, AT2002, AT2402, AT2702 FUNCTIONS & FEATURES Power On/Off 1. Power On Plug in the supply cord, and press the MAIN POWER SWITCH on the front of the TV to turn the power on. A channel number will appear on the upper right corner of screen. Also, the red indicator light on the TV will come on. STANDBY 2. Standby (Soft Off) With the main power ON, press the Standby button on the remote control. This will put the TV in “Standby” or soft off mode.
Instruction Manual FUNCTIONS & FEATURES (continued) Function Selection Menus All Function menus can be accessed by pressing the “Menu” key on the remote control, or using the “Menu” key on the TV set. When finished, press the “Menu” key until the screen clears. Picture Menu Access From the Main menu screen, press the “Menu” key until “Picture” is highlighted in red. Press the left or right arrow keys to access this menu. Features This menu allows you to adjust the various picture settings.
Standard - AT1302, AT2002, AT2402, AT2702 FUNCTIONS & FEATURES (continued) Timer Menu From the Main Menu screen, press the “Menu” key on the remote control until “Timer” on the main screen is highlighted in red. Press the left or right arrow key to enter this menu. Time This feature allows you to set the clock on the TV. With “Time” highlighted in red, use the left & right arrow keys to set the hour. Once the hour has been set, press the down arrow key to move to minutes, and then set them as well.
Instruction Manual FUNCTIONS & FEATURES (continued) System Menu From the Main Menu screen, press the “Menu” key until “System” is highlighted in red. Press the right arrow key to enter this menu. Use the up & down arrow keys to move between the various feature selections in this menu. Language This feature will allow you to change the language that is used for the on screen display.
Standard - AT1302, AT2002, AT2402, AT2702 FUNCTIONS & FEATURES (continued) System Menu (continued) Parental Guide This feature allows parents to block certain programs from being viewed, based on the programs’ rating. In order to access this menu, you must first enter a pass code. The factory default is 6688. With “Parental Guide” highlighted in red, use the numeric keypad to enter the pass code. If this turns the Parental Guide “Off,” press the right arrow key until Parental Guide in “On.
Instruction Manual FUNCTIONS & FEATURES (continued) Other Useful Remote Control Features Display This button will cause the TV to display the current channel, antenna mode, and time in the upper right hand corner of the screen. Please note that in Video mode, only the time will display. Timer This button allows you to directly access the TIMER menu. For an explanation of this menu’s features, please see page 13.
Standard - AT1302, AT2002, AT2402, AT2702 TROUBLESHOOTING GUIDE Check the following guide for a possible correction to a problem before contacting customer service. Check FAQ at our website: www.apexdigitalinc.com. Symptoms No power No picture Correction Connect the power plug into the wall outlet securely. Verify the connection from the DVD/VCR video output to the TV video input is secure.Then switch TV to the appropriate Video mode. Verify coaxial cable from antenna is connected to RF IN.
Instruction Manual LIMITED UNITED STATES WARRANTY AT MONAURAL COLOR TELEVISION SERIES (AT1302, AT2002, AT2402, AT2702) Apex Digital, Inc. makes the following limited warranties. These limited warranties extend to the original consumer purchaser and to no other purchaser or transferee. Limited Ninety (90) Days Warranty Apex Digital, Inc. warrants this product and its parts against defects in material or workmanship for a period of ninety (90) days after the date of original retail purchase.