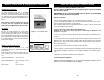
IMPORTANT INFORMATION IMPORTANT INFORMATION (CONT.) Important safeguards for you and your new product Your product has been manufactured and tested with your safety in mind. However, improper use can result in potential electrical shock or fire hazards. To avoid defeating the safeguards that have been built into your new product, please read and observe the following safety points when installing and using your new product, and save them for future reference.
Table of Contents Introduction Congratulations! Thank you for your purchase of the E2GO MP-2000 Portable Media Player by Apex Digital . This player allows you to take your music, photos, movie files and voice recordings with you wherever you go. Record non-copyright protected content from your VCR, DVD, or camcorder. Transfer your existing audio and video files from your PC using the USB 2.0 connection. View your media files on the stunning 3.
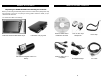
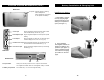
What’s In The Box? What’s In The Box -continued Unpacking the E2GO MP-2000 and checking the contents Before you start using the MP-2000, please review the contents of the package and verify that everything is in the box. If anything is missing, please contact the retailer you purchased the MP-2000 from.
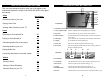
How to use Your E2GO MP-2000 Overview of E2GO MP-2000 Unit 78 This is a quick reference guide to refer you to the pages in this manual that explain the usage of the E2GO MP-2000’s most popular features.
Overview of E2GO MP-2000 Unit (cont.) Battery Installation & Charging Info Back View 14: Speaker External speaker for listening without Headphones. (When headphones are plugged in, the speaker is disabled). Installing your battery 1. 1. Open Battery compartment by applying slight downward pressure and sliding the compartment open. (see figure 1.) 15: A/V Input Plug the supplied A/V cable here to allow audio & video to be recorded directly into the unit. (p.
Battery Installation & Charging Info-continued Note to Windows 98SE and Windows Me Users: Do not connect the MP-2000 to your computer before you have installed the necessary drivers. CHARGING THE BATTERY The E2GO MP-2000 comes with a removable Lithium-Ion rechargeable battery. You can charge the battery via the included AC adapter. Please visit our accessory store at www.apexdigitalinc.com to purchase additional batteries or other related accessories.
Connecting the E2GO MP-2000 to the Computer In order to fully use the E2GO MP-2000, you will need to connect it to your personal computer. This will allow you to transfer video, music, and photo files from your PC’s hard drive to the hard disk on the MP-2000. Windows 98SE or Windows Me Users: Please make sure the appropriate drivers are installed before proceeding. See p. 12 for details. 1.
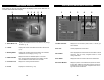
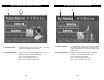
Main Menu Overview Video/Music/Photo Menu Overview After turning on the unit, the Main Menu will display on the screen. Below is an overview of the Main Menu Display 1 2 3 4 5 1 6 2 3 4 5 1. Main Menu List Displays all available functions; scroll via the 4 way navigation button. (p. 8) 1. Folder Indicator Displays the current folder (Video, Music, or Photo) you have selected. 2. Alarm Displays the current on/off status of the built in alarm clock. (p. 24) 2.
Voice Record Sub-Menu Overview 1 2 AV Record Sub-Menu Overview 1 1. Record Indicator Indicates whether or not the unit is recording. If recording, shows the time elapsed while recording. 2. Recording Mode(s) Displays the current recording Mode(s), there are 4: Standard - record at Standard quality mode Fine- record at Fine quality mode Better - record at Better quality mode Best - record at the Best quality mode 17 1. Record Indicator 2.
Setting Menu - Display Settings Setting Menu Overview The Setting menu is where you will make various adjustments to the functions of the E2GO MP-2000. The Setting submenu has several screens. Access the individual screens by pressing right or left on the 4-way navigation button. Press down to access the settings for each screen. The screens are: Display - p. 20 Record - p. 22 Photo - p. 21 Brightness - Use the 4-way navigation Button to adjust brightness of unit’s LCD screen.
Settings Menu - Photo Settings Slide Music - Select ON or OFF with the 4-way navigation button to Slide Repeat - select whether or not you would like to hear music while viewing your photos when you view a slideshow of your stored pictures. Press ENTER to confirm your selection. Exiting the Menu will save your settings.
Settings Menu - System Tab LCD Off - Power Off - Language- Use your 4-way navigation button to select and press ENTER to confirm. if you would like the LCD to shut off after a certain period of time, this helps to save batteries and the life of the LCD’s backlight. Select from the follwing options: Off,3,5,10,15,30 seconds and 1 minute. Use your 4-way navigation button to select, press ENTER to confirm and save your selection.
Settings Menu - Info Tab How to Playback and Record AV Files The E2GO MP-2000 can playback files in the following formats: Video: MPEG-4, DivX 4/5, Motion JPEG, and WMV-9 Photo: JPEG, GIF, BMP, and TIFF Music: MP3,WMA, LPCM, ADPCM, To playback a Video or Audio file: 1. Press the POWER button to turn the unit on. Note: If you locked the Hold Switch before power on, you will not be able to power on the device. Unlock the Hold Switch and continue. Volume Adjustment Volume Display Mute Function 2.
Using the Voice Record Function The MP-2000 may also be used as a voice recording device, with its built-in microphone, you can use it for notes, quick reminders, dictation, or a speech. How to Record a Voice File: 1. Select Voice Record by pushing the 4-way navigation button up or down.
Playing Video Recording Audio to your Unit Play a Recorded AV File 1. Select Video menu option. 2. Find the recording file name in the Record sub menu. 3. Once the video file is selected using the 4-way navigation button, press the ENTER button to play the file. Delete a Recorded AV File 1. To delete a recorded AV file, select it on the list. Push the 4-way navigation button to the left;you will see a Dialog Box to confirm the deletion.
Playing Audio Files Playing Audio Files-continued Playback your Recorded Audio File: Delete a Recorded Audio File: 1. Select Music menu option. 2. Find the recording file name in the Record sub menu. 3. Once the audio file is selected using the 4-way navigation button, press the ENTER button to play the file. (Note, you can preview the file by pressing the 4way navigation button to the right) 4. You will now be directed to the Virtual Music Player screen (see photo below) 1.
Viewing Photo Files Viewing Photo Files-continued To View a single Photo File: Delete a Photo File: 1. Enter the Photo Menu using the 4-way navigation button. 2. Once the photo file is selected using the 4-way navigation button, press the ENTER button to play the file. (Note, you can preview the file by pressing the 4way navigation button to the right) 1. To delete a Photo file, select it on the list. Push the 4-way navigation button to the left; you will see a Dialog Box to confirm the deletion.
FAQ & Troubleshooting FAQ & Troubleshooting-continued Question: Why doesn’t the MP-2000 automatically recognize multimedia content and assign them to the appropriate folders on the unit? Question: I have correctly connected the MP-2000 to the TV using the supplied AV cable and have also verified the connections. Why doesn’t the picture display on the TV? Answer: Because of the massive storage capacity of the MP-2000, the device isn’t capable of this.
Specifications Dimensions Weight 4.7 x 3.0 x 0.8 inches; 119 x 76 x 21 mm (W x H x D) 8.5 oz. ; 240g (with battery) Operating Temp. Storage Temp. Operating Humidity 32 °F ~ 113°F; 0 °C ~ 45°C -4 °F ~ 158°F; -20°C ~ +70 °C 20% ~ 80% OS Support Windows 98SE (needs driver install); Windows Me (needs driver install); Windows 2000 (Service Pack 3 & Above); Windows XP, Home or Professional USB Supports USB 1.1 or USB 2.0 LCD type 3.5" TFT 480x234 resolution with LED backlight Hard Disk Specs 1.