ASSEMBLY INSTRUCTIONS GUIDE D’ASSEMBLAGE 10’X10’ GAZEBO 10 PI X 10 PI GAZEBO MODEL / MODELO: YH-20S067HD SKU / N° DE RÉF: 71590067 MADE IN CHINA / FABRIQUÉ EN CHINE Questions, problems, missing parts? Before returning to your retailer, call our customer service department at 1-888-775-2225, 9 a.m. - 5 p.m., EST, Monday - Friday. WWW.APEXGARDEN.US / WWW.APEXGARDEN.
Important Safety Instructions WARNING! To reduce the risk of serious injury or damage to equipment, read all following safety instructions before assembling and using the gazebo. Failure to follow these warnings may result in serious injury or death. • Keep all children and pets away from assembly area. Children and pets should be supervised while gazebo is being assembled.
Directives de sécurité importantes AVERTISSEMENT! Afin de réduire le risque de blessures graves ou de dommages à l’équipement, lire toutes les instructions ci-dessous avant d’assembler et d’utiliser l’abri-soleil. Négliger de suivre ces avertissements peut provoquer des blessures graves ou la mort. • Gardez les enfants et les animaux de compagnie loin de l’aire d’assemblage. Les enfants et les animaux dovient être surveillés pendant l’assemblage de l’abri-soleil.
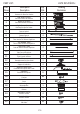
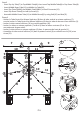
7 8 9 5 1 5 6 5 6 7 10 5 7 6 8 1 3 10 11 9 5 5 13 3 1 2 4 13 2 11 12 4 15 2 6 8 9 5 5 1 3 3 13 13 4 2 4 15 15 15 14 16 17 18 19 P4
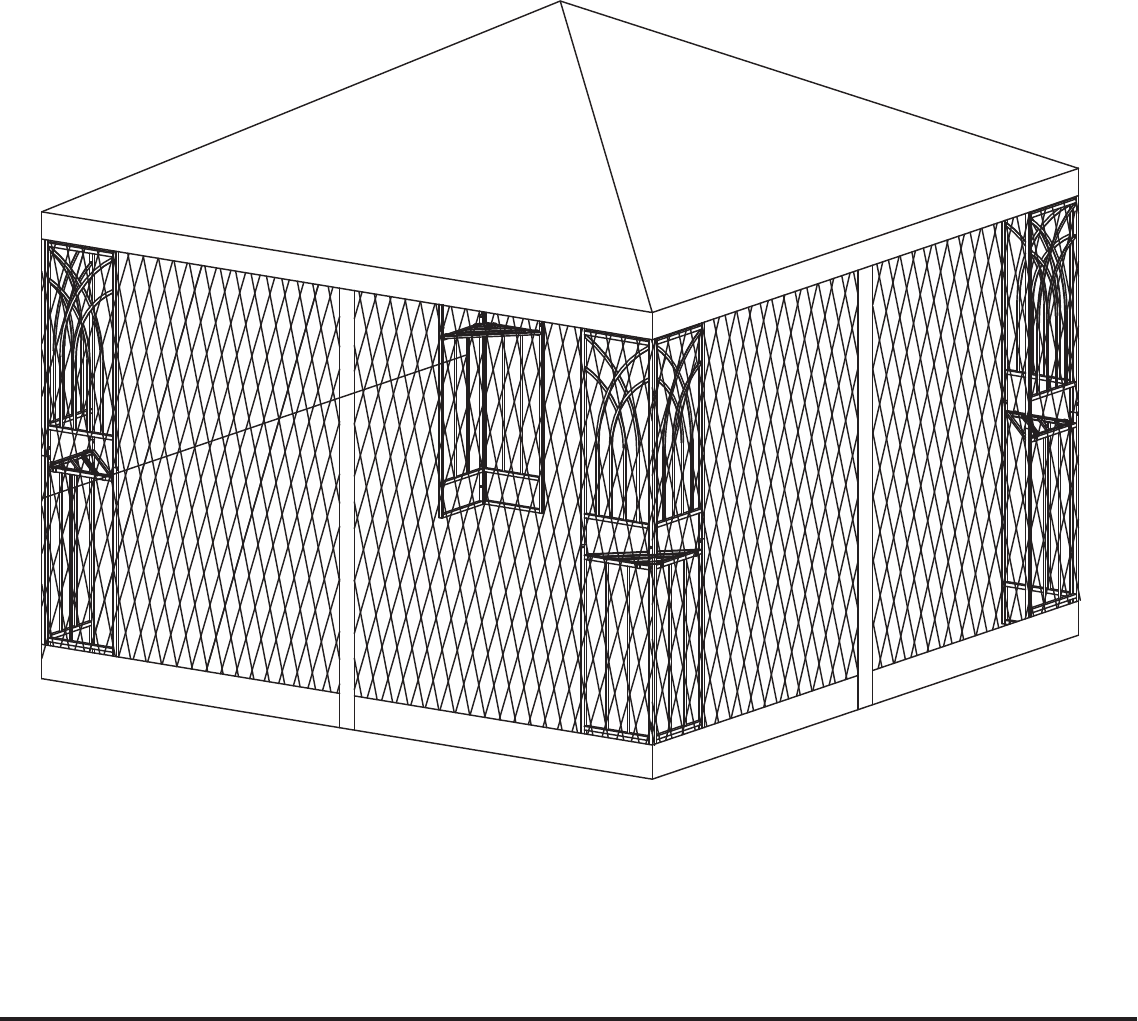
PART LIST: Part Pièces 1 2 3 4 5 6 7 8 9 10 11 12 13 14 15 16 17 18 19 20 21 22 LISTE DES PIÈCES : Description Description Qty Qté Left Up Screen Panneau Du Haut De Gauche Left Down Screen Panneau Du Bas De Gauche Right Up Screen Panneau Du Haut De Droite Right Down Screen Panneau Du Bas De Droite Side Beam Poteau Latéral Middle Beam Poteau Central Top Up Tube Tube Vertical Au Niveau Supérieur Top Middle Tube Tube Central Au Niveau Supérieur Top Down Tube Tube Du Bas Au Niveau Supérieur Middle Up Tube Tu
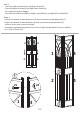
Step 1 · Insert the Left Up Screen(1) to Left Down Screen(2). · Insert the Right Up Screen(3) to Right Down Screen(4). Be careful not to pinch fingers! · Assemble the Left Screen(1&2) to Right Screen(3&4) by using Bolt(21) and Nut(22). Étape 1 · Insérer le panneau du haut de gauche (1) dans le panneau du bas de gauche (2) · Insérer le panneau du haut de droite (3) dans le panneau du bas de droite (4).
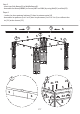
Step 2 · Insert two Side Beams(5) to Middle Beam(6). · Assemble the Beam(5&6&5) to Screen(1&2 and 3&4) by using Bolt(21) and Nut(22). Étape 2 · Insérer les deux poteaux latéraux (5) dans le poteau central (6) · Assembler les poteaux (5 et 6 et 5) avec les panneaux (1 et 2 et 3 et 4) en utilisant des vis (21) et des écrous (22).
Step 3 · Insert Top Up Tube(7) to Top Middle Tube(8), then insert Top Middle Tube(8) to Top Down Tube(9). · Insert Middle Down Tube(11) to Middle Up Tube(10). · Insert Top Tube(7&8&9) and Middle Tube(10&11) to Roof Connector(12). · Insert Top Down Tube(9) to Left Up Screen(1). · Assemble Middle Down Tube(11) to Middle Beam(6) by using Bolt(20) and Nut(22).
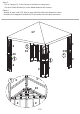
Step 4 · Put on Canopy(17), fix the Canopy to the frame by using velcro. · Put the 4 Planter Holders(13) on the Middle between two Screens Étape 4 · Ajouter le pare-soleil (17), fixer le pare-soleil au châssis en utilisant le velcro. · Installer les 4 supports à jardinière (13) au centre entre les deux panneaux.
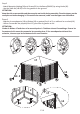
Step 5 · Attach Mosquito Netting(18) and Screen(19) to the Beam(5&6&5) by using Hooks(16). · Use the Stake kit(14&15) to fix the gazebo on the ground. ATTENTION: Keep the side screen outside and the mosquito net inside during assembly. Close the zippers on the mosquito net before hanging it. If it needs to be removed, make sure the zippers are closed first. Étape 5 · Attacher le moustiquaire (18) et Rideau(19) au poteau(5 et 6 et 5) en utilisant les crochets(16).
WARRANTY This warranty is extended to the original purchaser and applies to defects in materials and workmanship of your outdoor furniture or accessory item(s), provided it is maintained with care and used only for personal, residential purposes. Frames and welds are warranted to be free from defects in material or workmanship for a period of one year. Fabric is warranted for a period of one year against defects in material or workmanship.
Need more replacements? 1. Visit us at www.apexgarden.us 2. Choose your country 3. Search the model number of your gazebo or SKU numbers of items listed below using the search bar at the top left of our website. 4. Click on what you need and check out! Replacement Canopy Top (SKU# 71590067-C) 10 ft. x 10 ft. Mosquito Net (SKU# 49550916-18) 10 ft.