IN 2™ USB 2.
IN 2 Safety Declarations CAUTION: For protection against electric shock, do not remove the cover. No user serviceable parts inside. WARNING: This equipment has been tested and found to comply with the limits for a Class A digital device pursuant to Part 15 of the FCC Rules. These limits are designed to provide reasonable protection against harmful interference when the equipment is operated in a commercial environment.
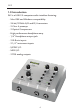
Owner’s Manual Table of Contents 1.0 INTRODUCTION 4 2.0 TOP PANEL FEATURES 2.1 Input Level Knobs 2.2 Sig/OL LED 2.3 48V Phantom Power 2.4 –20dB Pad 2.5 75Hz High Pass Filter 2.6 Compressor 2.7 Headphone Volume Knob 2.8 Volume Knob 2.9 Mono and Dim 5 5 5 5 5 5 5 5 6 6 3.0 REAR PANEL FEATURES 3.1 XLR Inputs 3.2 Analog Outputs 3.3 S/PDIF I/O 3.4 MIDI I/O 3.5 Power Switch 3.6 USB 2.0 Connector 3.7 DC Power Input 6 6 7 7 7 7 8 8 4.0 FRONT PANEL FEATURES 4.1 Headphone Output 4.
IN 2 1.0 Introduction IN2 is a USB 2.
Owner’s Manual 2.0 Top Panel Features INPUT LEVEL KNOBS Turn these knobs clockwise to boost the input level as needed. SIG/OL LED This LED will light green when an input signal is detected, yellow when a strong input signal is detected and red when too much input signal is detected. A red LED doesn’t automatically mean your signal is clipping, but that it’s getting too close and it’s time to back off the level.
IN 2 VOLUME Turn this knob clockwise to boost the output level of analog outputs 1&2 as needed. MONO Pressing this button will sum stereo output signal of analog outputs 1&2 to mono. This is useful for checking your mix balance. DIM Pressing this button lowers the output level of analog outputs 1&2 by 20dB. Use this when you want to have a quick conversation in the room without losing your monitor level or stopping playback. 3.0 Rear Panel Features XLR INPUTS Plug your microphones in here.
Owner’s Manual 1/4” TRS BALANCED ANALOG OUTPUTS Connect these outputs to the inputs of your powered studio monitors or power amp. S/PDIF I/O These 75Ohm, coaxial, digital inputs and outputs allow the unit to send and receive up to 24-bit/192kHz digital signals. The S/PDIF input might be used to connect external mic pres like the Aphex Project Channel. The S/PDIF output might be used to expand your headphone outputs with an Aphex HeadPod4.
IN 2 USB 2.0 CONNECTOR Connect the IN2 to your computer with the supplied USB 2.0 cable. DC POWER CONNECTOR Connect the included IN2 DC power supply here. Only use the official APHEX power supply with the IN2 or you may harm your unit and void your warranty. 4.0 Front Panel Features HEADPHONE OUTPUT The 1/4” TRS jack is located on the front, left of the IN2.
Owner’s Manual DRIVERS AND FIRMWARE All drivers required by the IN2 are available for download from the Aphex website. Be sure that you download and install the most up-to-date drivers before you connect the IN2 to your computer. If you don’t have Internet access, drivers are on the CD-ROM included in the box. MAC OS ONLY: The IN2 does not require special drivers on OSX. Just connect the IN2 to the Mac with a high quality USB cable and it will be recognized automatically.
IN 2 Additional Windows 7 notes: The UI Theme must be sent to Windows Basic for best performance. Right-click on the desktop and select “Personalize” to change this. USB CONNECTION The IN2 has a single USB 2.0 port on the rear panel. Once the software installation is complete, simply connect the IN2 to your computer using the USB cable provided. Note that the IN2 is a USB 2.0 device, and thus the USB connection requires a USB 2.0 compatible port on your computer. It will not operate correctly with USB 1.
Owner’s Manual the “N”key on your keyboard. This allows you back door access to the playback engine. • Select the IN2 as your device and continue. • Once Pro Tools finishes launching go to the Setup menu and select I/O. • Select the Input tab, delete all input paths and then select Default. • Now click the Output tab, delete all of the output paths and select Default. • Open a new session and select “Stereo Mix” in the I/O Settings drop down menu.
IN 2 No other iPads, iOS versions or apps were tested. Please check www.aphex.com for up to date testing results with new iPads, new versions of iOS and other apps. NOTE: Apple does not officially endorse the use of the Camera Connection kit and the Lightning to USB Camera Adapter for anything other than camera connections. Further information can be found at: http://support.apple.
Owner’s Manual 6.
IN 2 HEADPHONE OUTPUT Output Impedance: 10 ohms Output Power: >800mW into 25 ohms DIGITAL AUDIO Sample Rates: 44.1KHz, 48KHz, 88.2KHz, 96KHz, 176.4kHz, 192kHz Resolution: 24 bits OTHER SPECIFICATIONS Power requirements: 12VDC, center positive, 1000mA minimum All specifications are subject to change without notice.
Owner’s Manual 7.1 LIMITED WARRANTY PERIOD One year from date of original purchase. SCOPE All defects in materials and workmanship. The following are not covered: • Voltage conversions. • Units on which the serial number has been defaced, modified or removed. • Damage or deterioration resulting from: Installation and/or removal of the unit; Accident, misuse, neglect, unauthorized product modification; Failure to follow instructions in the Owner’s Manual, User Guide or other official Aphex documentation.
7.2 SERVICE INFORMATION If it becomes necessary to return this unit for repair, you must first contact Aphex LLC for a Return Authorization (RMA number), which will need to be included with your shipment for proper identification. If available, repack this unit in its original carton and packing material. Otherwise, pack the equipment in a strong carton containing at least 2 inches of padding on all sides. Be sure the unit cannot shift around inside the carton.