APOGEE ACOUSTICS INC.
INTRODUCTION The DAX 3 is a two channel Dedicated Active Crossover designed specifically to be used with the Apogee Acoustics Diva, Duetta Signature, Caliper Signature, and Centaur Major speakers. It provides exceptional tuning flexibility, which enables users to sculpt a tonal balance to meet their exact listening requirements. The DAX will accommodate a wide range of preamplifier and amplifier characteristics.
Amplifier Gain Matching Make sure that no cables, including power cord, are connected to the DAX. Remove the top cover of the DAX main unit by removing ten machine screws with the allen wrench provided. Viewing the printed circuit boards from the front of the DAX, 4 printed circuit boards wilt be visible: two smaller printed circuit boards attached to the front panel and two output printed circuit boards, one left channel, one right channel, attached to the rear panel.
Consult the manufacturer of your pre-amplifier or signal source device to determine the impedance loading that the device works best with. Most manufacturers have conducted extensive tests on the effects of impedance loading and should be able to answer this question. Select an impedance loading value equal to or greater than the manufacturer's recommendation.
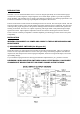
Remove all speaker cables from the Diva passive crossover. Carefully turn the Diva passive crossover upside down and remove the bottom cover by unscrewing ten machine screws with the alien wrench provided. Refer to Diagram #2 regarding the following procedures.
Midrange/Tweeter Wiring: a. Remove and insulate solid copper L3 coil, RED and YELLOW wires from MIDRANGE RED SPEAKER BINDING POST. b. Connect new midrange coil L5, included in the kit, between MIDRANGE/TWEETER RED AMPLIFIER BINDING POST and MIDRANGE RED SPEAKER BINDING POST. [Use the short lead for the speaker binding post and the long lead for the amplifier binding post.] Secure L5 to outer edge resistor bank, as shown in Diagram #2, with two tie-wraps included in kit. Leave ORANGE wire connected. c.
Midrange/Tweeter Wiring: a. Remove and insulate PURPLE wire from MIDRANGE/TWEETER RED BINDING POST. b. Remove heatshrink from unconnected BLUE wire and install on MIDRANGE/TWEETER RED BINDING POST. c. Remove and insulate solid copper wire from MIDRANGE/TWEETER BLACK BINDING POST. d. Re-secure BROWN wire on MIDRANGE/TWEETER BLACK BINDING POST. Replacing Wires and Nameplates: a. Check the wires and lugs to be certain that they do not short out to the nameplate or to each other.
d. Loosen and remove hex nuts from the main crossover board as shown. Remove RED and WHITE wires as indicated. e. Attach RED wire from crossover board to red woofer input binding post on input plate. f. Attach WHITE wire from crossover board to red midrange tweeter input binding post on input plate. g. Arrange all extra and unattached wires from the crossover board or input plate neatly so it will not rattle or cause any electrical shorts to input plate. h.
MAKE SURE THAT ALL DAX XLR CONNECTORS ARE WIRED AS FOLLOWS: PIN 1: COMMON (Shield) PIN 2: NEGATIVE (LO) Signal PIN 3: POSITIVE (HI) Signal In the owner's manual for the Diva and Duetta Signature is a diagram showing two different configurations for bi-amplification. Either Configuration A or B may be utilized.
FRONT PANEL CONTROLS On the DAX front panel are eight control knobs. Included are left and right WOOFER and MIDRANGE/TWEETER attenuation, left and right WOOFER – MIDRANGE/TWEETER FINE BALANCE, and left and right RAKE ANGLE knobs. 1) Woofer and Midrange/Tweeter Attenuation: The woofer may be attenuated in 1 dB steps from 0 to -6 dB by turning the WOOFER knob counter-clockwise. The numeric indication near the knob will indicate the corresponding level. The MIDRANGE/TWEETER knob operates in the same fashion.