Apogee Duet User’s Guide V1, April, 2013
Contents Overview!.........................................................................................................3 Introduction! Package contents! Duet panel tour! OLED Screen Tour! 3 4 5 7 Getting Started!...............................................................................................8 Connecting to your Mac! Connecting to your iPad ! Analog Inputs! Analog Outputs! MIDI! 8 9 10 11 12 Maestro Software !.............................................................................
Overview Introduction Thank you for purchasing Duet. This users guide describes how to set up Duet with your Mac and iPad, connect speakers or headphones to play back music and connect mics and instruments to record your own creations. Duet for iPad/Mac The Industry Standard for Personal Recording Apogee Duet is an award-winning audio interface, headphone amp and MIDI interface making it easy to create professional recordings anywhere on your iPod touch, iPhone, iPad or Mac.
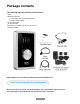
Package contents The following items are included in the Duet box: • Duet • Breakout cable with: • 2 combination line/mic/instrument inputs • 2 balanced line outputs • 2 meter USB cable • 30-pin iOS cable • Universal power supply with NA, EU, UK, AU, JP • QuickStart Guide Please register your product and download the latest installer here: http://www.apogeedigital.
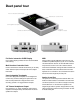
Duet panel tour Full Color Interactive OLED Display Multi-function Controller Knob User Assignable Touchpads 1/4” Stereo Headphone Output Durable Cast Aluminum Body MIDI Analog In and Out USB DC Power Stereo Headphones Out Full Color interactive OLED Display MIDI Duet's OLED display provides full color visual feedback and metering. Duet provides a single USB MIDI connection for your CoreMIDI compatible keyboard, synth, or DJ controller.
DC Power USB Duet is easily powered by any available USB port on your Mac in most applications. However there may be scenarios where connecting the external AC power adaptor is preferred or required. Duet includes a single connection with two included cables, providing connectivity to either a USB port on your Mac or to a 30-pin connection on your iPad/iOS device. Connection to iOS devices with Apple’s Lightning connector requires Apple’s Lightning to 30pin adapter. Sold separately.
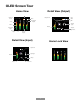
OLED Screen Tour Home View Detail View (Output) Dim Phantom Power Output Level Mute Phones Headphone Output Overs Meters Instrument Input Speaker Output Detail View (Input) Home Lock View Input Level Input Type Meters Group Phase Dim Output Type Meters Microphone Input Sum Mute Soft Limit 7 Output Assignment
Getting Started - Apogee Duet User’s Guide Getting Started Connecting to your Mac System Requirements • • • • • Computer: Intel Mac 1.5GHz or faster Memory: 2 GB RAM minimum, 4 GB recommended OS: 10.6.8, 10.7.5 or greater Connection and power: Any available USB port on a Mac USB bus powered; DC power optional (DC power supply included) Install Duet Software 1. Connect Duet’s USB port to a USB port on your Mac using the supplied USB 2 cable. http://www.apogeedigital.com/downloads 2. 3. 4. 5. 6.
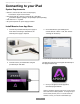
Getting Started - Apogee Duet User’s Guide Connecting to your iPad System Requirements • iPhone 4, iPhone 4S, iPad, iPad 2, iPad (3rd gen.) • Connection: 30-pin dock connector iPod Touch (5th gen.), iPhone 5, iPad (4th gen.), iPad Mini • • Connection: Apple’s Lighting to 30-pin adapter (sold separately) iOS version: 5.1.1 or greater • • DC power required: DC power supply included Install Maestro from App Store 1. Connect the provided external power supply to Duet.
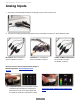
Getting Started - Apogee Duet User’s Guide Analog Inputs 1. Connect the provided breakout cable to the Analog I/O port on the rear of the unit 2.
Getting Started - Apogee Duet User’s Guide Analog Outputs 1. Connect the provided breakout cable to the Analog I/O port on the rear of the unit 2. Connect your left and right speakers to the respective 1/4” output connectors on Duet’s breakout cable. 3. Connect headphones to the 1/4” headphone jack on Duet’s front panel. Learn more about adjusting input/output levels here> 4.
Getting Started - Apogee Duet User’s Guide MIDI Duet’s USB MIDI input/output provides a MIDI connection between class compliant Core MIDI devices such as keyboards and other controllers and Apple’s Mac OS X. A class-compliant MIDI device works with Core MIDI without the need to install drivers or other additional software. To confirm that your MIDI device is class-compliant: 1. 2. 3. 4. 5. Using a standard USB cable, connect the device directly to a Mac.
Maestro - Apogee Duet User’s Guide Maestro Software Apogee Maestro is the first audio interface control application made for Mac and iOS. Featuring a single window design, and multiple tab interface for quick access to all device and system settings, Maestro makes software control of ONE, Duet, Quartet and Symphony I/O* easy. (*Symphony I/O is Mac only).
Maestro - Apogee Duet User’s Guide Input Input Tab for Mac 1 2 3 4 5 6 7 8 Input Tab for iOS 2 3 5 4 7 8 6 14
Maestro - Apogee Duet User’s Guide 5. Analog Input Meter - This meter displays the level of the analog input after A/D conversion. 1. Device Icon & ID Button (Mac only) - A device icon and ID button is placed adjacent to each row of parameters to identify the hardware unit to which the row belongs. By clicking on the ID button, the corresponding hardware unitʼs front panel will illuminate. Each hardware unit is assigned a Peripheral Prefix which is displayed on the ID button. 6.
Maestro - Apogee Duet User’s Guide Output Output Tab for Mac 2 1 4 9 3 6 5 Output Tab for iOS 2 5 3 4 6 7 8 9 16 7 8
Maestro - Apogee Duet User’s Guide 1. Device Icon & ID Button (Mac only) - A device icon and ID button is placed adjacent to each row of parameters to identify the hardware unit to which the row belongs. By clicking on the ID button, the corresponding hardware unitʼs front panel will illuminate. Each hardware unit is assigned a Peripheral Prefix which is displayed on the ID button. 8. Sum to Mono - Engage this to sum the left and right channels of the output to mono.
Maestro - Apogee Duet User’s Guide Mixer Mixer Tab on Mac 2 1 8 9 4 3 5 7 6 Mixer Tab on iOS 2 8 9 3 4 5 6 7 18
Maestro - Apogee Duet User’s Guide 1. Device Icon & ID Button - A device icon and ID button is placed adjacent to each row of parameters to identify the hardware unit to which the row belongs. By clicking on the ID button, the corresponding hardware unitʼs front panel will illuminate. Each hardware unit is assigned a Peripheral Prefix which is displayed on the ID button. 5. Input Level value Window - The Input Level fader value is displayed in this window.
Maestro - Apogee Duet User’s Guide Device Settings 1 2 4 3 5 6 3 4 20
Maestro - Apogee Duet User’s Guide 4. Lock Home view - When Lock Home view is checked, the OLED display doesn’t jump to the Detail view when the Controller knob is turned. If Lock Home view is not checked, the OLED display shows details for the selected input or output when the Controller knob is turned. 1. Device Icon & ID Button (Mac only) - A device icon and ID button is placed adjacent to each row of parameters to identify the hardware unit to which the row belongs.
Maestro - Apogee Duet User’s Guide System Setup (Mac only) 1 3 2 5 4 3. Peak Hold - This pop-up menu sets the time that peak indications are held on software and front panel meters. 1. Device Icon & ID Button (Mac only) - A device icon and ID button is placed adjacent to each row of parameters to identify the hardware unit to which the row belongs. By clicking on the ID button, the corresponding hardware unitʼs front panel will illuminate.
Maestro - Apogee Duet User’s Guide Maestro Menu Bar Window Menu Minimize - Choose this menu item to minimize the Maestro window to the OS X Dock. Zoom - Choose this menu item to maximize the size of the Maestro window. Open any of the currently active tabs by typing Command + number. About Apogee Maestro - Choose this menu item to display version information. Preferences - Choose this menu item to display Maestroʼs Preference panel.
Maestro - Apogee Duet User’s Guide iOS Main Menu 1. Apogee Device - Select device in use to access Maestro tab windows. 2. Register Product - Please register your Apogee Duet for free technical support and to receive product updates and notifications via email. 3. Knowledge Base - The Apogee KnowledgeBase is your number one resource for Frequently Asked Questions regarding your Duet. If you have a question, search the KnowledgeBase. If your question has not been answered, please contact technical support.
Software Setup - Apogee Duet User’s Guide Operation Configuring the Input Mac 1. Connect your input source (see analog inputs section>) 2. Open Apogee Maestro software (found in your Mac’s Applications folder), and select the Input tab. 3. Select the Analog Level setting that corresponds to the device you have connected to Duet’s input(s). +4 dBu: line level -10 dBV: line level Mic: XLR microphone (dynamic, condenser or ribbon) Inst: 1/4” Instrument (electric guitar, bass, keyboards) 4.
Software Setup - Apogee Duet User’s Guide Configuring the Input (continued) iPad 1. Connect your input source (see analog inputs section>) 2. Open Apogee Maestro app, choose Duet from the main menu and select the Input tab. 3. Select the Analog Level setting that corresponds to the device you have connected to Duet’s input(s).
Software Setup - Apogee Duet User’s Guide 4. If you are using a condenser microphone that requires phantom power, select the 48V box on the Input tab of the appropriate channel in Maestro. Phantom power is indicated on Duet’s display by a red dot above the microphone icon.
Software Setup - Apogee Duet User’s Guide Configuring the Output Speaker Output level Mac 1. Connect Duet to the Mac. 2. Open Apogee Maestro software (found in your Mac’s Applications folder), and select the Output tab. 3. Go to Speaker Output drop down menu and select your Output source for desired playback (1-2, 3-4 or Mixer). 1-2 is usually the default Output source on most recording software.
Software Setup - Apogee Duet User’s Guide Headphone Output level To change Duet’s headphone output level (i.e the listening level of connected headphones): 1. Connect Duet to the Mac. 2. Open Apogee Maestro software (found in your Mac’s Applications folder), and select the Output tab. 3. Go to Headphone Output drop down menu and select your Output source for desired playback (1-2, 3-4 or Mixer). 1-2 is usually the default Output source on most recording software.
Software Setup - Apogee Duet User’s Guide Configuring the Output (continued) Speaker Output level iPad 1. Connect Duet to the iPad. 2. Open Apogee Maestro app, choose Duet from the main menu and select the Output tab. 3. Go to Speaker Output drop down menu and select your Output source for desired playback (1-2, 3-4 or Mixer).1-2 is usually the default Output source on most recording apps. Headphone Output level To change Duet’s headphone output level (i.e the listening level of connected headphones): 1.
Software Setup - Apogee Duet User’s Guide Adjusting Input & Output Levels Levels can be adjusted from hardware or software The controller knob operates in parallel with Maestro’s speaker and headphone control. Input level To change Duet’s input level (i.e the preamp gain of microphones and instruments): 1. Push the Multi-function Controller Knob until the microphone or instrument icon is lit on the Duet’s display 2. Turn the Controller Knob until the desired recording level is obtained.
Software Setup - Apogee Duet User’s Guide Headphone Output level To change Duet’s headphone output level (i.e the listening level of connected headphones): 1. Push the Multi-function Controller Knob until the headphone icon is lit on the Duet’s display 2. Turn the controller knob to the desired listening level. Phones Low Latency Mixing While recording, if you notice a delay between the moment you play or sing a note and when you hear it in your headphones you are experiencing latency.
Software Setup - Apogee Duet User’s Guide Maestro Low Latency Mixing A bit of background information concerning latency and computer-based digital recording setups will help you better understand these functions. When recording with most computer-based digital audio applications, the delay between the input and output of the recording system often disturbs the timing of the musicians performing.
Software Setup - Apogee Duet User’s Guide Maestro Low Latency mixing (continued) Figure B By routing the hardware input directly to the hardware output and mixing in playback as shown in Figure B, it’s possible to provide the vocalist a headphone monitoring signal with a much shorter delay.
Software Setup - Apogee Duet User’s Guide Touchpads The 2 touchpads, located on either side of the encoder knob, allow you to quickly access output functions such as “Mute Outputs”, “Dim Outputs”, “Sum to Mono” or “Toggle Headphone Source”. Each are assignable using a dropdown menu within Apogee’s new Maestro. This unique feature allows you to select the function you want and access it directly from Duet 2 without having to look at software.
Software Setup - Apogee Duet User’s Guide Software Setup Mac OS: Using Duet with Logic 1. Go to the Logic Pro or Logic Express menu and choose Preferences > Audio. 4. Now close the Logic Pro Preferences window and select New > Empty Project > from the File Menu. 2. In the Core Audio pane of the Device tab, select Duet for Output Device and Input Device. 5. If you are recording a single microphone or instrument, make the following selections in the New Tracks dialog box: 3. Set the I/O Buffer Size to 64.
Software Setup - Apogee Duet User’s Guide 6. Logic will now ask you to name the project and save in on your hard drive. 7. Click the Record button in the transport control at the bottom of the Logic window.
Software Setup - Apogee Duet User’s Guide Mac OS: Using Duet with Avid Pro Tools (9 or greater) 1. Choose Setup menu > Playback Engine. 3. Set the Buffer Size to 64. Click OK. 2. Choose Duet for Current Engine. 4. The following dialog box will appear. Click Yes.
Software Setup - Apogee Duet User’s Guide Mac OS: Using Duet with Ableton Live 1. 2. 3. 4. 5. Choose Live > Preferences. Click on the Audio tab. Select CoreAudio in the Driver Type menu. Select Duet in both the Audio Input Device and Audio Output Device menus. Set Buffer Size to 128 Close the Preferences window after making settings.
Software Setup - Apogee Duet User’s Guide Using Duet with iOS Apps 3. Go to Input Setting on the top left corner of the screen. Duet works with any iOS Core Audio compatible app on iPod Touch, iPhone or iPad. Simply download your favorite app, connect Duet and you’re ready to go! Recommended apps: Garageband 1. Open Garageband and create a new song. 4. Select either Left or Right Channel (Left for Mic inputs, Right for Instrument input). 2. Select the instrument to be used.
Software Setup - Apogee Duet User’s Guide 3. Choose Menu > Input Matrix and make sure the input is going to the desired track Auria 1. Open Auria App 2. Choose Menu > New Project and select Sample Rate and number of tracks 4. Record enable the desired track 5.
Software Setup - Apogee Duet User’s Guide Cubasis 1. Open Cubasis app and create a New Project with an Audio Track. 3. Open the Mixer by pressing the Mixer button on top left corner of screen. 2. Go to the Audio Input drop down Menu and select Mono/Stereo and your input source by tapping on the input channel number. 4. Press Record Enable and Input Enable buttons on your channel and press Record.
Software Setup - Apogee Duet User’s Guide Animoog 1. Connect Core MIDI device into the USB MIDI I/O port on the Duet 2. Open Animoog 4. Press any key on your MIDI Keyboard to test 3. Choose > Setup > MIDI In and select Duet USB 5. Find your sound and play! Visit www.apogeedigital.
Troubleshooting Looking for answers? Ask the www.apogeedigital.com/knowledgebase Duet FAQs Q: I’ve connected my guitar, but I’m not getting any input. What should I check? A: On the Input tab of Maestro, be sure to set Analog Level to Instrument (Inst). Q: I’m not getting any output from audio software applications. What should I check? A: If you have chosen Mixer for the output then the Software Return fader must be raised to send audio software outputs to Duet’s outputs.
Additional Support For more information: • • • • Complete Apogee Duet User's Guide Apogee KnowledgeBase and FAQs Apogee Product Registration How to contact Apogee Technical Support Visit: http://www.apogeedigital.
Specifications Features Duet Computer Connectivity USB 2.0 High Speed Roundtrip Latency performance 32 buffer @ 96kHz = 3.5 ms 64 buffer @ 44.1kHz = 4.2 ms Power USB Bus Power or DC power supply Bit resolution/sample rate 24-bit/44.
Warranty & Notifications Registration and Warranty Information To receive free tech support, important information and product updates first... Register your new Apogee product here: www.apogeedigital.com/register/ If you do so, Apogee can contact you with any update information. As enhancements and upgrades are developed, you will be contacted at the registration address. Firmware updates are free for the first year of ownership unless otherwise stated.
USA: Some states do not allow for the exclusion or limitation of implied warranties or liability for incidental or consequential damage, so the above exclusion may not apply to you. This warranty gives you specific legal rights, and you may have other rights which vary from state to state. Service Information Your Apogee product contains no user-serviceable components; refer to qualified service personnel for repair or upgrade. Your warranty will be voided if you tamper with the internal components.
Declarations of Conformity This device complies with Part 15 of the FCC Rules. Operation is subject to the following two conditions: 1. This device may not cause harmful interference 2. This device must accept any interference received, including interference that may cause undesired operation. This equipment has been tested and found to comply with the limits of a Class B digital device, pursuant to Part 15 of the FCC Rules.
Declaration of Conformity – Australia Apogee Electronics Corporation hereby declares that the Duet is in material conformity with AN/NZS standard requirements.
Apogee Electronics Corp. Santa Monica, CA www.apogeedigital.