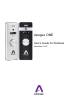
Apogee ONE User’s Guide for Windows November, 2017
Apogee ONE | User’s Guide for Windows Contents Overview 3 Introduction 3 Apogee ONE 3 Legendary Sound Quality 3 ONE (Silver) Package Contents 4 Panel Tour 6 ONE for iPad & Mac (Black) Package Contents 5 Built-in Microphone 6 Input/Output Level Meters 6 1/8” Stereo Headphone/Speaker Output 7 Input/Output Selection Indicator 6 Multi-function Controller Knob 7 Mic/Instrument Input 7 USB 7 DC Power 7 External Power
Apogee ONE | User’s Guide for Windows Operation 22 Using Apogee ONE’s built-in mic 22 Can I record my session on my Windows (startup) hard drive? 22 What is phantom power? 23 Maestro Low Latency Mixing 25 What sample rate should I record at? 22 How do I set a recording level? 23 How do I set my software’s I/O buffer? 24 Software Setup 28 Windows OS: Select Apogee ONE in Pro Tools 28
Apogee ONE | User’s Guide for Windows Overview Introduction Thank you for purchasing Apogee ONE. This User’s Guide describes how to set up Apogee ONE (both Silver and Black versions) with your Windows PC, connect headphones to play back music and record your own creations with the built-in mic, an external mic or an electric instrument.
Apogee ONE | User’s Guide for Windows ONE (Silver) Package Contents The following items are included in the Silver ONE box: ● ● ● ● ● ● ● ONE (Silver) Breakout cable with: 1 XLR Mic input 1 1/4” Instrument input Microphone stand clip USB cable QuickStart guide Software, firmware and the ONE User’s Guide are available online only.
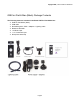
Apogee ONE | User’s Guide for Windows ONE for iPad & Mac (Black) Package Contents The following items are included in the Black ONE for iPad & Mac box: ● ONE for iPad & Mac (black) ● USB cable ● QuickStart guide • PSU + adapters • Lightning cable ● Breakout cable with: ● 1 XLR Mic input ● 1 1/4” Instrument input ● Microphone stand clip Page 5
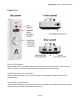
Apogee ONE | User’s Guide for Windows Panel Tour Built-in Microphone Apogee ONE’s built-in microphone capsule is located at the top of the front panel. When using the built-in microphone, orient the capsule towards the sound source being recorded. Input/Output Selection Indicator These indicators show the input or output selected for level adjustment using the multi-function Controller Knob.
Apogee ONE | User’s Guide for Windows Multi-function Controller Knob Apogee ONE’s multi-function controller knob allows you to easily switch between Inputs and Outputs as well as adjust their levels. 1/8” Stereo Headphone/Speaker Output Apogee ONE’s 1/8” stereo output may be connected to headphones or powered speakers.
Apogee ONE | User’s Guide for Windows External Power Both versions of ONE are capable of being powered completely by the USB bus power provided by the computer’s USB port. However some Windows PC’s may not provide adequate bus power. In this case, connect the ONE’s DC power supply to guarantee proper performance. When connected to iPad, iPod Touch, or iPhone, external power is required.
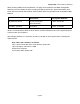
Apogee ONE | User’s Guide for Windows When powering ONE from two AA batteries, it is highly recommended to use NiMH rechargeable batteries for the best battery life when recording and playing back audio. Approximate battery life is shown below for minimal and maximum load conditions when using standard and rechargeable NiMH batteries.
Apogee ONE | User’s Guide for Windows Getting Started Connecting to your Windows PC System Requirements ● ● ● ● ● OS : Windows 10 Enterprise, Pro or Home Editions (64-bit) Anniversary Update or greater Driver: Apogee USB Windows Driver Computer: Windows PC with Intel Core i3 processor or greater Memory: 8GB recommended (4GB minimum) Connection/power: USB port on computer; DC power supply optional Install
Apogee ONE | User’s Guide for Windows 5. Immediately following the software installation, the firmware updater will launch and verify that the Apogee interface’s firmware is up-to-date. Click Start if an update is required, otherwise click Exit to close the Firmware Updater app. 6.
Apogee ONE | User’s Guide for Windows Choosing Apogee ONE for Windows Sound I/O After connecting Apogee ONE, installing the software and updating the firmware, go to the windows search bar and type ‘sound’ to open the sound control panel. Select Apogee ONE under both the Playback and Recording Tab.
Apogee ONE | User’s Guide for Windows Sample Rate Considerations When setting the Sound Control Panel sample rate, it’s crucial to match this rate with the rate of DAW sessions that are running simultaneously. So, if you open an Ableton session at 96kHz, you should set the Sound Control Panel rates to 96kHz as well.
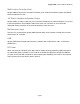
Apogee ONE | User’s Guide for Windows 1. Open Apogee Maestro software (found in your Start Menu). 2. Select the Analog Level setting that corresponds to the microphone source you’d like to record. ● ● ● For example, if you have a microphone connected to the XLR connection on the breakout cable, select Ext Mic from the Analog Level menu on channel 1.
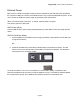
Apogee ONE | User’s Guide for Windows Adjusting Input & Output Levels Input level To change the input level (i.e the preamp gain of microphones and instruments): 1. Push the Controller Knob until the built-in microphone, external microphone or instrument icon is lit on the display. 2. Turn the Controller Knob until the desired recording level is obtained.
Apogee ONE | User’s Guide for Windows Output level To change the output volume (i.e. the headphones jack volume): 1. Push the Controller Knob until the Speaker icon is lit on ONE’s display. 2. Turn the controller knob to the desired listening level. The controller knob operates in parallel with any software output controls.
Apogee ONE | User’s Guide for Windows Maestro Software All features and settings of the Apogee ONE interface can be controlled from the Apogee Maestro software.
Apogee ONE | User’s Guide for Windows Toolbar 1. System Sidebar Button 2. Clear Meters Button 3. Mute All Button System Sidebar Provides System-wide settings that apply to your recording system as a whole. 1. Sample Rate - Selects ONE’s sample rate. In most cases this setting will be overridden by software running on the computer (i.e. When a DAW session project is open).
Apogee ONE | User’s Guide for Windows Channel Section This portion of the Primary Window displays Channels for Analog input, and Playback from audio software. 1. Channel Top Label - Indicates the channels source. 2. Input Channel Level Meter - Shows the post-gain digital signal level coming into the channel. 3. Input Icon - Shows the input type selected from the Analog Level drop-down 4.
Apogee ONE | User’s Guide for Windows Mixer Section The mixer section provides a Direct Monitor mixer for workflows that utilize the low-latency Direct Monitoring features of your ONE interface. 1. Mixer 1 - Signal from each channel can be sent through this mixer by raising the corresponding Mixer 1 Channel Fader. a.
Apogee ONE | User’s Guide for Windows Monitor/Output Section The Monitor/Output section provides controls for routing signal to the outputs, and controlling the analog output volume. 1. Output Level Meters - This meter displays the level of the analog output before D/A conversion. Therefore, it is not affected by the output level control. 2.
Apogee ONE | User’s Guide for Windows Operation In this section you’ll find answers to questions that might arise while you’re recording with Apogee ONE on your Windows PC. Using Apogee ONE’s built-in mic The Apogee ONE includes a built-in mic for those instances when you want to record quickly and easily - to preserve an inspiration, capture an ambience or record a conversation.
Apogee ONE | User’s Guide for Windows How do I set a recording level? Once your microphone or instrument is connected, your audio software is configured and you’ve created a new recording track, just how do you set the input gain for a proper recording level in your audio software? There’s no simple answer, but with a few guidelines and a bit of experience, you’ll find the perfect
Apogee ONE | User’s Guide for Windows How do I set my software’s I/O buffer? The I/O Buffer setting found in most audio software is one of the most crucial, but often ignored, settings in a Windows-based recording system.
Apogee ONE | User’s Guide for Windows Maestro Low Latency Mixing While recording, if you notice a delay between the moment you play or sing a note and when you hear it in your headphones you are experiencing latency. With Maestro’s low latency mixer, you can set up a signal path to hear yourself with minimal latency. How to set up a session using the Low Latency Mixer 1.
Apogee ONE | User’s Guide for Windows When recording with most computer-based digital audio applications, the delay between the input and output of the recording system often disturbs the timing of the musicians performing. This delay, known as latency, means that the musician hears the notes played a few milliseconds after having actually played them.
Apogee ONE | User’s Guide for Windows Figure B. By routing the hardware input directly to the hardware output and mixing in playback as shown in Figure B , it’s possible to provide the vocalist a headphone monitoring signal with a much shorter delay.
Apogee ONE | User’s Guide for Windows Software Setup Windows OS: Select Apogee ONE in Pro Tools 1. Choose Setup menu > Playback Engine. 2. Choose Apogee USB ASIO Driver for current Playback Engine. 3. Set the H/W Buffer Size to 128 Samples and keep Safe Mode on. These settings may need to be adjusted based on your computer’s performance. Click OK. 4.
Apogee ONE | User’s Guide for Windows Windows OS: Select Apogee ONE in Ableton Live 1. In Ableton Live, go to the Options menu and choose Preferences. 2. 3. 4. 5. Click on the Audio tab. Select Driver Type: ASIO Select Audio Device: Apogee USB ASIO Driver Set desired Sample Rate 6. Buffer Size is set in the Apogee Maestro software. Click Hardware Setup to access Maestro.
Apogee ONE | User’s Guide for Windows Windows OS: Select Apogee ONE in Cubase 1. Open Devices > Device Setup… 2. Select VST Audio System, then in the ASIO Driver drop-down, select “Apogee USB Audio Driver”. 3. If prompted to switch ASIO driver, select SWITCH.
Apogee ONE | User’s Guide for Windows 4. Buffer Size is set in the Apogee Maestro software. select Apogee USB ASIO Driver, then Control Panel. Apogee Maestro will appear. To start, set buffer to 128 Samples and keep Safe Mode on. These settings may need to be adjusted based on your computer’s performance.
Apogee ONE | User’s Guide for Windows Additional Support For more information: • Apogee KnowledgeBase and FAQs • Apogee Product Registration • How to contact Apogee Technical Support Visit: http://www.apogeedigital.com/support/ Specifications Features ONE Computer Connectivity USB 2.0 High Speed Roundtrip Latency Performance 32 buffer @ 96kHz = 3.5 ms 64 buffer @ 44.1kHz = 4.
Apogee ONE | User’s Guide for Windows Warranty & Notifications Registration and Warranty Information To receive free tech support, important information and product updates first... Register your new Apogee product here: www.apogeedigital.com/register/ If you do so, Apogee can contact you with any update information.
Apogee ONE | User’s Guide for Windows Warranty Exclusions ● Used products purchased through a third party or online. ● Products with missing or defaced serial numbers. ● Products damaged by environmental factors, such as oxidation and/or damages caused by natural disaster. ● Units that have NOT been opened by user within the one year warranty period.
Apogee ONE | User’s Guide for Windows Software Notice Redistribution and use in source and binary forms, with or without modification, are permitted provided that the following conditions are met: 1. Redistributions of source code must retain the above copyright notice, this list of conditions and the following disclaimer. 2.
Apogee ONE | User’s Guide for Windows Santa Monica,CA 90404, USA Industry Canada Notice This Class B digital apparatus meets all requirements of the Canadian Interference-Causing Equipment Regulations. Cet appareil numérique de la classe B respecte toutes les exigences du Règlement sur le matérial brouilleur du Canada.
Apogee ONE | User’s Guide for Windows Apogee Electronics Corp. Santa Monica, CA www.apogeedigital.