Apogee Duet User’s Guide for Windows November, 2017
Apogee Duet | User’s Guide for Windows Contents Introduction 3 Duet for Windows 3 Package Contents 4 Duet panel tour 5 Legendary Sound Quality 3 Full Color interactive OLED Display 5 User Assignable Touchpads 5 MIDI 6 Analog In and Out 6 USB 6 Multi-function Controller Knob 5 1/4” Stereo Headphone Output 5 DC Power 6 OLED Screen Tour 7 Getting Started 8 Connecting to your Windows PC 8 System Requirement
Apogee Duet | User’s Guide for Windows Reference 23 Monitoring Strategies 23 Monitoring through your DAW 23 Monitoring through the Apogee Maestro Low-Latency Mixer 24 Why use a Low Latency Mixer? 26 How do I set my software’s I/O buffer? 23 How to configure Low Latency Mixer 25 Touchpads 28 Soft Limit 28 DAW Software Setup 29 Windows OS: Select Apogee Duet in Cubase 29 Windows OS: Select Apogee
Apogee Duet | User’s Guide for Windows Introduction Thank you for purchasing Duet. This User’s Guide describes how to set up Duet with your Windows PC, connect speakers or headphones to play back music and connect mics and instruments to record your own creations.
Apogee Duet | User’s Guide for Windows Package Contents The following items are included in the Duet box: ● ● ● ● ● Duet Breakout cable with: ○ 2 combination line/mic/instrument inputs ○ 2 balanced line outputs 2 meter USB cable Universal power supply with NA, EU, UK, AU, JP QuickStart Guide Note: Lightning iOS cable sold separately.
Apogee Duet | User’s Guide for Windows Duet panel tour Full Color interactive OLED Display Duet's OLED display provides full color visual feedback and metering. Multi-function Controller Knob Duet’s multi-function controller knob allows you to easily switch between Inputs and Outputs as well as adjust their levels.
Apogee Duet | User’s Guide for Windows MIDI Duet provides a single USB MIDI connection for your CoreMIDI compatible keyboard, synth, or DJ controller. This eliminates the need for an external MIDI interface and promotes an all-in-one music creation solution.
Apogee Duet | User’s Guide for Windows OLED Screen Tour Home View Detail View (Input) Detail View (Output) Page 7
Apogee Duet | User’s Guide for Windows Getting Started This guide explains setup and use of the Apogee Duet with Windows systems. The User’s Guide for Mac & iOS devices can be found on our website at w ww.apogeedigital.com/support.
Apogee Duet | User’s Guide for Windows 4. Click Finish to complete the installation. If your Apogee hardware interface isn’t connected, connect it now, then click Finish. 5. Immediately following the software installation, the firmware updater will launch and verify that the Apogee interface’s firmware is up-to-date.
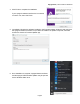
Apogee Duet | User’s Guide for Windows Choosing Duet for Windows Sound I/O After connecting Duet, install the software and restart your Windows, in the windows search bar, type sound to open the sound control panel. Select Apogee Duet under both the Playback and Recording Tab.
Apogee Duet | User’s Guide for Windows Sample Rate Considerations When setting the Sound Control Panel sample rate, it’s crucial to match this rate with the rate of DAW sessions that are running simultaneously. So, if you open an Ableton session at 96kHz, you should set the Sound Control Panel rates to 96kHz as well.
Apogee Duet | User’s Guide for Windows Instrument: 1/4” connection to Duet’s combination connector 3. Open the Apogee Maestro software and select the appropriate input source setting for your XLR or ¼” input. See Configuring the Input Section> 4. To adjust the input gain level, press Duet’s Multi-function Controller Knob until the desired input icon is lit on the Duet’s display.
Apogee Duet | User’s Guide for Windows Analog Outputs 1. Connect the provided breakout cable to the Analog I/O port on the rear of the unit 2. Connect your left and right speakers to the respective 1/4” TRS balanced output connectors on Duet’s breakout cable.
Apogee Duet | User’s Guide for Windows 3. Connect headphones to the 1/4” headphone jack on Duet’s front panel. 4. To adjust the volume, press Duet’s Multi-function Controller Knob until the speaker or headphone icon is lit on the display’s Home View and turn the knob clockwise to increase the volume. 5. Playback audio from iTunes to verify output.
Apogee Duet | User’s Guide for Windows Apogee Maestro Software All features and settings of the Apogee Duet interface can be controlled from the Apogee Maestro software.
Apogee Duet | User’s Guide for Windows Toolbar 1. System Sidebar Button 2. Device S idebar Button 3. Clear Meters Button 4. Mute A ll Button System Sidebar Provides System-wide settings that apply to your recording system as a whole 1. Sample Rate - Sets the Duet’s Sample Rate. In most cases this setting will be overridden by software running on the computer (i.e.
Apogee Duet | User’s Guide for Windows Device Sidebar Provides settings specific to the connected Device 1. Line 1-2 Out Level a. Choose +4dBu when connecting to “pro” gear, such as an external mic pre, compressor, or EQ, with outputs at a +4dBu nominal level. b. Choose -10dBV when connecting to “semi-pro”, hi- , or musical instrument gear with outputs at a -10 dBV nominal level. 2.
Apogee Duet | User’s Guide for Windows Channel Section Displays the Analog inputs & Playback Channels 1. Channel Top Label - Indicates the channel source. 2. Input Icon - This picture changes with the input type selected from the Analog Level drop-down. 3. Input Channel Level Meter - Shows the post-gain digital signal level coming into the channel. 4.
Apogee Duet | User’s Guide for Windows Mixer Section The mixer section provides a Direct Monitor mixer for workflows that utilize the low-latency Direct Monitoring features of your Duet interface. 1. Mixer 1 - Signal from each channel can be sent through this mixer by raising the corresponding Mixer 1 Channel Fader.
Apogee Duet | User’s Guide for Windows Monitor Output Sidebar The Monitor/Output section provides controls for routing signal to the outputs, and controlling the analog output volume. 1. Output Level Meters - This meter displays the level of the analog output before D/A conversion. Therefore, it is not affected by the output level control. 2.
Apogee Duet | User’s Guide for Windows Operation In this section you’ll find answers to questions that might arise while you’re recording with Apogee Duet on your Windows PC. Setting up an Input 1. Connect a ¼” instrument, XLR Microphone, or XLR Line-Input to the Duet’s i nput plugs. 2. Open Apogee Maestro 3.
Apogee Duet | User’s Guide for Windows Setting up the Outputs 1. Connect Headphones to the Duet’s Headphones jack, or speakers to the Out-L and Out-R plugs on the I/O Breakout Cable 2. Open Apogee Maestro 3. In the Monitor/Output Sidebar, adjust the Main and HP1 level knobs to the desired listening volume. 4. For each output, there is a separate Output Source Selector. Set this to: a.
Apogee Duet | User’s Guide for Windows Reference Monitoring Strategies There are two ways to monitor your input signal: 1) Through a Digital Audio Workstation (DAW) recording software 2) Using the low-latency Maestro Mixer Monitoring through your DAW The preferred method of monitoring your input signal, you rely on your DAW’s input monitoring function to pass the Duet’s input signal along to the Due
Apogee Duet | User’s Guide for Windows A higher Buffer setting, on the other hand, results in greater amount of accessible processor power (i.e. less chance of overruns) but increases the latency. Determining the best setting requires some trial-and-error in order to find the best compromise.
Apogee Duet | User’s Guide for Windows How to configure Low Latency Mixer 1. In your audio software, turn off software monitoring or simply mute the recording track. 2. In y our audio software, set up a mix of all playback tracks and route the mix to Out 1-2 . It’s suggested to set the audio software Master fader to 0 dB. 3. In Maestro, set the Output Selection to Mixer.
Apogee Duet | User’s Guide for Windows Why use a Low Latency Mixer? A bit of background information concerning latency and computer-based digital recording setups will help you better understand these functions. When recording with most computer-based digital audio applications, the delay between the input and output of the recording system often disturbs the timing of the musicians performing.
Apogee Duet | User’s Guide for Windows Figure B By routing the hardware input directly to the hardware output and mixing in playback as shown in Figure B, it’s possible to provide the vocalist a headphone monitoring signal with a much shorter delay.
Apogee Duet | User’s Guide for Windows Touchpads The 2 touchpads, located on either side of the encoder knob, allow you to quickly access output functions such as “Mute Outputs”, “Dim Outputs”, “Sum to Mono” or “Toggle Headphone Source”. Each are assignable using a drop-down menu within Apogee Maestro.
Apogee Duet | User’s Guide for Windows DAW Software Setup The following instructions describe how to select Apogee Duet in a few popular recording softwares: Windows OS: Select Apogee Duet in Cubase 1. Open Devices > Device Setup… 2. Select VST Audio System, then in the ASIO Driver drop-down, select “Apogee USB Audio Driver”. 3. If prompted to switch ASIO driver, select SWITCH.
Apogee Duet | User’s Guide for Windows 4. Buffer Size is set in the Apogee Maestro software. select Apogee USB ASIO Driver, then Control Panel. Apogee Maestro will appear. To start, set buffer to 128 Samples and keep Safe Mode on. These settings may need to be adjusted based on your computer’s performance.
Apogee Duet | User’s Guide for Windows Windows OS: Select Apogee Duet in Pro Tools 1. Choose Setup menu > Playback Engine. 2. Choose Duet USB for Current Engine. 3. Set the H/W Buffer Size to 128 Samples and keep Safe Mode on. These settings may need to be adjusted based on your computer’s performance. Click OK. 4. If the following dialog box appears, Click Yes.
Apogee Duet | User’s Guide for Windows Windows OS: Select Apogee Duet in Ableton Live 1. In Ableton Live, go to the Options menu and choose Preferences. 2. 3. 4. 5. Click on the Audio tab. Select Driver Type: ASIO Select Audio Device: Apogee USB ASIO Driver Set desired Sample Rate 6. Buffer Size is set in the Apogee Maestro software. Click Hardware Setup to access Maestro.
Apogee Duet | User’s Guide for Windows Troubleshooting Looking for answers? Ask the www.apogeedigital.com/knowledgebase Duet FAQs Q: I’ve connected my guitar, but I’m not getting any input. What should I check? A: On the Input tab of Maestro, be sure to set Analog Level to Instrument (Inst). Q: I’m not getting any output from audio software applications.
Apogee Duet | User’s Guide for Windows Visit www.apogeedigital.com/knowledgebase for the most up to date information. Additional Support For more information: ● Complete Apogee Duet User's Guide ● Apogee KnowledgeBase and FAQs ● Apogee Product Registration ● How to contact Apogee Technical Support Visit: http://www.apogeedigital.
Apogee Duet | User’s Guide for Windows Duet Specifications Computer Connectivity USB 2.0 High Speed Roundtrip Latency performance 32 buffer @ 96kHz = 3.5 ms 64 buffer @ 44.1kHz = 4.2 ms Power USB Bus Power or DC power supply Bit resolution/sample rate 24-bit/44.
Apogee Duet | User’s Guide for Windows Warranty & Notifications Registration and Warranty Information To receive free tech support, important information and product updates first... Register your new Apogee product here: www.apogeedigital.com/register/ If you do so, Apogee can contact you with any update information.
Apogee Duet | User’s Guide for Windows ○ ○ ○ Missing/bent parts Cracked components Liquid/water damage USA: Some states do not allow for the exclusion or limitation of implied warranties or liability for incidental or consequential damage, so the above exclusion may not apply to you. This warranty gives you specific legal rights, and you may have other rights which vary from state to state.
Apogee Duet | User’s Guide for Windows IMPLIED WARRANTIES OF MERCHANTABILITY AND FITNESS FOR A PARTICULAR PURPOSE ARE DISCLAIMED.
Apogee Duet | User’s Guide for Windows Industry Canada Notice This Class B digital apparatus meets all requirements of the Canadian Interference-Causing Equipment Regulations. Cet appareil numérique de la classe B respecte toutes les exigences du Règlement sur le matérial brouilleur du Canada.
Apogee Duet | User’s Guide for Windows Apogee Electronics Corp. Santa Monica, CA www.apogeedigital.