
Specifications


AD-8000 Operating Manual
Page 11
Getting Started
Installation
The AD-8000 incorporates a highly-specified and rated power-supply section. However, when fully loaded
with interface and D/A cards, the unit does consumer quite a lot of power, and thus generates a certain amount
of heat. As a result, we recommend that, to minimize the risk of failure, you insure that the AD-8000 is installed
in a well-ventilated environment, with plenty of airflow around the unit. Monitor the temperature in the rack dur-
ing operation. A thermally-controlled fan is used to control the temperature inside the unit, and if you find that
this is running at full speed all the time, you may wish to check the ventilation of the rack and, if neccessary,
include a 1U ventilated rack plate above and/or below the AD-8000.
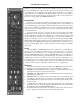
Connections
(See rear panel illustration above.) Use high-quality audio cable to make analog connections from your mixer
or other source to the balanced XLR line-level inputs on the back of the unit. If your mixer has –10 dBu (con-
sumer level) outputs, flick the input gain switch — switch #1 of the AUX CONTROL DIP switch on the back of
the unit — to “ON” (up); otherwise leave the unit in the +4 dBu mode (switch #1 “OFF”).
Use high-quality 110Ω digital audio cable, preferably Apogee Wyde Eye
®
Digital Audio Cable, to make con-
nections between the AD-8000’s AES outputs (XLR connectors) to the AES inputs of your digital recorder.
If you’re using an AMBus card to interface directly to a specific recorder or workstation, make the connec-
tion with the appropriate cable from the AMBus card to the recording device. If the AMBus card hasn’t been
installed, refer to the section entitled “Installing AMBus Cards”.
If you’re using external word clock, use high-quality 75Ω video cable, preferably Apogee Wyde Eye®
S/PDIF cable, to make a connection between your clock source, usually the word clock output of the recording
device or another A/D converter, to the word clock input on the back of the unit. Note: This is usually not nec-
essary unless you are running multiple recorders and you’re recording on a slave machine. In fact, you may find
a slight improvement in the audio quality if you can use the AD-8000 as your master clock source, because of
its proprietary Apogee Low Jitter Clock.
Settings
(see front panel illustration overleaf)
Power
Check that the voltage setting is correct for your local requirements. Power up the unit. During the power-
up self-test sequence you will see the meters indicate the “Apogee Wave” if all is well.
Sync Source
Initially, you’ll probably want to set this to CRYSTAL just to make sure everything is working OK. Repeatedly
press the button immediately below the columns of sync source indicators on the far left of the unit until CRYS-
TAL is indicated. In this mode, the AD-8000 locks to its own extremely stable internal crystal at either 44.1 or
48 kHz sample rates.
Other sync sources can be accessed via the external word clock (WC), AES or S/PDIF inputs on the back.
Additionally, the unit can lock to any device which has an active output connected to an AMBus card installed
in one of the AMBus slots. The sync sources are designated by indicators labeled accordingly with the respec-
tive AMBus slots designated as “AMB A” through “AMB D”.