
User Guide
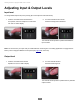

Input
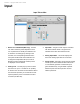
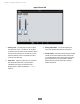
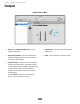
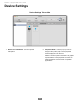
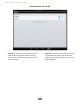
Input Tab on Mac
1. Device Icon & ID Button (Mac only) - A device
icon and ID button is placed adjacent to each
row of parameters to identify the hardware unit
to which the row belongs. By clicking on the
ID button, the corresponding hardware unitʼs
front panel will illuminate. Each hardware unit
is assigned a Peripheral Prefix (A-Z, found in
Maestroʼs Device Settings tab window) which
is displayed on the ID button.
2. Analog Level - Use this pop-up menu to select
the source for Input 1 - the built-in mic (Int Mic),
an external mic connected to the breakout cable’s
XLR connector (Ext Mic), or an external mic that
requires phantom power connected to the XLR
connector (Ext Mic 48v).
3. Input Gain - The gain of each input is controlled
with these software knobs. The gain level is
indicated in the value box below the knob.
4. Analog Input Meter - This meter displays the
level of the analog input after A/D conversion.
5. Group On/Off - This button groups the gain setting
of both inputs so that ONE’s multi-function knob
or one software gain knob controls both input
gains simultaneously. If a gain offset is present
between inputs when Group is set to On, this
offset is preserved.
Maestro - Apogee ONE User’s Guide
1313
1 2 3 4 5 6 7 8 9 10 11 12 13 14 15 16 17 18 19 20
1 2 3 4 5 6 7 8 9 10 11 12 13 14 15 16 17 18 19 20
1 2 3 4 5 6 7 8 9 10 11 12 13 14 15 16 17 18 19 20
1 2 3 4 5 6 7 8 9 10 11 12 13 14 15 16 17 18 19 20
1 2 3 4 5 6 7 8 9 10 11 12 13 14 15 16 17 18 19 20