
Yard Vacuum User Manual


9
METHOD 2
NOTE:
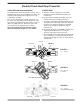
Test set-up is illustrated in Figure 7 for 1/2"
through 2" and Figure 8 for 2-1/2 through 10".
EQUIPMENT REQUIRED:
Differential pressure gauge type test kit such as
Conbraco Model No. 40-200-TKU or 40-200-TK5U.
NOTE:
For all testing, the gauge and open ends of hoses
not being used must be held at the same level as
the assembly being tested.
TEST NO. 1:
Purpose:
To determine the static pressure drop across check
valve No. 1.
Requirement:
The static Pressure drop across check valve No. 1
shall be at least 1 psid.
PROCEDURE:
1. To eliminate foreign material, flush all four test
cocks, one at a time.
2. Open test valves No. 1 and No. 2 on the gauge
and close test valve No. 3. Attach “high” side hose
to test cock No. 2.
3. Bleed all air from hose and gauge by slowly
opening test cock No.2. Then slowly close test
valve No. 2.
4. Close the outlet shut-off valve. Then close the inlet
shut-off valve.
5. Slowly open test cock No. 3. After the gauge
reading stabilizes and water stops running out of
test cock No. 3, the static pressure drop across the
check valve indicated by the gauge and is
recorded as such.
NOTE: If water continues to discharge from test
cock No. 3 then a leaky shut-off valve is evident
and should be repaired or bypassed before testing
continues. If the water recedes from the test cock
opening then move the gauge to a point level with
the centerline of the check seat area and record
the gauge reading as the static pressure
differential across check No. 1.
TEST NO. 2:
Purpose:
To determine the static pressure drop across check
valve No. 2.
Requirement:
The static pressure drop across check valve No. 2
shall be at least 1 psid.
PROCEDURE:
1. Open test valves No. 1 and No. 2 on the gauge
and close test valve No. 3. Attach "high" side hose
to test cock No. 3.
2. Bleed all air from hose and gauge by slowly
opening test cock No. 3. Then slowly close test
valve No. 2.
3. Close the outlet shut-off valve. Then close the inlet
shut-off valve.
4. Slowly open test cock No. 4. After the gauge
reading stabilizes and water stops running out of
test cock No. 4, the static pressure drop across the
check valve is indicated by the gauge and is
recorded as such.
NOTE: If water continues to discharge from test cock
No. 4 then a leaky shut-off valve is evident and should
be repaired or bypassed before testing continues. If
the water recedes from the test cock opening then
move the gauge to a point level with the centerline of
the check seat area and record the gauge reading as
the static pressure differential across check No. 2.