
Instructions / Assembly


is-69PTKANG_02/24/23
INSTRUCTION SHEET
PEX
Go/No-Go Gauge
PEX
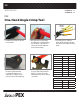
Illustration of a good connection:
1. Fitting shoulder location.
2. Pipe is cut square and stops at the tting shoulder.
3. Position the CrimpRing 1/8" - 1/4" from the end of the pipe, directly over two end ribs of the tting.
4. The CrimpRing is evenly compressed over the pipe and shows no evidence of uneven distortion.
5. The PEX material is uniformly compressed between the ribs, resulting in a leak-free, quality joint.
Adjustment Dial
How to adjust the crimp diameter:
C-Clip
1. Note the number that the adjustment dial is currently set at.
2. Pop o the C-Clip that is aligned with the adjustment dial with
a small tool, such as a athead screwdriver.
3. Slide the hexagonal adjustment dial head out approximately
1/4".
4. Rotate the back pin until the line on the adjustment dial head
points to the next highest number on the tool body.
5. Push the adjustment dial head back into position and return
the C-Clip to its original position.
All Apollo PEX Tools are pre-
calibrated for 10,000 crimps.
After repeated use, the crimp
tool may need to be adjusted to
produce a proper crimp result.
1. Slide the correct slot on the gauge around the crimped ring.
2. If the ring does not t into the “Go” slot at all, but ts into the “No-Go” slot, then the crimp
is not correct. Remove the incorrectly crimped ring from the PEX pipe, adjust the crimping
force on the tool and repeat the crimping process.
3. If the ring slides into the slot and stops in the “Go” range at least at one point, then the
crimp is good. The ring will not t the go range all the way around it.
Please check every ring with the Go/No-Go Gauge after crimping to ensure a proper connection.
Photo left shows a correct crimp.
The Mosack Group, Inc.
Mint Hill, NC 28227
1.888.229.2874
www.apolloow.com